ID1330 ViewBoard Pen Display User Guide Model number: VS18342
Thank you for choosing ViewSonic® As a leading global visual solution provider, ViewSonic® is committed to exceeding the global expectations for technological evolution, innovation and simplicity. At ViewSonic®, we believe that our products may cause a positive impact to the world, and we are confident that you will be satisfied with the ViewSonic® product that you chose.
Important safety instructions and recycling tips 1. Do not press the screen; do not store this device together with small objects, otherwise the screen may get scratched easily or small objects might fall inside the device. 2. Do not place this device in dirty or dusty environments; keep the environment dry and clean. 3. Do not place this device on unstable work surfaces. 4. Do not place objects on top of the device or drop any objects on the device; do not force any foreign object into this device. 5.
Table of Contents Important safety instructions and recycling tips .......... 3 Product introduction ................................................... 6 About the product ........................................................................................... 6 The product and its accessories........................................................................ 7 System requirements ....................................................................................... 7 Product specifications .....
Tablet function settings ............................................. 19 Settings guide under Windows systems ..........................................................19 Opening the tablet settings panel ......................................................................... 19 Settings panel options ........................................................................................... 19 Settings guide under Mac systems ..................................................................
Product introduc�on About the product Thank you for choosing Notas series products. This product will bring you all new visual effects – not only will it display the outstanding advantages of LCD, it even integrates advanced tablet technologies. Users can connect it to a computer and perform input and drawing operations on the screen with the electromagnetic pen directly, and apply it in multimedia teaching and related fields.
The product and its accessories Please confirm that all the accessories listed below are included in the packing box before using this product.
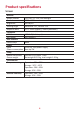
Product specifications Screen Monitor Model number Resolution Brightness Viewing angle Response time Connector USB-C Mini HDMI User controls Control keys Power Input Power consumption Entity Device dimensions Device weight Environment Temperature range Relative humidity 13.3-inch TFT LCD, LED backlight 1920 x 1080 300 cd/m2 Horizontal 178°, vertical 178° Tr+Tf: 25ms (typical) / 50ms (maximum) USB-C x2 (both input) Mini HDMIx1 None DC5V/2A, USB power supply Boot up 5W 344 mm x 210 mm x 7 mm Net weight 0.
Electromagnetic pen Model number Technical method Active area Technical specifications Resolution Tracking speed Pressure sensitivity Accuracy Readable height Electromagnetic pen Model number Able to detect the inclination of the pressure sensitive pen User controls (switch) Penpoint Note: Electromagnetic touch control Full screen 5080 LPI (lines per inch) 266 PPS (points per second) 8192 ± 0.25 mm (center), ± 0.
Accessory descriptions Electromagnetic pen Note: • Users can set the key functions manually for the first and second pen keys, please refer to Chapter Five “Pen Key Setting Instructions” of the manual for the specifics. • Do not pull out the pen cover in any way.
Refill replacement Refill replacement steps 1. Use the refill changer to remove the refill from the pen body 2.
Hardware installation and commissioning Hardware installation How to connect the tablet Connecting using the HDMI+USB cables 1. Please first switch off the power of the computer and tablet before connec�ng the tablet. 2. Connect the HDMI cable to the HDMI interface of the tablet and the HDMI interface on the graphics card of the computer. 3. Connect the two ends of the USB data cable to the TYPE C USB interface of the computer and the tablet respectively. 4.
Connecting using the TYPE C data cable 1. Please first confirm that your computer is equipped with full function TYPE C interface or Thunderbolt 3 interface. 2. Connect the double-sided TYPE C cable to the full function TYPE C interface of the tablet and the full function TYPE C interface of the computer. 3. After placing the tablet horizontally or vertically on the desktop, press the power switch.
Hardware commissioning Replacing mouse operations with the electromagnetic pen After the tablet is connected to the computer properly, the following operations can be used before installing the drivers: • Moving the cursor Suspend the electromagnetic pen (of a distance less than 15 mm) and move it on top of the sensing area of the tablet to move the cursor.
OSD control key descriptions LED indicator Power switch key Menu key or OK key • LED indicator: Green means power on and red means no video signal • POWER key: Power switch key 15
OSD control key descriptions • Brightness adjustment: Adjusts the display brightness/contrast/ECO mode/ dynamic contrast SB signal output jack of the screen • IMAGE: Adjusts the screen display position output jack • COLOR TEMP: Adjusts the screen display RGB color gamut output jack 16
• OSD SETTING: OSD display frame setting, allows adjusting the language/position/ display time/transparency • RESET: Allows resetting to the default factory settings and adjusting the USB signal output jack 17
Driver installation Precautions before installation • If you have previously installed other tablets or tablet drivers on your computer, be sure to fully uninstall them and restart the computer first. • Firewalls, antivirus software and related application programs must be switched off before installation. • Please connect the tablet to the computer properly and keep the data cables and interfaces from becoming loose. Driver installation under Windows systems 1.
Tablet function settings Settings guide under Windows systems Opening the tablet settings panel There are two ways to open the tablet settings panel: • Tap on the small digital setting panel icon ( ) (the icon is located in the bottom-right corner of the computer system taskbar) to open the digital settings panel. • Tap “Start” → “All Programs” → “Digitizerpanel” → “Digitizerpanel.exe” to open the digital settings panel.
• Express Keys: Customize settings for the function options of the 6 express keys on this device. Settings guide under Mac systems Currently there is only the English version tablet driver for Apple systems; its functions are similar to the driver functions under the Windows system. Users can refer to the driver settings introduction under Windows systems in the manual.
Control panel: Pen (electromagnetic stylus function) Under this option, users can customize the function parameter settings used on the electromagnetic pen, set the functions of two keys, and perform a pressure test for the electromagnetic pen. Control panel: Mapping (screen calibration) Under this option, users can use screen calibration to confirm the corresponding screen area.
Control panel: Express Keys (express key settings) Click “Express Keys” to enter the express key settings page; users can customize the functions according to the hints on the page and the express keys on the tablet.
Uninstalling the drivers Uninstalling the drivers under Windows systems There are two ways to uninstall the drivers: • Open “Start” → “All programs” → “DigitizerWhiteboardManager” → “Uninstall”, and follow the uninstall instructions until the uninstall program ends; then restart the computer. • Open “Control Panel” → “Programs and Functions”, locate “DigitizerWhiteboardManager” and select “Uninstall/Modify”, follow the uninstall instructions until the uninstall program ends; then restart the computer.
Uninstalling the drivers under Mac systems • Open “Finder” → “Apps” → “Tablet Utility” → “Uninstall-Driver”, follow the uninstall instructions until uninstall program ends; then restart the computer. Note: After the driver was successfully uninstalled, if the driver needs to be reinstalled again, please restart the computer first to ensure that the driver was fully uninstalled.
Common Issues • How to find out whether the driver was installed properly? After the driver was properly installed, when the tablet and computer are connected properly, a small driver icon ( ) will appear on the taskbar of the computer. When the electromagnetic pen is used on the tablet, it will be able to control the cursor properly, and it will be able to sense pressure during the pressure test in the driver control panel.
Regulatory and Service Information Declaration of RoHS2 Compliance This product has been designed and manufactured in compliance with Directive 2011/65/EU of the European Parliament and the Council on restriction of the use of certain hazardous substances in electrical and electronic equipment (RoHS2 Directive) and is deemed to comply with the maximum concentration values issued by the European Technical Adaptation Committee (TAC) as shown below: Substance Lead (Pb) Mercury (Hg) Cadmium (Cd) Hexavalent Chro
Indian Restriction of Hazardous Substances Restriction on Hazardous Substances statement (India). This product complies with the “India E-waste Rule 2011” and prohibits use of lead, mercury, hexavalent chromium, polybrominated biphenyls or polybrominated diphenyl ethers in concentrations exceeding 0.1 weight % and 0.01 weight % for cadmium, except for the exemptions set in Schedule 2 of the Rule.
Copyright Information Copyright© ViewSonic® Corporation, 2020. All rights reserved. Macintosh and Power Macintosh are registered trademarks of Apple Inc. Microsoft, Windows, and the Windows logo are registered trademarks of Microsoft Corporation in the United States and other countries. ViewSonic®, the three birds logo, OnView, ViewMatch, and ViewMeter are registered trademarks of ViewSonic® Corporation. VESA is a registered trademark of the Video Electronics Standards Association.
Customer Service For technical support or product service, see the table below or contact your reseller. NOTE: You will need the product’s serial number. Country/ Region Website Country/ Region Website Asia Pacific & Africa Australia www.viewsonic.com/au/ Bangladesh www.viewsonic.com/bd/ 中国 (China) www.viewsonic.com.cn 香港 (繁體中文) www.viewsonic.com/hk/ Hong Kong (English) www.viewsonic.com/hk-en/ India www.viewsonic.com/in/ Indonesia www.viewsonic.com/id/ Israel www.viewsonic.
Limited Warranty ViewSonic® Display What the warranty covers: ViewSonic® warrants its products to be free from defects in material and workmanship during the warranty period. If a product proves to be defective in material or workmanship during the warranty period, ViewSonic® will, at its sole option, and as your sole remedy, repair or replace the product with a similar product. Replacement Product or parts may include remanufactured or refurbished parts or components.
• • • • • • • • • • Any damage of the product due to shipment. Causes external to the product, such as electric power fluctuations or failure. Use of supplies or parts not meeting ViewSonic’s specifications. Failure of owner to perform periodic product maintenance as stated in the User Guide. Any other cause which does not relate to a product defect. Damage caused by static (non-moving) images displayed for lengthy periods of time (also referred to as image burn-in).
Exclusion of damages: ViewSonic’s liability is limited to the cost of repair or replacement of the product. ViewSonic® shall not be liable for: • Damage to other property caused by any defects in the product, damages based upon inconvenience, loss of use of the product, loss of time, loss of profits, loss of business opportunity, loss of goodwill, interference with business relationships, or other commercial loss, even if advised of the possibility of such damages.
Mexico Limited Warranty ViewSonic® Display What the warranty covers: ViewSonic® warrants its products to be free from defects in material and workmanship, under normal use, during the warranty period. If a product proves to be defective in material or workmanship during the warranty period, ViewSonic® will, at its sole option, repair or replace the product with a like product. Replacement product or parts may include remanufactured or refurbished parts or components & accessories.
How to get service: For information about receiving service under warranty, contact ViewSonic® Customer Support (Please refer to the attached “Customer Service” page). You will need to provide your product’s serial number, so please record the product information in the space provided below on your purchase for your future use. Please retain your receipt of proof of purchase to support your warranty claim.
Contact Information for Sales & Authorized Service (Centro Autorizado de Servicio) within Mexico: Name, address, of manufacturer and importers: México, Av. de la Palma #8 Piso 2 Despacho 203, Corporativo Interpalmas, Col. San Fernando Huixquilucan, Estado de México Tel: (55) 3605-1099 http://www.viewsonic.com/la/soporte/index.htm NÚMERO GRATIS DE ASISTENCIA TÉCNICA PARA TODO MÉXICO: 001.866.823.2004 Hermosillo: Distribuciones y Servicios Computacionales SA de CV. Calle Juarez 284 local 2 Col. Bugambilias C.
Process Color C0 M91 Y72 K24 Process Color C0 M0 Y0 K100 Process Color C0 M91 Y72 K24 Spot Color Pantone Black C Spot Color Pantone 187 C