
User Guide


11
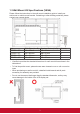
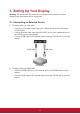
3.3 Connecting USB Peripherals
Just like a regular PC, it is easy to connect various USB devices and other
peripherals with your smart whiteboard.
1. USB Peripherals: Plug the USB device cable into the USB IN port.
2. Networking and modem cables: Plug the router cable into the LAN IN port.
3. Microphone: Plug the microphone cable into the MIC port.
8
9
Connecting USB Peripherals
HDMI Connections
General Setting
More OSD settings
11
12
vPen
10
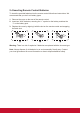
1. USB Peripherals: Plug the USB device cable into the USB IN port.
2. Networking and modem cables: Plug the router cable into the LAN IN port.
3. Microphone: Plug the microphone cable into the MIC port.
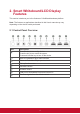
1. In any input source, you can call up the annotation menu by placing two fingers
on the screen (about 20-50mm spacing) and holding there for two seconds.
2. In annotation menu, user can only use floating pen to operate.
Input sources, Volume, Back light and Flicker free
Audio Setting Screen Setting Display Setting
Adjust Setting
Annotation Menu
Floating Pen Menu
Short cut Menu
Item Descripon
vBoard
Click to launch annotaon app
vShare
Click to show wireless screen sharing app
Browser
Click
to visit
web site
APPs
Click to pop up app list
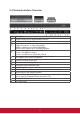
Item Description
Annotation menu
Return
Click to return to previous operation interface.
Main
Clickto return to main interface of Embedded Player.
Pen
Pop up Pen menu.
Click to make annotaon in the picture, click again to change color.
Screen
capture
Click and drag a rectangle on screen. It can arbitrarily adjust position
and shape of the rectangular.
Stora
ge location: /Storage/vBoard
Storage location: /Storage/vBoard
Save as
Click to save the current image.
Eraser
Click to erase handwriting as required.
Short cut
Pop up short cut menu.
vBoard
Click to enter vBoard software.
vShare
Click to enter vShare software.
App Click to App interface of Embedded Player.
Close
Click to close annotation menu.
Pop up sub-menu.
Network cable
Network cable
USB cable
USB equipment
Audio cable
Router and other
network signal
output
Internet