
User Guide


Intel Unite® Solution User Guide v3.1.5 7
2 Launching and connecting to the Intel
Unite application
2.1 Launching the application for the first time
Follow the process to install the Intel Unite application according to the client device you have. After
the app has been installed, you will not need to repeat this step.
2.1.1 Windows* and macOS* Client devices
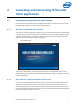
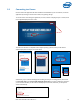
To launch the Intel Unite application for the first time, you will need to enter the web link provided by
your organization in your browser and follow the installation wizard instructions provided by the app.
The link is normally shown on the display or monitor connected to the Hub running the Intel Unite
application where the meeting or session is taking place.
See example below:
If there’s not a download link, check with the IT Administrator as the application may have to be
installed using the Client installer, to find detailed information please refer to the Deployment Guide
or the IT Administrator.
2.1.2 iOS*, Android* and Chromebook* Client devices
To launch the Intel Unite application for the first time, you will need to download the app from the
Apple store or the Google store before you can continue. You will need to be connected to your
company/ group network (or VPN) in order to find the Server where the Client device will connect to.
Once the app has been downloaded, open the app on your device and add the information needed to
connect, see below according to your device.