
User Guide


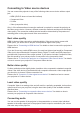


Table Of Contents
- Key safety instructions
- Introduction
- Projector Positioning
- Connection
- Operation
- Activate the projector
- Using the menus
- Using the password function
- Setting a password
- If you forget your password
- Entering the password recall procedure
- Change Password
- Disabling the password function
- Switching input signal
- Changing HDMI input settings
- Adjusting the projected image
- Perform keystone correction
- Adjust four corners
- Zoom in to see details
- Selecting the aspect ratio
- About the aspect ratio
- Optimizing the image
- Fine-tuning of image quality in user modes
- Setting the Presentation Timer
- Hiding the image
- Locking control keys
- Light source settings
- Extending light source life
- Operations at high altitudes
- Using the CEC function
- 3D functions
- Control the projector through the local area network
- Control the projector with the web browser
- About Crestron e-Control®
- Using the projector under standby mode
- Switch off the projector
- Menu operations
- Description of each menu
- Maintenance
- Troubleshooting
- Specifications
- Copyright information
- Appendix

14
Connection
When connecting a signal source to the projector, be sure to:
1. Turn all devices off before making any connections.
2. Use the correct signal cables for each source.
3. Ensure the cables are rmly inserted.
In the connections shown below, some cables may not be included within the projector
packaging (please refer to “Shipping contents”).
You may purchase the required signal cables from an electronics store.
The following links and icons are for references only. Connection jacks at the back of the
projectors may differ according to the projector model.
RS232
S-VIDEO
USB
HDMI
1
2
3
4 5 6 7 8
6
4
9
Screen
Computer
AV device
USB charger
Internet
LAN interface
Monitor
Speaker
1. HDMI cable
2. USB cable (mini-B to type A)
3. RS-232 cable
4. VGA cable (D-Sub to D-Sub)
5. S-VIDEO cable
6. Audio Cable
7. Composite video line
8. VGA (D-Sub) to HDTV (RCA) line
9. RJ45 cable