
User Guide

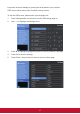
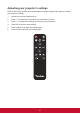
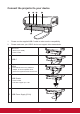
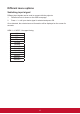

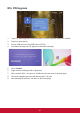
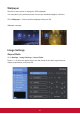

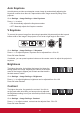
Table Of Contents
- Introduction
- Shipping contents
- Controls and functions
- Setting up
- Positioning your projector
- Using the menus
- Adjusting your projector’s settings
- Connect the projector to your device
- Different menu options
- M1+ FW Upgrade
- Wallpaper
- Image Settings
- About the aspect ratio
- Auto Keystone
- V Keystone
- Brightness
- Contrast
- Harman Kardon - Adjusting the audio settings
- Muting the Sound
- Adjusting the Sound level
- Adjusting the Audio Mode
- Adjusting the Light source settings
- Reset All Settings
- Eye Protection
- Viewing different file
- Using the 3D function
- OSD Menu System
- Specification sheet
- HDMI Support Video Timing
- HDMI Support PC Timing
- 3D Support Timing
- USB-C Support Timing

20
M1+ FW Upgrade
1. Copy FW “MstarUpgrade.bin and M1+.bin)” to FAT32 USB from ViewSonic website
2. Power on the projector
3. Plug in USB with new FW (USB Format: FAT32)
4. Auto detect and pop up FW upgrade conrmation message
5. Click “Conrm”
6. Page with the loading bar will be appeared
7. After reached 100%, will return to ViewSonic start up screen for loading again
8. The whole upgrading process will take around 5~10 mins
9. After nishing the process, will return to the Home page