
User Guide
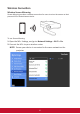


Table Of Contents
- Introduction
- Shipping contents
- Controls and functions
- Setting up
- Positioning your projector
- Using the menus
- Adjusting your projector’s settings
- Connect the projector to your device
- Different menu options
- M1+ FW Upgrade
- Wallpaper
- Image Settings
- About the aspect ratio
- Auto Keystone
- V Keystone
- Brightness
- Contrast
- Projector Position
- Harman Kardon - Adjusting the audio settings
- Muting the Sound
- Adjusting the Sound level
- Adjusting the Audio Mode
- Adjusting the Light source settings
- Reset All Settings
- Eye Protection
- Viewing different file
- Using the 3D function
- OSD Menu System
- Specification sheet
- HDMI Support Video Timing
- HDMI Support PC Timing
- 3D Support Timing
- USB-C Support Timing

35
4. Once inside the Screen Mirroring menu, follow the below direcons:
NOTE: Ensure your device is connected to the same network as the
projector.
For iOS:
1. Access the drop down control menu.
2. Select the “Screen Mirroring” icon.
3. Choose “ViewSonic PJ-XXXX”.
For Android:
1. Download and install the “Google Home” applicaon and open it.
2. Pull-to-refresh the app and wait for 30 seconds.
3. “ViewSonic PJ-XXXX” will now be visible, select it.
NOTE:
• Some Android devices support direct “Casng”. If your device does, go
to the Casng feature and choose “ViewSonic PJ-XXX” from the list of
available devices. You can also scan the FAQ QR code and follow the
steps to directly cast your Android device.
• Ensure your network environment is working normally.
• Wireless network quality will aect performance.
• 5Ghz Wi-Fi connecon is preferred and beer than 2.4Ghz.
• The NetFlix App is not supported.