ViewSonic ® N2010 LCD TV Display - User Guide - Guide de l’utilisateur - Bedienungsanleitung - Guía del usuario - Guida dell’utente - Användarhandbok - Käyttöopas - Руководство пользователя ViewSonic ®
Contents Product Registration.................................................................2 For Your Records.....................................................................2 Important Product Safety Instructions......................................3 Antenna Installation Instructions...............................................4 Cleaning the LCD Display.................................................4 Getting Started Package Contents..............................................................
Copyright © ViewSonic Corporation, 2005. All rights reserved. ViewSonic, the three birds logo, OnView, ViewMatch, and ViewMeter are registered trademarks of ViewSonic Corporation. Disclaimer: ViewSonic Corporation shall not be liable for technical or editorial errors or omissions contained herein; nor for incidental or consequential damages resulting from furnishing this material, or the performance or use of this product.
IMPORTANT PRODUCT SAFETY INSTRUCTIONS ATTENTION: Follow and obey all warnings and instructions marked on your product and its operating instructions. For your safety, please read all the safety and operating instructions before you operate this product follow its operating and keep this user guide for future reference. INSTALLATION 1. Grounding or Polarization Your product may be equipped with a polarized alternating-current line plug (a plug having one blade wider than the other).
ANTENNA INSTALLATION INSTRUCTIONS 1.
Getting Started Congratulations on your purchase of a ViewSonic® LCD TV display. Important! Save the original box and all packing material for future shipping needs. Package Contents Your LCD TV display package includes: LCD TV Display Power Cable (s) ViewSonic User Guide RF Cable *SCART Cable or SCART Adapter 37-Key Remote Control with batteries Quick Start Guide Note: * SCART Cable is for Europe, SCART Adapter is for Pacific Asia.
Front View of the Product 1 2 34 5 6 7 E N G L I S H 8 9 1 Volume Down Decrease sound volume or adjust a highlighted control while in OSD menu. 2 Volume Up Increase sound volume or adjust a highlighted control while in OSD menu. 3 MENU Turn OSD menu ON/OFF. 4 CH Down/ Scroll Down Channel down when source is at TV or select a control while in OSD menu. 5 CH Up/ Scroll Up Channel up when source is at TV or select a control while in OSD menu. 6 ENTER Confirm Select.
Rear View of the Product H I J K L A B C D E FG E N G L I S H A Power (AC input) Using cable provided, connect to a power source. B Cable manager C VGA signal input D Earphone output (light blue) and PC Audio input (light green) E Audio output Connect this port to your external speaker. YPbPr signal Audio input (left/right) Connect the external audio into this jack. G AV/ S-Video signal Audio input (left/right) Connect the external audio into this jack.
Remote Control E N G L I S H ViewSonic N2010 8
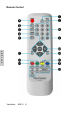
Remote control button function as follow A POWER button Power ON/OFF B INFO button Source and channel display C SLEEP button TV Sleep time setup D SOUND button Switch sound sap type in TV mode E MUTE button Mute ON/OFF F EXIT button OSD exit G PIP INPUT button Select input source of sub-picture in PIP, PBP, Multi Window condition H PIP ON/OFF button Activate or inactivate PIP function I TV button Switch to TV input mode J Input button Select Input Source K 0~100+ number button
Teletext function control button TEXT/ MIX/ PICTURE button In TV Mode: Press the TEXT/ MIX/ PICTURE button to enter the Teletext mode. In TELETEXT Mode: Press the button again to superimpose a Teletext broadcast onto the screen of current TV program (mixed Mode). In MIXED Mode: Press the button again to return back to the normal TV screen (current program). Index button E N G L I S H Press the Index button to return to index page. When you press this button in teletext mode, a CURSOR appears.
Reveal button Press this button to display concealed information, such as solutions of riddles or puzzles. Press this button again to remove the information from the display. Hold button Press this button to remove the information from the display and stop the automatic page change which will occur if a teletext page consists of 2 or more sub pages. To continue press this button again. The number of sub pages and the sub page displayed is, usually, shown on the screen below the time.
Installation 1. Insert Remote Control Batteries 1 Remove the battery cover by pulling then lifting the knob on the cover. 2 Insert the batteries, corresponding to the (+) and (-) markings on the battery compartment. 3 Reattach the battery cover. CAUTION E N G L I S H Only use the specified AAA batteries. Do not mix new and old batteries. This may result in cracking or leakage, which may pose a risk of fire or lead to personal injury. Insert batteries according to (+) and (-) markings.
3. Connect Audio Cable Connect Video/Audio cables from compatible devices into the back panel of N2010. OPTIONAL: To connect an external amplifier, connect the L/R RCA cable from the TV AUDIO OUT port to the appropriate AUDIO IN port on a compatible amplifier as shown on the right. Audio Cable (Cable not supplied) Stereo system 4. Connect AV, S-Video, YPbPr to Video Devices E N G L I S H Connect Video/Audio cables from compatible devices into the back panel of N2010.
S-Video model: S-Video Cable (Cable not supplied) Audio in Cable (Cable not supplied) VCR YPbPr model: E N G L I S H YPbPr Cable (Cable not supplied) Audio in Cable (Cable not supplied) ViewSonic N2010 14 DVD Palyer or VCR
5. Connect to the PC VGA (15pin D-Sub): Connect the VGA cable from VGA output of PC to the VGA terminal input of N2010. PC up to 800 x 600, 640 x 480 is the preferred resolution. Note: PC must output 640 x 480 signal only. PC E N G L I S H VGA 15 Pin Cable (Cable not supplied) PC Audio in: Connect the Audio In cable (green) from audio output of your PC to the audio input terminal (green) of N2010.
Earphone: Connect Earphone from compatible devices into the back panel of N2010. Earphone (Earphone not supplied) E N G L I S H 6. Connect power cable Connect the power cord to the N2010 then to a properly grounded AC outlet.
7. Turn Power ON Press the Power button on top of the LCD display, or press the Power On (red) button on the Remote Control. Turn Video source power ON. 8. Select input source for your LCD TV display, via either OSD menu or Remote control The Enter key of N2010 is the shortcut key for selection of input source to display. TV key of remote control is a shortcut for TV selection.
Basic Operation To adjust the function of your LCD TV, you may use the remote control or top panel buttons above your LCD TV to select input source, change channels, or adjust LCD TV volume. Turning on the LCD TV Before using the LCD TV: 1. Insert the power plug. 2. Connect external equipment properly. 3. Power On/Off: Press the POWER button of the top of the LCD TV or press the POWER button on your remote control to turn on/off the TV. The power LED indicator lights when the LCD TV is on.
OSD Functions IN TV/ AV/ S-VIDEIO/ YPBPR/ SCART MODE Picture Menu 1. Press Enter to get into Picture Menu. 2. Use to select the desired items. 3. To adjust Constrast, Brightness, Colour, Tint, or Sharpness, press ENTER then adjust them with . 4. To setup Colour Temp or Picture Mode, press directly. Picture Contrast Brightness Colour Tint E N G L I S H Sharpness Colour Temp Normal Picture Mode Exit Select Standard Enter Adjust Contrast: To adjust the foreground luminance of the video.
Sound Menu MTS function only works when the input source is TV. 1. Press Enter to get into Sound Menu. 2. Use to select the desired items. 3. To adjust Bass, Treble, or Balance, press ENTER then adjust them with 4. To setup AVC or MTS, press directly. Sound Bass Treble Balance E N G L I S H AVC ON MTS Stereo Exit Select Enter Adjust Balance: To adjust the bass. Bass: To adjust the treble. Treble: To adjust the left and right audio balance. AVC: To turn the AVC on/off.
TV Channel Menu TV Channel Menu only works when the input source is TV. 1. Press Enter to get into TV Channel Menu. 2. Use to select the desired items. 3. Press Enter to get in to the items. T V- C h a n n e l Auto Scan System Select ALL Channel Skip Channel Exchange Channel Copy Fine Tune Manual Store Exit Select Enter Adjust Auto Scan: To automatically preset the TV channels into the TV. 1. Function: To look for all the viewable channels in the set area.
Channel Exchange: To make TV channels exchanged. Channel Exchange From : CH 0 To : CH 0 Store : Save Select Adjust For instance, if you expect to exchange CH2 and CH10, 1. From: use to select CH2. 2. To: use to select CH10. 3. Store: press ENTER, it will show “Ok” instead of “Save.” 4. Press EXIT to leave the page. Channel Copy: To make a copy of TV channel.
Function Menu 1. 2. Press Enter to get into Function Menu. To select the items for Sleep Timer or Source Select, use . Function Sleep Timer Source Select Exit Select OFF TV Enter Adjust Sleep Timer: To set up the Sleep Timer -- 15min, 30min, 45min, or 60min. The Sleep Timer is used to automatically shut off your LCD TV after a preset period of time passed. Choose OFF for disable Sleep Timer function.
OSD Menu 1. 2. 3. 4. Press Enter to get into OSD Menu. To select the items for Language, use . To adjust OSD H. Position, and OSD V. Position, use To setup Memory Recall, press Enter. . OSD Language English OSD H.Position OSD V.Position Memory Recall E N G L I S H Exit Select Enter Adjust Language Select: To choose the language of OSD window. There are various languages to place at your disposal-English, French, German, Spanish, Italian, Finland, Dutch, Swedish, and Russian. OSD H.
IN PC MODE Note: PC Input is limited to 640 x 480 and 800 x 600 resolution only. Main Menu Main Menu AUTO Auto Adjust Contrast/Brightness Colour Adjust i Information Image Adjust Source Select ? Setup Menu PIP Menu Memory Recall SET :Exit :Select Auto Adjust: To auto adjust the picture’s H./V. Position, Fine Tune and H. Size. Contrast: To adjust the foreground luminance of the video. Press ENTER to get into Brightness adjustment. Brightness: To adjust the background luminance of the video.
Source Select: To select the input source of your screen-PC, SCART, YPbPr, S-Video, AV, or TV. Be sure all the cables of selected input source are connected well. Setup Menu: To set up Language Select, OSD (On Screen Display) Position, and OSD (On Screen Display)Time Out. Language Select: To choose the language of On Screen Display window. There are various languages to place at your disposalEnglish, French, German, Spanish, Italian, Finland, Dutch, Swedish, and Russian. OSD H.
Other Information Specifications LCD Type 20.1" TFT Active Matrix Panel tilt Input signal UP: +15° , Down: 0° RGB RF Video Audio RGB analog (0.7/1.0 Vp-p, 75 ohms) Separate Sync, fh:30-37.
Troubleshooting No power Make sure power button (or switch) is ON. Make sure A/C power cord is securely connected to the LCD TV. Plug another electrical device (like a radio) into the power outlet to verify that the outlet is supplying proper voltage. Power is ON but no screen image Make sure the video cable supplied with the LCD TV is tightly secured to the video output port on the back of the Video source.
Customer Support For technical support or product service, see the table below or contact your reseller. NOTE: You will need the product serial number. Contry/ Region Web site T = Telephone F = FAX United Kingdom T: 00 44 (0) 800 833 648 viewsonic@brands.co.uk F: 00 44 (0) 1475 657808 www.viewsonic.com/ support Email France T: 00 33 (0) 1 414 74930 F: 00 33 (0) 1 47 99 75 30 German T: 00 49 (0) 800 1717 430 viewsoniceurope@rtsservices.de Nordics www.infocare.
Limited Warranty VIEWSONIC LCD DISPLAY E N G L I S H What the warranty covers: ViewSonic® warrants its products to be free from defects in material and workmanship during the warranty period. If a product proves to be defective in material or workmanship during the warranty period, ViewSonic will, at its sole option, repair or replace the product with a like product. Replacement product or parts may include remanufactured or refurbished parts or components.
Appendix Safety Guidelines For European Countries In Europe you must use a cord set which is appropriate for the receptacles in your country. The cord set is HAR-Certified, and a special mark that will appear on the outer sheath, or on the insulation of one of the inner conductors. AC PLUG CORD PRECAUTIONS FOR THE UNITED KINGDOM FOR YOUR SAFETY PLEASE READ THE FOLLOWING TEXT CAREFULLY. IF THE FITTED MOULDED PLUG IS UNSUITABLE FOR THE SOCKET OUTLET THEN THE PLUG SHOULD BE CUT OFF AND DISPOSED OF SAFELY.
ViewSonic ®