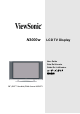
N3000w LCD TV Display User Guide Guía Del Usuario Guide De L’utilisateur ユーザーズ ガイド 使用指南 30” (29.
Contents Product Registration ................................................................................2 For Your Records ....................................................................................2 Important Product Safety Instructions ..................................................... 3 Product Cleaning .....................................................................................4 Getting Started Package Contents .................................................................
Copyright © ViewSonic Corporation, 2004. All rights reserved. Macintosh and Power Macintosh are registered trademarks of Apple Computer, Inc. Microsoft, Windows, Windows NT, and the Windows logo are registered trademarks of Microsoft Corporation in the United States and other countries. ViewSonic, the three birds logo, OnView, ViewMatch, and ViewMeter are registered trademarks of ViewSonic Corporation. VESA is a registered trademark of the Video Electronics Standards Association.
Important Product Safety Instructions ATTENTION: Follow and obey all warnings and instructions marked on your product. For your safety, please read all operating instructions before you operate this product. Keep this user guide for future reference. INSTALLTION 1. Grounding or Polarization Your product may be equipped with a polarized alternating-current line plug (a plug having one blade wider than the other). This plug will fit into the power outlet only one way. This is a safety feature.
Product Cleaning • MAKE SURE THE PRODUCT IS TURNED OFF • NEVER SPRAY OR POUR ANY LIQUID DIRECTLY ONTO THE SCREEN OR CASE To clean the screen: 1. Wipe the screen with a clean, soft, lint-free cloth. This removes dust and other particles. 2. If still not clean, apply a small amount of non-ammonia, non-alcohol based glass cleaner onto a clean, soft, lint-free cloth, and wipe the screen. To clean the case: 1. Use a soft, dry cloth. 2.
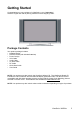
Getting Started Congratulations on your purchase of a ViewSonic product. Important ! Save the original box and all packing material for future shipping needs. Package Contents Your product package includes: • N3000w Display • Remote Control (with included batteries) • Power Cord(s) • VGA Cable • Audio Cable • AV RCA Cable • RF Cable • Quick Start Guide • User Guide NOTE: Your product may also include, the ViewSonic Wizard CD.
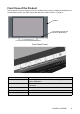
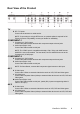
Front View of the Product Use the buttons on the front panel control (or included remote control) to display and adjust the On Screen Display (OSD). The OSD controls are defined in “OSD Functions” on page 16. Speaker Front panel controls are shown in detail below Front Panel Control 1.Menu Turn OSD Menu ON/OFF 2.Volume + / - Increase/Decrease sound volume or adjust a highlighted control while in OSD Menu. 3.Channel + / - Channel up/down when source is at TV or select a control while in OSD Menu.
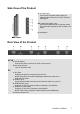
Side View of the Product A. AV Video input Connect the Composite Video (Yellow) to external video device such as VCR, DVD and Video game B/C. Audio input (Right / Left) Connect the external audio to this jack; (Audio (R/L) inputs are supporting either S-Video or AV input.) D. Headphone Rear View of the Product AC IN A. AC IN (Power) Connect the power cord from AC IN to a power source B. AC switch (Power) Turn AC IN power on/off PC C.
Rear View of the Product TV H. RF / TV Inputs Connect to the antenna or cable service. NOTE: If connecting to a single RF Source, an optional splitter is required for full Picture-in-Picture compatibility, contact your dealer for availability. COMPONENT-1 I. Component (Y Pb Pr) input Connect the external video devices with component output to these jacks J. Audio input (Right / Left) Connect the external audio to this jack NOTE: The YPbPr input is compatible with 480p, 576p, 720p, and 1080i formats.
S. Audio input (Right / Left) Connect the external audio to this jack; (Audio (R/L) inputs are supporting either SVideo or AV input.) NOTE: SVHS and COMPOSITE Inputs SHARE their respective Audio Inputs. In Normal applications, only one source may have an active Audio Input at a time. AUDIO OUTPUT N. Audio output (Right / Left) Provide the external audio output T.
Remote Controls The Remote Control is compatible with the display from up to 5m distances. 1. POWER: Switch the power On/Off 2. MUTE Turn the Sound On/Off 3. TV Press to toggle between TV1 and TV2. 4. AV1 Source selected to AV1 mode 5. AV2 Source selected to AV2 mode 6. AV3 Source selected to AV3 mode 7. S-VIDEO1 Source selected to S-video1 mode 8. S-VIDEO2 Source selected to S-video2 mode 9. YPbPr <=COMP1 Source selected to YPbPr mode 10. YCbCr <=COMP2 Source selected to YCbCr mode 11.
Remote Controls (cont..) 23. SWAP Swap Main / Sub screen on PIP or POP 24. MENU Turn OSD Menu On/Off 25. CC Turn Close caption On/Off 26. DVI Source selected PC DVI mode 27. AUDIO Multi-sound selection: Mono/Stereo/SAP 28. ZOOM Normal, Zoom1,Zoom2 29. RGB Source selected PC VGA mode 30.
Installation 1. Insert Remote Control Batteries 1) Remove the battery cover. 2) Insert the batteries, corresponding to the (+) and (-) markings on the battery compartment. 3) Re-attach the battery cover. CAUTION: • • • • • • • Only use AA batteries. Do not mix new and old batteries. This may result in cracking or leakage, which may pose a fire risk or lead to personal injury. Insert batteries according to (+) and () markings.
2. Connect audio and video cables to PC Connect one or all of the following into the back of the product IMPORTANT: Before beginning, make sure all devices are off . RGB CONNECTION: Connect the supplied analog VGA cable from your PC VGA OUT port to the product RGB IN port. DVI CONNECTION: Connect the supplied Digital DVI cable from your PC DVI OUT port to the product DVI IN port. AUDIO CONNECTION: Connect the supplied stereo mini cable from the PC’s AUDIO OUT port to the AUDIO IN port on the product.
3. Connect AV, Y Pb/Cb Pr/Cr, S-Video, Antenna/Cable to Video Devices Connect Video/Audio cables from compatible devices to the back panel of product.
4. Connect power cables Connect the power cord to the product then to a properly grounded AC outlet. 5. Turn Power On Press the AC switch button to “I”, then press the Power ON button on the front of the product. Or press the Power ON (Blue) button on the remote control. Power Button 6. Select input source for your product, via either OSD menu or remote control 7.
OSD Functions All the function settings for your product are controlled either via the remote control or using the bottom control keys on the front panel. To display the OSD main menu, press Menu button on the front control keys or the MENU key on the remote control. Use W/X arrow keys to highlight the desired OSD sub-menu. Main Menu To select a sub-menu, press SOURCE on the front control keys or the ENTER key on the remote control.
PICTURE: PICTURE Function Name Explanation Brightness Brightness Adjustment Contrast Contrast Adjustment Color Color Adjustment Tint Tint Adjustment Sharpness Sharpness Adjustment Color Temp Color Temp Adjustment (Cool, Normal, User) for PC Mode ViewSonic N3000w 17
AUDIO: AUDIO Function Name Explanation Volume Volume Adjustment Bass Bass Adjustment Treble Treble Adjustment Balance Balance Adjustment DVI audio from PC : DVI+RGB share 3.5mm jack, YCbCr has own Audio YCBCR : DVI uses YCbCr Audio input, RGB uses 3.5mm jack Input exclusively, YCbCr share Audio with DVI Speaker Turn Speaker OFF or ON Line Out Sets Live Out Level to Variable: Sound level will change with Volume. Fixed: Sound level remains constant.
SOURCE: SOURCE Function Name Explanation Main Screen Select main screen sources (TV1=>TV2 => AV1 => AV2 => AV3 => S-VIDEO1 => S-VIDEO2 => YPbPr => YCbCr => RGB => DVI) Sub Screen Select sub screen sources (OFF => TV1=>TV2 => AV1 => AV2 => AV3 => S-VIDEO1 => SVIDEO2 => YCbCr) Audio From Select main screen or sub-screen audio sources Display Mode Full --> PIP --> POP Full: Normal. PIP: Displays selected Sub Screen within the Main Screen. POP: Displays selected Sub Screen next to the Main Screen.
GRAPHIC: GRAPHIC Function Name Explanation Auto Adjust Auto Adjust the Horizontal Phase of the image H. Position Horizontal Position on the image adjustment V. Position Vertical Position on the image adjustment Phase Phase adjustment H. Size Clock adjustment Resolution Display Source Resolution and Frequency NOTE: The GRAPHIC menu is only available when RGB or DVI source is selected.
TV: TV Function Name Explanation Input Select TV Source Type (ANT => Cable => HRC => IRC) Caption Mode Selects the Active Closed Caption Mode. OFF, CC1, CC2, CC3, CC4, TT1, TT2, TT3, TT4 Note: Closed Caption is broadcaster dependent. Check with your Broadcaster regarding availability of captioned content. Auto Scan Searches, finds, and presets all available channels. Note: Due to signal strength, not all channels may be detected.
TV: TV ViewSonic N3000w 22
Function Name Explanation Password Edit Change Password. NOTE: There is no Default password, just hit “ENTER” on the Remote Control. ViewSonic is not responsible for parental control password security.
CLOCK: Clock Function Name Explanation Date Display present date in MM/DD/YY format Time Display present time Timer1 Set the time and duration to automatically turn on. Timer2 Set the time and duration to automatically turn on.
SETUP Function Name Explanation OSD H-POS OSD Horizontal Position adjustment OSD V-POS OSD Vertical Position adjustment OSD Timeout Set Time to turn OFF the OSD Language OSD language INFO Display Input Source, Type and Signal Reset Restore factory defaults ViewSonic N3000w 25
Other Information Specifications Panel Type 30" (29.53" viewable diagonal area), TFT (Thin Film Transistor), Active Matrix WXGA LCD, 1280*768 vertical stripe Color Anti-reflective coating + Anti-glare coating 170° (H) / 170° (V) Input signal Video/Audio RGB Analog * 1 (75 ohms, 0.
Troubleshooting / Tips & Tricks No power • Make sure AC power button is ON, DC power button is ON (Blue LED) • Make sure AC power cord is securely connected to the AC socket • Plug another electrical device (like a radio) to the power outlet to verify that the outlet is supplying the proper voltage System is “Locked” or Not Responding: • In the unlikely occurrence, press the “Up” key + AC power on to reset the monitor.
Remote Control does not work • Make sure batteries are inserted correctly • Batteries could be weak Image Quality Issues: • TV: For Best Image Quality, “Standard Definition” TV should be viewed as 4:3. • COMPONENT 480i: For Best Image Quality the “YCBCR” Input should be used. For High-Definition Users: • The N3000w is an ideal platform for viewing High Definition Content. • Best Image Quality will be achieved by the DVI Input, then YPBPR, then RGB.
Customer Support For technical support or product service, see the table below or contact your reseller. NOTE: You will need the product serial number. Country/Region Web site T = Telephone F = FAX Email United States viewsonic.com/support T: (800) 688-6688 F: (909) 468-1202 service.us@viewsonic.com Canada viewsonic.com/support T: (800) 688-6688 F: (909) 468-1202 service.ca@viewsonic.com United Kingdom viewsoniceurope.com T: 0800 833 648 F: (01293) 643910 service.eu@viewsoniceurope.
Limited Warranty VIEWSONIC N3000w PRODUCT What the warranty covers: ViewSonic warrants its products to be free from defects in material and workmanship during the warranty period. If a product proves to be defective in material or workmanship during the warranty period, ViewSonic will, at its sole option, repair or replace the product with a like product. Replacement product or parts may include remanufactured or refurbished parts or components.
Appendix Safety Guidelines CAUTION: The socket-outlet should be installed near the equipment and should be easily accessible. CAUTION: Use a power cable that is properly grounded. Always use the appropriate AC cord that is certified for the individual country. Some examples are listed below: USA ...............................UL Canada......................... CSA Germany....................... VDE Switzerland ...................SEV Britain............................BASE/BS Japan .........................
Compliance Information for U.S.A. This equipment has been tested and found to comply with the limits for a Class B digital device, pursuant to part 15 of the FCC Rules. These limits are designed to provide reasonable protection against harmful interference in a residential installation. This equipment generates, uses, and can radiate radio frequency energy, and if not installed and used in accordance with the instructions, may cause harmful interference to radio communications.
ViewSonic® Corporation