Get started with SureMDM for Windows 10 The information contained in these documents is confidential, privileged and only for the information of the intended recipient and may not be used, published or redistributed without the prior written consent of 42Gears Mobility Systems.
Table of Contents Setup SureMDM Nix Agent on Windows 10 device...................................................................................... 1 Approve enrolled Windows 10 device on SureMDM Web Console .............................................................
Get started with SureMDM for Windows 10 Setup SureMDM Nix Agent on Windows 10 device 1. Download SureMDM Nix Agent from 42Gears website 2. Once downloaded, click and run nix_installer_win.exe 3. Once the setup and installation completes, SureMDM Nix Agent and SureMDM File Store shortcut icons will appear on the desktop 4. On User Account Control prompt, click Yes to allow SureMDM to make changes in the device 5. SureMDM Nix Agent will launch Page 1 of 5 © 2017 42Gears Mobility Systems.
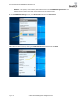
Get started with SureMDM for Windows 10 6. SureMDM Nix Agent will automatically take Computer name as the default name and will show service status as Stopped 7. To start configuring SureMDM Nix Agent, click Settings 8. SureMDM Nix Settings has following options: - Enable Nix Service – Use this check box to enable or disable Nix Service. Disable this option before making any changes in the settings and enable it once done.
Get started with SureMDM for Windows 10 - Mailbox – This option, once enabled, will mailbox feature on SureMDM Nix Agent Home. This mailbox can be used to send and receive mails from the administrator. 9. On SureMDM Nix Settings screen, click Account ID and enter the Account ID 10. Enable the Nix service by clicking on Enable Nix Service checkbox and click Back Page 3 of 5 © 2017 42Gears Mobility Systems. All Rights Reserved.
Get started with SureMDM for Windows 10 11. On successful completion of the steps, SureMDM Nix Agent Home should show status as Online Approve enrolled Windows 10 device on SureMDM Web Console 1. Login to SureMDM Web Console 2. On SureMDM Home, click Unapproved option at the bottom left of the console Page 4 of 5 © 2017 42Gears Mobility Systems. All Rights Reserved.
Get started with SureMDM for Windows 10 3. Click to highlight the Windows 10 device under Unapproved Device section and click Approve 4. The approved device will start reflecting under Device List section and it is ready to be managed Page 5 of 5 © 2017 42Gears Mobility Systems. All Rights Reserved.