
User Guide
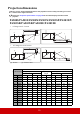
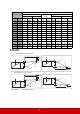
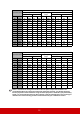
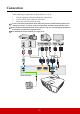
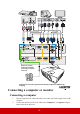

Table Of Contents
- Table of contents
- Important safety instructions
- Introduction
- Positioning your projector
- Connection
- Operation
- Starting up the projector
- Using the menus
- Utilizing the password function
- Switching input signal
- Adjusting the projected image
- Magnifying and searching for details
- Selecting the aspect ratio
- Optimizing the image
- Setting the presentation timer
- Hiding the image
- Locking control keys
- Operating in a high altitude environment
- Using the CEC function
- Using the 3D functions
- Using the projector in standby mode
- Adjusting the sound
- Shutting down the projector
- Menu operation
- Maintenance
- Troubleshooting
- Specifications
- Copyright information

13
Connection
When connecting a signal source to the projector, be sure to:
1. Turn all equipment off before making any connections.
2. Use the correct signal cables for each source.
3. Ensure the cables are firmly inserted.
In the connections shown below, some cables may not be included with the projector (see
"Shipping contents" on page 4). They are commercially available from electronics stores.
The connection illustrations below are for reference only. The connecting jacks available on
the projector vary with each projector model.
For detailed connection methods, see pages 14-17.
PA500S/PA500X