PF77 Color Monitor User’s Guide Guide de l’utilisateur Bedienungsanleitung (International Spanish) (Italian) (Brazilian Portuguese) (Swedish) (Russian) (Polish) (Arabic) PerfectFlat® Full 17" (16.
Copyright © ViewSonic Corporation, 1999. All right reserved. Macintosh and Power Macintosh are registered trademarks of Apple Computer, Inc. Microsoft, Windows, Windows NT, and the Windows logo are registered trademarks of Microsoft Corporation in the United States and other countries. ViewSonic, the three birds logo, OnView, ViewMatch, PerfectFlat, and ViewMeter are registered trademarks of ViewSonic Corporation. OptiSync is a trademark of ViewSonic. ENERGY STAR is a registered trademark of the U.S.
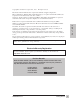
CONTENTS For Your Records . . . . . . . . . . . . . . . . . . . . . . . . . . . . . . . . . . . . . . . . . 1 Getting Started Package Contents . . . . . . . . . . . . . . . . . . . . . . . . . . . . . . . . . . . . . . . 3 E N G L I S H Before using the Monitor . . . . . . . . . . . . . . . . . . . . . . . . . . . . . . . . . 4 Precautions . . . . . . . . . . . . . . . . . . . . . . . . . . . . . . . . . . . . . . . . . . . . . 4 Quick Installation* . . . . . . . . . . . . . . . . . . . . . . . . . . . .
Getting Started Congratulations on your purchase of a ViewSonic PF77 color monitor! You have selected one of the most advanced display devices in the industry. Features include: • • OptiSync™ technology— makes the PF77 capable of accepting virtually any of today's analog and tomorrow's digital (DVI) input sources. E N G L I S H PerfectFlat® technology— offers an edge-to-edge flat screen for distortion-free images and minimal light reflection to prevent eye fatigue.
Before Using the Monitor • • E N G L I S H Read Precautions (on this page) and Power Cord Safety Guidelines (on page 17). Read Setting the Timing Mode on page 6 before you adjust the ViewPanel. This will prevent you from making adjustments unnecessarily. Precautions • For best viewing conditions sit at least 18" from the monitor. • AVOID TOUCHING THE SCREEN WITH YOUR FINGERS. Oils from the skin are difficult to remove. • NEVER REMOVE THE REAR COVER. The monitor contains highvoltage parts.
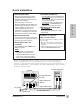
Quick Installation 1 Connect video cable Make sure both the monitor and the computer are powered OFF. Connect the video cable from to the back of the monitor to the computer. Macintosh® users: Connect a Macintosh adapter (part No. VMAC-1) to the video cable, then to the monitor. To order an adapter, send an email to vsparts@viewsonic.com or call ViewSonic® customer service (see the back cover of this guide). You will need to provide your monitor's serial number.
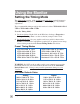
Using the Monitor Setting the Timing Mode The timing mode consists of the resolution and refresh rate (vertical frequency). After setting the timing mode, use the OnView® controls (pages 7-12) to make adjustments. The recommended timing mode for this monitor is either: VESA 1024 x 768 @ 75Hz or VESA 1600 x 1200 @ 75Hz. To set the Timing Mode: 1 Set the resolution: Right-click on the Windows® desktop > Properties > Settings > Desktop Area > set the resolution (example 1024 x 768).
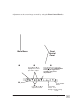
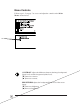
Adjustments to the screen image are made by using the Front Control Panel to Front Control Panel Main Menu ➊ ➋ ➌ Press Button [2] to select the highlighted control. IMPORTANT: ▼] to toggle to the Press [▼ second in the pair of adjustments. Press [▼] or [▲] to highlight the control you wish to adjust. 1 ➎ 2 ➍ Press [▼] or [▲] to adjust the control.
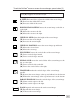
Menu Controls Follow steps 1–5 on page 7 to access and adjust the controls on the Main Menus shown below. CONTRAST adjusts the difference between the image background (black level) and the foreground (white level). [▼] Decreases contrast [▲ ] Increases contrast. BRIGHTNESS adjusts the background black level of the screen image. [▼] Decreases brightness [▲] Increases brightness.
To exit the OnView® menu or screen & save changes, press button [1]. For options that appear as pairs on the menu, highlight an option and press [▼] to toggle to the second in the pair. H. SIZE (Horizontal Size) adjusts the width of the screen image. [▼] Decreases the width of the screen. [▲] Increases width of the screen. HORIZONTAL POSITION moves the screen image to the left or to the right. [▼] Moves the screen to the left [▲] Moves the screen to the right.
To exit the OnView® menu or screen & save changes, press button [1]. For options that appear as pairs on the menu, highlight an option and press [▼] to toggle to the second in the pair. TILT rotates the entire screen image [▼] Rotates the screen image counter-clockwise [▲] Rotates the screen image clockwise. VIEWMETER ® displays information regarding the current input signal coming from the graphics card of the computer. H. CONVERGENCE (Horizontal Convergence) adjusts vertical color alignment.
To exit the OnView® menu or screen & save changes, press button [1]. For options that appear as pairs on the menu, highlight an option and press [▼] to toggle to the second in the pair. ViewMatch® provides several color options: preset color temperatures and User Color which allows you to adjust red, green and blue. The factory setting for this product is 9300K (93000 Kelvin), the color temperature most frequently used in offices with fluorescent lights.
To exit the OnView® menu or screen & save changes, press button [1]. For options that appear as pairs on the menu, highlight an option and press [▼] to toggle to the second in the pair. PURITY adjusts the uneven color of the overall image. For example, if one area of a color appears darker than another area, first use the DEGAUSS feature. If color is still uneven, use the PURITY control. Press [▼] or [▲] to adjust. Press [▼] or [▲] to select/deselect this mode.
Other Information Specifications CRT Type Phosphor Glass surface 17" (16.0" viewable diagonal area), PerfectFlat® 0.25mm aperture grille pitch, 90° deflection RGB, medium short persistence Anti-reflective and anti-static coating Standard light transmission rate = 41.5% Analog Input Signal Video Sync RGB analog (0.
Troubleshooting No power • Make sure power button (or switch) is ON. • Make sure A/C power cord is securely connected to the back of the monitor and to a power outlet. • Plug another electrical device (like a radio) into the power outlet to verify that the outlet is supplying proper voltage. Power on but no screen image • Make sure the video cable supplied with the monitor is tightly secured to the video output port on the back of the computer.
Cleaning the Monitor • • MAKE SURE THE MONITOR IS TURNED OFF. NEVER SPRAY OR POUR ANY LIQUID DIRECTLY ONTO THE SCREEN OR CASE. To clean the screen: 1 2 Wipe the screen with a clean, soft, lint-free cloth. This removes dust and other particles. If still not clean, apply a small amount of non-ammonia, non-alcohol based glass cleaner onto a clean, soft, lint-free cloth, and wipe the screen. E N G L I S H To clean the case: 1 2 Use a soft, dry cloth.
LIMITED WARRANTY VIEWSONIC MONITORS What the warranty covers: ViewSonic® warrants its products to be free from defects in material and workmanship during the warranty period. If a product proves to be defective in material or workmanship during the warranty period, ViewSonic will, at its sole option, repair or replace the product with a like product. Replacement product or parts may include remanufactured or refurbished parts or components.
Customer Service To receive the most prompt assistance, dial the appropriate number below and listen to all menu options before making your selection: Customer Support, Technical Support, Parts, etc. U.S. and Canada only 1-800-688-6688 From outside U.S. and Canada 909-869-7976 From Europe 44 (1293) 643-900 From Asian/Pacific Rim countries 886 (22) 248-4072 Other Options Technical Support Questions vstech@viewsonic.com Product or Dealer Questions prodinfo@viewsonic.com World Wide Web: http://www.viewsonic.