
User Guide


Page 10
Installation Manual
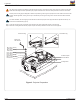
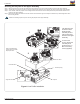
Step 1. With the projector secured in the mount and power on and signal supplied to the projector you can now proceed with the nal height,
tilt, roll and yaw to optimize the projected image.
Final Adjustments
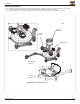
A
The height can be adjusted by rotating the coupler
clockwise (higher) / counterclockwise (lower). Once
the height is achieved, tighten the locking set screw
using the supplied Security Allen Wrench.
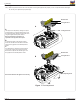
B
To adjust the tilt angle of the projector, slightly
loosen the side M8 screws and tilt to the desired
angle and rmly tighten the two M8 adjustments
screws.
C
If roll adjustment is needed to square the images
on the screen, slightly loosen the front and rear
M8 screws and adjust to the desired angle. Then
rmly tighten the two M8 adjustment screws.
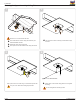
Re-check the hardware for tightness and security
Note: A minimum of 4 full rotations is
required to securely fasten the coupler.
A
B
c
Wooden Stud
Ceiling Structure
Locking Set Screw
Wooden Stud
Ceiling Structure
(Roll) Adjusting Screw
Figure 7. Final Adjustment
PJ-WMK-006