PJ502 User Guide Guide de l’utilisateur Bedienungsanleitung Guía del usuario Guida dell’utente Guia do usuário Användarhandbok Käyttöopas Руководство пользователя 使用手冊 使用手冊 Inage size 30"-300" High Brightness Light Weight LCD Projector
Contents For Your Records ....................................................................................... 1 Projector features....................................................................................... 2 Package Contents ...................................................................................... 2 Part names .................................................................................................. 3 Projector ............................................................
Contents PICTURE menu ...................................................................................................22 BRIGHT, CONTRAST, GAMMA, COLOR TEMP, COLOR, TINT, SHARPNESS, PR-OGRES-SIVE, MY MEMORY IMAGE menu .......................................................................................................24 ASPECT, OVER SCAN, V POSITION, H POSITION, H PHASE, H SIZE, AUTO ADJUST INPUT menu ......................................................................................................
Copyright © ViewSonic Corporation, 2004. All rights reserved. Apple, Mac and ADB registered trademarks of Apple Computer, Inc. Microsoft, Windows, Windows NT, and the Windows logo are registered trademarks of Microsoft Corporation in the United States and other countries. ViewSonic, the three birds logo and OnView are registered trademarks of ViewSonic Corporation. VESA and SVGA are registered trademarks of the Video Electronics Standards Association. DPMS and DDC are trademarks of VESA.
Projector features This projector is used to project various computer signals as well as NTSC/PAL/SECAM video signals onto a screen. Little space is required for installation and large images can easily be reached. Package Contents Your projector should come with the following items. Contact your dealer immediately if anything is missing. .
Part names Projector Controls Zoom knob (See the following page.) Focus ring Remote control sensor Lens cover Speaker (Lens is inside) Elevator button (right) Front-Right side Input ports AUDIO Elevator foot (right) Restart switch (*) S-VIDEO Power switch COMPONENT VIDEO (Y) (Cb/Pb) AC inlet (Cr/Pr) Elevator button (left) Elevator foot (left) Vents VIDEO RGB CONTROL port Rear-Left side Lamp cover Kensington lock slot Filter cover (Lamp unit is inside.
Part names Projector LAMP indicator TEMP indicator POWER indicator Menu cursor button S,T,W,X INPUT button STANDBY/ON button Controls RGB button VIDEO button ASPECT button MAGNIFY SEARCH button STANDBY/ON button AUTO button BLANK button ON button OFF button FREEZE button VOLUME button MUTE button KEYSTONE button POSITION button MENU button Menu cursor buttons S,T,W,X ESC (Escape) button ENTER RESET button ViewSonic PJ502 4
Setting up WARNING X Place the projector in a stable position horizontally. A fall or a turnover could cause an injury and/or damage to the projector. Then using a damaged projector could result in a fire and/or an electric shock. * Don't place the projector on an unstable, slanted or vibrating surface such as a wobbly or inclined stand. * Do not place the projector in the side/front/rear-up position, except for care of the air filter.
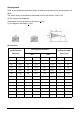
Arrangement Refer to the illustrations and tables below to determine the screen size and projection distance. The values shown in the table are calculated for a full size screen: 1280 x 720 (a) The screen size (diagonal) (b) Distance from the projector to the screen (+10%) (c) The height of the screen (+10%) At 4:3 screen (b) Projection distance (a) Screen size [inch (m)] min (c) Screen height [inch (cm)] max 30 (0.8) 35 (0.9) 42 (1.1) 2 (5) 40 (1.0) 47 (1.2) 56 (1.4) 2 (6) 50 (1.
At 16:9 screen (b) Projection distance (a) Screen size [inch (m)] min (c) Screen height [inch (cm)] max 30 (0.8) 38 (1.0) 46 (1.2) 0 (-1) 40 (1.0) 52 (1.3) 62 (1.6) -1 (-2) 50 (1.3) 65 (1.6) 77 (2.0) -1 (-2) 60 (1.5) 78 (2.0) 93 (2.4) -1 (-2) 70 (1.8) 91 (2.3) 109 (2.8) -1 (-3) 80 (2.0) 105 (2.7) 125 (3.2) -1 (-3) 90 (2.3) 118 (3.0) 140 (3.6) -1 (-4) 100 (2.5) 131 (3.3) 156 (4.0) -2 (-4) 120 (3.0) 158 (4.0) 188 (4.
Adjusting the projector's elevator WARNING X Do not adjust the projector's elevator during use or immediately after use. Handling while the projector is in a high temperature could cause a burn and/or malfunction to the projector. CAUTION X If you press the elevator button without holding the projector, the projector might crash down, overturn, smash your fingers and possibly result in malfunction.
About the filter cover for a unit installed bottom side up WARNING X Do not replace the filter cover during use or immediately after use. While the projector is connected to a power supply or is in a high temperature state, handling the projector could cause electric shock, a fire, a burn and/or malfunction to the projector. Before handling, make sure the power switch is off and the power cord is not plugged in, then wait at least 45 minutes.
Connecting your devices CAUTION X Turn off all devices prior to connecting them to the projector. Attempting to connect a live device to the projector may generate extremely loud noises or other abnormalities that may result in malfunction and/or damage to the device and/or projector. X Use the accessory cable or a designated-type cable for the connection. Some cables have to be used with core set. A cable that is too long may cause a certain picture degradation.
With a computer RGB out RS-232C AUDIO Stereo mini audio cable RS-232C cable RGB cable Vith a VCR/DVD player Video out AUDIO Video cable Stereo mini audio cable AUDIO S-Video out S-Video cable Stereo mini audio cable AUDIO Y CB/PB CR/PR Component video out Component video cable Stereo mini audio cable ViewSonic PJ502 11
Connecting power supply WARNING X Please use extra caution when connecting the power cord as incorrect or faulty connections may result in fire and/or electrical shock. * Only use the power cord that came with the projector. If it is damaged, contact your dealer to newly get correct one. * Only plug the power cord into an outlet rated for use with the power cord's specified voltage range. * Never modify the power cord. Never attempt to defeat the ground connection of the three-pronged plug.
Remote control Putting Batteries WARNING X Always handle the batteries with care and use them only as directed. Improper use may result in battery explosion, cracking or leakage, which could result in fire, injury and/ or pollution of the surrounding environment. * Be sure to use only the batteries specified. Do not use batteries of different types at the same time. Do not mix a new battery with used one. * Make sure the plus and minus terminals are correctly aligned when loading a battery.
Operating the remote control CAUTION X Be careful in handling the remote control. * Do not drop or otherwise expose the remote control to physical impact. * Do not get the remote control wet or place it on wet objects. Doing so may result in malfunction. * Remove the batteries from the remote control and store them in a safe place if you won't be using the remote control for an extended period. * Replace the batteries whenever the remote control starts to malfunction.
Power on/off WARNING X When the power is on, a strong light is emitted. Do not look into the lens or vents of the projector. NOTE. Turn the power on/off in right order. Please power on the projector before the connected devices. Power off the projector after the connected devices STANDBY / ON button POWER indicator STANDBY / ON button Power switch (On position) (Off position) Turning on the power 1. Make sure that the power cord is firmly and correctly connected to the projector and outlet. 2.
Operating Adjusting the volume 1. Press the VOLUME button on the remote control. A dialog will appear on the screen to aid you in adjusting the volume. 2. Use the menu cursor buttons S/T to adjust the volume. To close the dialog and complete the operation, press the VOLUME button again. Even if you don't do anything, the dialog will automatically disappear after a few seconds. Temporarily muting the sound 1. Press the MUTE button on the remote control.
Searching an input signal 1. Press the SEARCH button on the remote control. The projector will begin to check its input ports in order to find any input signals. Then when an input is found, the projector will stop searching and display the image. If no signal is found, the projector will return to the state selected before the operation. RGB B COMPONENT VIDEO B S-VIDEO B VIDEO Selecting an aspect ratio 1. Press the ASPECT button on the remote control.
At a COMPONENT VIDEO, S-VIDEO or VIDEO signal The video format best suited for the respective input signal will be selected automatically. This function is available only when the AUTO mode is selected to the item VIDEO FORMAT of INPUT menu. For a component video signal, the signal type is automatically identified independently of this function. * The automatic adjustment operation requires approximately 10 seconds. Also please note that it may not function correctly with some input.
2. Use the menu cursor buttons S/T to adjust the zoom level. To move the zoom area, press the POSITION button in the MAGNIFY mode, the use the menu cursor buttons S/T/W/X to move the area. And to finalize the zoom area, press the POSITION button again. To exit the MAGNIFY mode and restore the screen to normal, press the OFF button of MAGNIFY on the remote control.
Multifunctional setting Using the menu function This projector has the following menus: PICTURE, IMAGE, INPUT, SETUP, SCREEN, OPTION and EASY MENU. Each of these menus is operated using the same methods. The basic operations of these menus are as follows. 1. Press the MENU button on the remote control or one of the menu cursor buttons on the projector. The advanced MENU or EASY MENU will appear. 2. Use the menu cursor buttons S/T to select a menu.
EASY MENU With the EASY MENU, items shown in the table below can be performed. Select an item using the menu cursor buttons S/T, and press the menu cursor button X or the ENTER button on the remote control to progress. Then perform it referring to the following table. Item ASPECT KEYSTONE MODE Description Using the buttons W/X switches the mode for aspect ratio. See the item ASPECT of section IMAGE menu. Using the buttons W/X corrects the keystone distortion. See the item KEYSTONE of section SETUP menu.
PICTURE menu With the PICTURE menu, items shown in the table below can be performed. Select an item using the menu cursor buttons S/T, and press the menu cursor button X or the ENTER button on the remote control to progress. Then perform it referring to the following table. Item BRIGHT CONTRAST GAMMA Description Using the buttons S/T adjusts the brightness. Light Q Dark Using the buttons S/T adjusts the contrast. Strong Q Weak Using the buttons S/T switches the GAMMA mode.
COLOR TEMP Using the buttons S/T switches the mode of color temperature. HIGH MIDDLE LOW CUSTOM To adjust CUSTOM Selecting the CUSTOM and then pressing the button X or the ENTER button on the remote control displays a dialog to aid you in adjusting the OFFSET and/or GAIN of CUSTOM mode. OFFSET adjustments change the color intensity on the whole tones of the test pattern.
IMAGE menu With the IMAGE menu, items shown in the table below can be performed. Select an item using the menu cursor buttons S/T, and press the menu cursor button X or the ENTER button on the remote control to progress. Then perform it referring to the following table. Item ASPECT Description Using the buttons S/T switches the mode for aspect ratio.
INPUT menu With the INPUT menu, items shown in the table below can be performed. Select an item using the menu cursor buttons S/T, and press the menu cursor button X or the ENTER button on the remote control to progress. Then perform it referring to the following table. Item COLOR SPACE Description Using the buttons S/T switches the mode for color space. RGB SMPTE240 REC709 REC601 AUTO * This item can be selected only at a RGB input or a component video input.
SETUP menu With the SETUP menu, items shown in the table below can be perormed. Select an item using the menu cursor buttons S/T, and press the menu cursor button X or the ENTER button on the remote control to progress. Then perform it referring to the following table. Item KEYSTONE WHISPER MIRROR VOLUME Description Using the buttons S/T corrects the keystone distortion. Upper in the data Q Lower in the data * The adjustable range of this function will vary with the type of input signal.
SCREEN menu With the SCREEN menu, items shown in the table below can be performed. Select an item using the menu cursor buttons S/T, and press the menu cursor button X or the ENTER button on the remote control to progress. Then perform it referring to the following table. Item LANGUAGE Description Using the buttons S/T switches the OSD (On Screen Display) language. MENU POSI- Using the buttons W/X/S/T adjusts the menu position.
MyScreen MyScreen Lock MESSAGE This item functions for capturing the MyScreen of the blank screen and the start up screen. Please execute displaying the input including the picture you want to capture. 1. Selecting this item displays a dialog titled “MyScreen”. It will ask you if you start capturing the picture from the current screen. Please wait for the target picture to be displayed, and press the ENTER button on the remote control when the picture is display.
OPTION menu With the OPTION menu, items shown in the table below can be performed. Select an item using the menu cursor buttons S/T. And press the menu cursor button X or the ENTER button on the remote control to progress, except for the items LAMP TIME and FILTER TIME. Then perform it referring to the following table. Item SEARCH Description Using the buttons S/T turns on/off the message function.
SERVICE Selecting this item displays the SERVICE menu. Select an item using the menu cursor buttons S/T, and press the menu cursor button X or the ENTER button on the remote control to progress. FAN SPEED FACTORY RESET GHOST FAN SPEED: Using the buttons S/T switches the rotation speed of the cooling fans. The HIGH is the mode for use at highlands etc. Note that the projector is noisier when the HIGH is selected. NORMAL HIGH FACTORY RESET: Selecting “RESET” using the button S performs this function.
Maintenance Lamp WARNING HIGH VOLTAGE HIGH TEMPERATURE HIGH PRESSURE X The projector uses a high-pressure mercury glass lamp. The lamp can break with a loud bang, or burn out, if jolted or scratched, handled while hot, or worn over time. Note that each lamp has a different lifetime, and some may burst or burn out soon after you start using them.
When the indicators or a message prompts you to replace the lamp, replace the lamp as soon as possible. 1 Turn the projector off, and unplug the power cord. Allow the lamp to cool for at least 45 minutes. 2. To prepare a new lamp, contact your dealer and tell the lamp type number: PRJ-RLC-015 If the projector is mounted on the ceiling, or if the lamp has broken, also ask the dealer to replace the lamp. In the case of replacement by yourself, 3.
Air filter WARNING X Before caring, make sure the power switch is off and the power cable is not plugged in, and then allow the projector to cool sufficiently. The care in a high temperature state of the projector could cause a burn and/or malfunction to the projector. X Use only the air filter of the specified type. Do not use the projector with the air filter and filter cover removed. X Avoid wetting the projector or inserting liquids in the projector.
Other care WARNING X Before caring, make sure the power switch is off and the power cable is not plugged in, and then allow the projector to cool sufficiently. The care in a high temperature state of the projector could cause a burn and/or malfunction to the projector. X Never try to care for the inside of the projector personally. Doing is so dangerous. X Avoid wetting the projector or inserting liquids in the projector. It could result in a fire, an electric shock, and and/or malfunction to the projector.
Troubleshooting Related messages When the unit's power is on, messages such as those shown below may be displayed. When any such message is displayed on the screen, please respond as described below. If the same message is displayed after the treatment, or if a message other than the following appears, please contact your dealer or service company. Although these messages will be automatically disappeared around several minutes, it will be reappeared every time the power is turned on.
Regarding the indicator lamps Lighting and flashing of the POWER indicator, the LAMP indicator, and the TEMP indicator have the meanings as described in the table below. Please respond in accordance with the instructions within the table. If the same indication is displayed after the treatment, or if an indication other than the following is displayed, please contact your dealer or service company.
POWER indicator Blinking In Red or Lighting In Red LAMP indicator Turned off TEMP indicator Description Lighting In Red There is a possibility that the interior portion has become heated. Please turn the power off, and allow the unit to cool down at least 20 minutes. After the projector has sufficiently cooled down, please make confirmation of the following items, and then turn the power on again.
Phenomena that may easily be mistaken for machine defects WARNING X Never use the projector if abnormal operations such as smoke, strange odor, excessive sound, damaged casing or elements or cables, penetration of liquids or foreign matter, etc. should occur. In such cases, immediately turn off the power switch and then disconnect the power plug from the power outlet After making sure that the smoke or odor has stopped, contact your dealer or service company. 1.
Phenomenon No pictures are displayed. Colors have a faded-out appearance, or Color tone is poor. Cases not involving a machine defect Reference page The lens cover is closed. Remove the lens cover. Part name Power on/off The signal cables are not correctly connected. Correctly connect the connection cables. Connecting your devices The brightness is adjusted to an extremely low level. Adjust the BRIGHT to a higher level using the menu function or the remote control.
Warranty and after-service If a problem occurs with the equipment, first refer to the “Troubleshooting” and run through the suggested checks. If this does not resolve the problem, please contact your dealer or the service company. They will tell you what warranty condition is applied. Specifications NOTE • This specifications are subject to change without notice. Item Specification Product Name Liquid crystal projector Liquid Crystal panel Panel size 1.8 cm (0.
[unit: mm] ViewSonic PJ502 41
Customer Support For technical support or product service, see the table below or contact your reseller. NOTE: You will need the product serial number. Country/ Region Web site T = Telephone Email United States www.viewsonic.com/support T: (800) 688-6688 F: (909) 468-1202 service.us@ viewsonic.com Canada www.viewsonic.com/support T: (800) 688-6688 F: (909) 468-1202 service.ca@ viewsonic.com United Kingdom www.viewsoniceurope.com T: 0800 833 648 F: (01293) 643910 service.eu@ viewsoniceurope.
LIMITED WARRANTY ViewSonic Projector What the warranty covers: ViewSonic® warrants its products to be free from defects in material and workmanship during the warranty period. If a product proves to be defective in material or workmanship during the warranty period, ViewSonic will at its sole option repair or replace the product with a like product. Replacement product or parts may include remanufactured or refurbished parts or components.
Appendix Power Cord Safety Guidelines Caution: Use a power cable that is properly grounded. Always use an AC power cord that meets your country’s safety standard. USA............................UL Canada ......................CSA Germany....................VDE Switzerland ...............SEV Britain........................BASE/BS AC PLUG CORD PRECAUTIONS FOR THE UNITED KINGDOM FOR YOUR SAFETY PLEASE READ THE FOLLOWING TEXT CAREFULLY.
Compliance Information for U.S.A. This equipment has been tested and found to comply with the limits for a Class B digital device, pursuant to part 15 of the FCC Rules. These limits are designed to provide reasonable protection against harmful interference in a residential installation. This equipment generates, uses, and can radiate radio frequency energy, and if not installed and used in accordance with the instructions, may cause harmful interference to radio communications.
ViewSonic Corporation