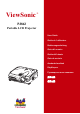
ViewSonic ® PJ862 Portable LCD Projector User Guide Guide de l’utilisateur Bedienungsanleitung Guía del usuario Guida dell’utente Guia do usuário Användarhandbok Käyttöopas Руководство пользователя 使用手冊 使用手冊
Compliance Information For U.S.A. This equipment has been tested and found to comply with the limits for a Class B digital device, pursuant to part 15 of the FCC Rules. These limits are designed to provide reasonable protection against harmful interference in a residential installation. This equipment generates, uses, and can radiate radio frequency energy, and if not installed and used in accordance with the instructions, may cause harmful interference to radio communications.
Important Safety Instructions 1 . Read these instructions. 2. Keep these instructions. 3. Heed all warnings. 4. Follow all instructions. 5. Do not use this unit near water. 6. Clean only with dry cloth. 7. Do not block any ventilation openings. Install in accordance with the manufacturer’s instructions. 8. Do not install near any heat sources such as radiators, heat registers, stoves, or other devices (including amplifiers) that produce heat. 9.
Copyright © ViewSonic Corporation, 2004. All rights reserved. Apple, Mac and ADB registered trademarks of Apple Computer, Inc. Microsoft, Windows, Windows NT, and the Windows logo are registered trademarks of Microsoft Corporation in the United States and other countries. ViewSonic, the three birds logo and OnView are registered trademarks of ViewSonic Corporation. VESA and SVGA are registered trademarks of the Video Electronics Standards Association. DPMS and DDC are trademarks of VESA.
Projector PJ-862 User Manual – Operating Guide Thank you for purchasing this projector. WARNING ►Before using, read the "User's Manual - Safety Instruction Guide" and these manuals to ensure correct usage through understanding. After reading, store them in a safe place for future reference. About this manual Various symbols are used in this manual. The meanings of these symbols are described below.
Contents Contents Compliance informtion . . . . . . . I Important Safety Instructions II For your Record . . . . . . . . . . .III About this manual . . . . . . . . . . 1 Contents . . . . . . . . . . . . . . . . . 2 Projector features . . . . . . . . . . 3 Preparations . . . . . . . . . . . . . . 3 About contents of package . . . . . . . 3 Fastening the lens cap . . . . . . . . . . 3 Part names . . . . . . . . . . . . . . . 4 Projector . . . . . . . . . . . . . . . . . . . . . 4 Control buttons . . . . .
Projector features / Preparations Projector features This projector is used to project various computer signals as well as NTSC/PAL/ SECAM video signals onto a screen. It requires just a little space for installation and gets a large image from short distance. High Brightness Newly developed 230W UHB (Ultra High Brightness) lamp gives you a higher brightness image on a screen. The image can be still kept as bright and clean enough for use in bright rooms.
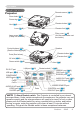
Part names Part names Remote sensor (15) Projector Speaker Zoom knob (18) Focus ring (18) Elevator button (8) Vent (6) Front-Right side Lens (16) Elevator foot (8) Filter cover (46) (Air filter and intake vent are inside.) Lamp cover (45) (Lamp unit is inside.) Bottom side Speaker Control buttons (5) (See the following page.) Elevator button (8) Ports (See below.
Part names Control buttons LAMP TEMP STANDBY/ON button (16) POWER STANDBY/ON LAMP incicator (50) TEMP indicator (50) POWER indicator (16) INPUT MENU KEYSTONE RESET INPUT button (17) Cursor buttons ▲,▼,◄,► (23) KEYSTONE button (20) RESET button (23) Remote control LASER INDICATOR (14) LASER INDICATOR STANDBY/ON button (16) STANDBY/ON VIDEO UP VIDEO button (17) BLANK button (21) RGB PAGE DOWN BLANK RGB button (17) PAGE buttons (22) LASER button (14) LASER Disk pad(22) AS
Setting up Setting up WARNING ►Place the projector in a stable position horizontally. A fall or a turnover could cause an injury and/or damage to the projector. Then using damaged projector could result in a fire and/or an electric shock. • Don’t place the projector on an unstable, slant or vibrant surface such as a wobbly or inclined stand. • Do not place the projector in the side/front/rear-up position, except for care of the air filter.
Setting up Arrangement Refer to the illustrations and tables below to determine the screen size and projection distance. The values shown in the table are calculated for a full size screen: 1024 x 768 (a) The screen size (diagonal) (b) Distance from the projector to the screen (±10%) (c) The height of the screen (±10%) (b) 4:3 (a) 16:9 (c) up (a) (c) down At 4:3 screen (a) Screen size (b) Projection distance [m (inch)] [inch (m)] min. max. 30 40 50 60 70 80 90 100 120 150 200 250 300 (0.8) (1.0) (1.
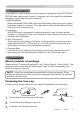
Setting up Adjusting the projector's elevator WARNING ►Do not adjust the projector’s elevator during use or immediately after use. Handling while the projector is in a high temperature could cause a burn and/or malfunction to the projector. CAUTION ►If you press the elevator button without holding the projector, the projector might crash down, overturn, smash your fingers and possibly result in malfunction.
Setting up About the filter cover for bottom-up use WARNING ►Do not replace the filter cover during use or immediately after use. While the projector connects with a power supply, or the projector is in a high temperature state, handling could cause an electric shock, a fire, a burn and/or malfunction to the projector.Before handling, make sure the power switch is off and the power cord is not plugged in, then wait at least 45 minutes.
Setting up Connecting your devices CAUTION ►Turn off all devices prior to connecting them to the projector. Attempting to connect a live device to the projector may generate extremely loud noises or other abnormalities that may result in malfunction and/or damage to the device and/or projector. ►Use the accessory cable or a designated-type cable for the connection. Some cables have to be used with core set. A too long cable may cause a certain picture degradation.
Setting up Examples of connection with a computer * AUDIO IN is linked to RGB IN1/2 and DVI-D.
Setting up Examples of connection with a VCR/DVD player Audio/Video cable Video out RGB IN1 RGB IN2 DVI-D LAN AUDIO-IN Audio (L) out RGB OUT COMPONENT VIDEO CR/PR Audio (R) out VIDEO S-VIDEO S-Video cable RGB IN1 RGB IN2 DVI-D LAN AUDIO-IN Audio (L) out RGB OUT COMPONENT VIDEO CR/PR Audio cable Component video out VIDEO S-VIDEO Component video cable RGB IN1 RGB IN2 DVI-D LAN AUDIO-IN RGB OUT COMPONENT VIDEO CR/PR CR/PR VIDEO S-VIDEO Audio cable RGB IN1 LAN port DVI-D
Setting up Connecting power supply WARNING ►Please use extra caution when connecting the power cord as incorrect or faulty connections may result in fire and/or electrical shock. • Only use the power cord that came with the projector. If it is damaged, contact your dealer to newly get correct one. • Only plug the power cord into an outlet rated for use with the power cord's specified voltage range. • Never modify the power cord. Never attempt to defeat the ground connection of the three-pronged plug.
Remote control Remote control Laser pointer WARNING ►The laser pointer of the remote control is used in place of a finger or rod. Never look directly into the laser beam outlet or point the laser beam at other people. The laser beam can cause vision problems. CAUTION ►Use of controls or adjustments or performance of procedures other than those specified herein may result in hazardous radiation exposure.
Remote control Using the remote control CAUTION ►Be careful in handling the remote control. • Do not drop or otherwise expose the remote control to physical impact. • Do not get the remote control wet or place it on wet objects. Doing so may result in malfunction. • Remove the batteries from the remote control and store them in a safe place if you won’t be using the remote control for an extended period. • Replace the batteries whenever the remote control starts to malfunction.
Power on/off Power on/off WARNING ►When the power is on, a strong light is emitted. Do not look into the lens or vents of the projector. NOTE • Turn the power on/off in right order. Please power on the projector before the connected devices. Power off the projector after the connected devices.
ASPECT Operating LASER INDICATOR RGB STANDBY/ON VIDEO Operating PUSH ENTER UP Adjusting the volume RESET PAGE MENU ESC DOWN the VOLUME button on the remote control. 1. Press A dialog will appear on the screen to aid you in adjusting AUTO POSITION BLANK MAGNIFY LASER VOLUME ON MUTE FREEZE the volume. Use the cursor buttons ▲/▼ to adjust the volume. To close the dialog and complete the operation, press the VOLUME button again.
ASPECT Operating PUSH ENTER Adjusting screen with ONE-TOUCH the ONE TOUCH button on the remote control. This 1. Press activates the following functions at one time. ESC MENU POSITION AUTO RESET VOLUME MAGNIFY ON FREEZE MUTE Signal search: Projector will cycle through its input ports in order to find any input signal. The search is started from the current port. Then when an input is found, the projector will stop searching and display the image.
Operating ASPECT Using the automatic adjustment feature 1. Press the AUTO button on the remote control. PUSH ENTER ESC RESET MENU At a RGB signal The vertical position, the horizontal position, the clock phase and horizontal size will be automatically adjusted. Make sure that the application window is set to its maximum size prior to attempting to use this feature. A dark picture may still be incorrectly adjusted. Use a bright picture when adjusting.
PUSH ENTER Operating ESC MENU POSITION AUTO VOLUME MAGNIFY Correcting the keystone distortions RESET ON FREEZE MUTE OFF the KEYSTONE button on the projector or the 1. Press remote control. A dialog will appear on KEYSTONE ONE TOUCH KEYSTONE AUTO EXECUTE the screen to aid you in correcting the +0 +0 MANUAL distortion. Use the cursor buttons ▲/▼ to select AUTO or MANUAL operation, and press the button ► to perform the following. 1) AUTO executes automatic vertical keystone correction.
ASPECT Operating PUSH ENTER Freezing the screen the FREEZE button on the remote control. 1. Press The “FREEZE” indication will appear on the screen, and ESC MENU POSITION AUTO RESET VOLUME MAGNIFY ON the projector will enter the FREEZE mode. To exit the FREEZE mode and restore the screen to normal, press the FREEZE button again.
Operating Operating the computer screen CAUTION ►Mistaken use of the mouse/keyboard control could damage your equipment. • While using this function, please connect only with a computer. • Before connecting, read the manuals of the computer you will connect. NOTE • It may not be possible to control notebook PC, and other computers with built-in pointing device (e.g. track ball), using this remote control.
Operating Multifunctional settings LASER INDICATOR STANDBY/ON VIDEO Using the menu function RGB UP PAGE DOWN This projector has the following menus: PICTURE, IMAGE, VIDEO Qlty., INPUT, SETUP, SCREEN, OPTION, NETWORK and EASY MENU. Each of these menus is operated using the same methods. The basic operations of these menus are as follows.
Multifunctional settings EASY Menu EASY MENU With the EASY MENU, items shown in the table below can be performed. Select an item using the cursor buttons ▲/▼ on the projector or remote control. Then perform it referring to the following table. Item ASPECT ASPECT 4:3 MODE NORMAL +0 BRIGHT +0 CONTRAST +0 COLOR +0 TINT +3 SHARPNESS WHISPER NORMAL MIRROR NORMAL RESET FILTER TIME 0 LANGUAGE ENGLISH Go To Advance Menu... Description Using the buttons ◄/► switches the mode for aspect ratio.
Multifunctional settings EASY Menu (continued) Item MIRROR Description Using the buttons ◄/► switches the mode for mirror status. See the item MIRROR of section SETUP menu ( 34). RESET Performing this item resets all of the items of EASY MENU except FILTER TIME and LANGUAGE. A dialog is displayed to make sure. Selecting RESET using the button ▲ performs reset. FILTER TIME Performing this item resets the filter timer which counts use time of air filter. A dialog is displayed to make sure.
Multifunctional settings PICTURE Menu With the PICTURE menu, items shown in the table below can be performed. Select an item using the cursor buttons ▲/▼ on the projector or remote control, and press the cursor button ► on the projector or remote control, or the ENTER button on the remote control to progress. Then perform it referring to the following table. Item BRIGHT CONTRAST MENU [RGB] PICTURE IMAGE VIDEO Qlty.
Multifunctional settings PICTURE Menu (continued) Item Description Using the buttons ▲/▼ switches the mode of color temperature. HIGH MIDDLE LOW CUSTOM To adjust CUSTOM COLOR TEMP ENTER : Selecting the CUSTOM and then pressing the OFFSET GAIN button ► or the ENTER button displays a dialog R G B R G B to aid you in adjusting the OFFSET and/or GAIN of CUSTOM mode. OFFSET adjustments change the color intensity +0 +0 +0 +0 +0 +0 on the whole tones of the test pattern.
Multifunctional settings PICTURE Menu (continued) Item Description Selecting a mode of MY MEMORY using the buttons ▲/▼ and then pressing the button ► or the ENTER button performs each function. LOAD1 LOAD2 LOAD3 LOAD4 MY MEMORY SAVE4 SAVE3 SAVE2 SAVE1 This projector has 4 numbered memories for adjustment data. Performing the LOAD1, LOAD2, LOAD3 or LOAD4 loads the data on the memory whose number corresponds with the command’s number, and adjusts the picture automatically depending on the data.
Multifunctional settings IMAGE Menu With the IMAGE menu, items shown in the table below can be performed. Select an item using the cursor buttons ▲/▼ on the projector or remote control, and press the cursor button ► on the projector or remote control, or the ENTER button on the remote control to progress. Then perform it referring to the following table. Item MENU [RGB] PICTURE IMAGE VIDEO Qlty.
Multifunctional settings IMAGE Menu (continued) Item H SIZE AUTO ADJUST EXECUTE Description Using the buttons ▲/▼ adjusts the horizontal size. Large Small • This item can be selected only at a RGB signal (except DVI-D). • When this adjustment is excessive, the picture may not be displayed correctly. In such a case, please reset the adjustment pressing the RESET button on the remote control during this operation. Selecting this item performs the automatic adjustment feature.
Multifunctional settings VIDEO Qlty. Menu With the VIDEO Qlty. menu, items shown in the table below can be performed. Select an item using the cursor buttons ▲/▼ on the projector or remote control, and press the cursor button ► on the projector or remote control, or the ENTER button on the remote control to progress. Then perform it referring to the following table. Item MENU [RGB] :SELECT PICTURE PROGRESSIVE IMAGE 3D‑YCS VIDEO Qlty.
Multifunctional settings INPUT Menu With the INPUT menu, items shown in the table below can be performed. Select an item using the cursor buttons ▲/▼ on the projector or remote control, and press the cursor button ► on the projector or remote control, or the ENTER button on the remote control to progress. Then perform it referring to the following table. Item MENU [RGB] PICTURE IMAGE VIDEO Qlty.
Multifunctional settings INPUT Menu (continued) Item Description Selecting this item displays a dialog titled “INPUT INFORMATION”. It shows the information about the current input. INPUT-INFORMATION RGB 1024x768 @60.0 FRAME LOCK INFORMATION INPUT-INFORMATION S-VIDEO SECAM AUTO INPUT-INFORMATION COMPONENT 576i @50 SCART RGB • The “FRAME LOCK” message on the dialog means the frame lock function is working.
Multifunctional settings SETUP Menu With the SETUP menu, items shown in the table below can be performed. Select an item using the cursor buttons ▲/▼ on the projector or remote control, and press the cursor button ► on the projector or remote control, or the ENTER button on the remote control to progress. Then perform it referring to the following table. Item WHISPER MENU [RGB] PICTURE IMAGE VIDEO Qlty.
Multifunctional settings SCREEN Menu With the SCREEN menu, items shown in the table below can be performed. Select an item using the cursor buttons ▲/▼ on the projector or remote control, and press the cursor button ► on the projector or remote control, or the ENTER button on the remote control to progress. Then perform it referring to the following table.
Multifunctional settings SCREEN Menu (continued) Item Description Using the buttons ▲/▼ switches the mode for the start up screen. The start up screen is the screen displayed when no signal or an unsuitable signal is detected. MyScreen ORIGINAL TURN OFF START UP My Screen My Screen Lock MyScreen is the screen you can register a desired screen. ORIGINAL screen is the existing standard screen. When the TURN OFF is selected, the BLACK screen is used.
Multifunctional settings SCREEN Menu (continued) Item MESSAGE Description Using the buttons ▲/▼ turns on/off the message function. TURN ON TURN OFF When the TURN ON is selected, the following message function works. “AUTO IN PROGRESS” while automatically adjusting ”NO INPUT IS DETECTED” ”SYNC IS OUT OF RANGE” "Searching….” while searching for the input ”Detecting….
Multifunctional settings OPTION Menu With the OPTION menu, items shown in the table below can be performed. Select an item using the cursor buttons ▲/▼ on the projector or remote control, and press the cursor button ► on the projector or remote control, or the ENTER button on the remote control to progress, except for the items LAMP TIME and FILTER TIME. Then perform it referring to the following table.
Multifunctional settings OPTION Menu (continued) Item Description LAMP TIME The lamp time is the time counted after the last resetting. It is shown in the OPTION menu as the use time of the lamp. Pressing the RESET button on the remote control or the button ► of the projector for about 3 seconds displays a dialog. To reset the lamp time, select the RESET using the button ▲. RESET CANCEL • Please reset the lamp time only when you have replaced the lamp, for correct messages about the lamp.
Multifunctional settings NETWORK Menu With the NETWORK menu, items shown in the table below can be performed. Select an item using the cursor buttons ▲/▼ on the projector or remote control, and press the cursor button ► on the projector or remote control, or the ENTER button on the remote control to progress. Then hen perf perform it referring to the following table. MENU [RGB] :SELECT PICTURE IMAGE VIDEO Qlty.
Multifunctional settings NETWORK Menu (continued) This projector provides the NETWORK function. When you start to use this function, please consult your dealer for further information. To start, connect the LAN port to a gateway device via a CAT-5 cable, then set up the projector according to the Network environment in which you use it. When your network enables the DHCP function You can set automatically, if you set the DHCP function to TURN ON using the NETWORK menu.
Multifunctional settings NETWORK Menu (continued) Screen 3 Information 1) Allows you to confirm the current network settings of the projector. 2) Click on "return to top page" to return to Screen 2. IP Configuration Screen 4 Allows you to configure the IP address, subnet mask and default gateway if DHCP is disable. 1) Enter the IP address. 2) Enter the subnet mask. 3) Enter the default gateway. 4) Click on "Write". 5) Click on "return to top page" to return to Screen 2.
Multifunctional settings NETWORK Menu (continued) modified the IP configuration or the DHCP setting, click on "Reboot" in Screen 2 4. Iftoyou have the settings take effect. 5. Close the Web browser to end the configuration session. NOTE • If the Projector Network Configuration dialog is accessed by more than one computer at the same time, the last computer to login retains the authority to modify the settings.
Maintenance Maintenance Lamp WARNING HIGH VOLTAGE HIGH TEMPERATURE HIGH PRESSURE ►The projector uses a high-pressure mercury glass lamp. The lamp can break with a loud bang, or burn out, if jolted or scratched, handled while hot, or worn over time. Note that each lamp has a different lifetime, and some may burst or burn out soon after you start using them.
Maintenance Lamp (continued) When the indicators or a message prompts you to replace the lamp, replace the lamp as soon as possible. Turn the projector off, and unplug the power cord. Allow the lamp to cool for at least 45 minutes. To prepare a new lamp, contact your dealer and tell the lamp type number = RLC-003. If the projector is mounted on the ceiling, or if the lamp has broken, also ask the dealer to replace the lamp. Lamp cover 1. 2.
Maintenance Air filter WARNING ►Before caring, make sure the power switch is off and the power cable is not plugged in, then allow the projector to cool sufficiently. The care in a high temperature state of the projector could cause a burn and/or malfunction to the projector. ►Use only the air filter of the specified type. Do not use the projector with the air filter and filter cover removed. ►Avoid wetting the projector or inserting liquids in the projector.
Maintenance Other care WARNING ►Before caring, make sure the power switch is off and the power cable is not plugged in, and then allow the projector to cool sufficiently. The care in a high temperature state of the projector could cause a burn and/or malfunction to the projector. ►Never try to care for the inside of the projector personally. Doing is so dangerous. ►Avoid wetting the projector or inserting liquids in the projector.
Troubleshooting Troubleshooting Related messages When the unit's power is on, messages such as those shown below may be displayed. When any such message is displayed on the screen, please respond as described below. If the same message is displayed after the treatment, or if a message other than the following appears, please contact your dealer or service company. Although these messages will be automatically disappeared around several minutes, it will be reappeared every time the power is turned on.
Troubleshooting Related messages (continued) Message Description The internal portion temperature is rising. CHECK THE AIR FLOW CLEAN THE AIR FILTER POWER OFF FIRST, THEN CLEAN THE AIR FILTER. AFTER CLEANING THE AIR FILTER, RESET THE FILTER TIMER. Please turn the power OFF, and allow the unit to cool down at least 20 minutes. After having confirmed the following items, please turn the power ON again.
Troubleshooting Regarding the indicator lamps Lighting and flashing of the POWER indicator, the LAMP indicator, and the TEMP indicator have the meanings as described in the table below. Please respond in accordance with the instructions within the table. If the same indication is displayed after the treatment, or if an indication other than the following is displayed, please contact your dealer or service company.
Troubleshooting Regarding the indicator lamps (continued) LAMP TEMP POWER indicator indicator indicator Description The cooling fan is not operating. Blinking In Red or Lighting In Red Turned off Blinking In Red Please turn the power off, and allow the unit to cool down at least 20 minutes. After the projector has sufficiently cooled down, please make confirmation that no foreign matter has become caught in the fan, etc., and then turn the power on again.
Troubleshooting Phenomena that may easily be mistaken for machine defects WARNING ►Never use the projector if abnormal operations such as smoke, strange odor, excessive sound, damaged casing or elements or cables, penetration of liquids or foreign matter, etc. should occur. In such cases, immediately turn off the power switch and then disconnect the power plug from the power outlet. After making sure that the smoke or odor has stopped, contact your dealer or service company.
Troubleshooting Phenomena that may easily be mistaken for machine defects (continued) Phenomenon Reference page Cases not involving a machine defect The lens cap is attached. 4, 16 Remove the lens cap. The signal cables are not correctly connected. 10, 11, 12 Correctly connect the connection cables. No pictures are displayed. The brightness is adjusted to an extremely low level. Adjust the BRIGHT to a higher level using the menu function or the remote control.
Warranty And After-Service Warranty and after-service If a problem occurs with the equipment, first refer to the “Troubleshooting” and run through the suggested checks. If this does not resolve the problem, please contact your dealer or the service company. They will tell you what warranty condition is applied. Specifications Specifications NOTE • This specifications are subject to change without notice. Item Product name Liquid Crystal panel Specification Liquid crystal projector Panel size 2.0 cm (0.
Specifications Specifications (continued) 265mm 336mm 109mm 95mm ViewSonic PJ862 55
Customer Support For technical support or product service, see the table below or contact your reseller. NOTE: You will need the product serial number. Country/Region Web site T = Telephone F = FAX Email United States www.viewsonic.com/support T: (800) 688-6688 F: (909) 468-1202 service.us@ viewsonic.com Canada www.viewsonic.com/support T: (800) 688-6688 F: (909) 468-1202 service.ca@ viewsonic.com United Kingdom www.viewsoniceurope.com T: 0800 833 648 F: (01293) 643910 service.
LIMITED WARRANTY ViewSonic Projector What the warranty covers: ViewSonic® warrants its products to be free from defects in material and workmanship during the warranty period. If a product proves to be defective in material or workmanship during the warranty period, ViewSonic will at its sole option repair or replace the product with a like product. Replacement product or parts may include remanufactured or refurbished parts or components.
How to get service: 1 .For information about receiving service under warranty, contact ViewSonic Customer Support. You will need to provide your product’s serial number. 2 .To obtain warranted service, you will be required to provide (a) the original dated sales slip, (b) your name, (c) your address, (d) a description of the problem, and (e) the serial number of the product. 3 .Take or ship the product freight prepaid in the original container to an authorized ViewSonic service center or ViewSonic. 4 .
ViewSonic®