ViewSonic ® PJD6220/PJD6230/PJD6240 DLP Projector - User Guide - Guide de l’utilisateur - Bedienungsanleitung - Guía del usuario - Guida dell’utente - Guia do usuário - Användarhandbok - Käyttöopas - Руководство пользователя - 使用手冊 (繁體) IMPORTANT: Please read this User Guide to obtain important information on installing and using your product in a safe manner, as well as registering your - 使用手冊 (簡體) product for future service.
Compliance Information FCC Statement This device complies with part 15 of FCC Rules. Operation is subject to the following two conditions: (1) this device may not cause harmful interference, and (2) this device must accept any interference received, including interference that may cause undesired operation. This equipment has been tested and found to comply with the limits for a Class B digital device, pursuant to part 15 of the FCC Rules.
Important Safety Instructions 1. Read these instructions. 2. Keep these instructions. 3. Heed all warnings. 4. Follow all instructions. 5. Do not use this unit near water. 6. Clean with a soft, dry cloth. If still not clean, see “Cleaning the Display” in this guide for further instructions. 7. o not block any ventilation openings. Install the unit in accordance with the manufacturer’s D instructions. 8.
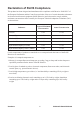
Declaration of RoHS Compliance This product has been designed and manufactured in compliance with Directive 2002/95/EC of the European Parliament and the Council on restriction of the use of certain hazardous substances in electrical and electronic equipment (RoHS Directive) and is deemed to comply with the maximum concentration values issued by the European Technical Adaptation Committee (TAC) as shown below: Proposed Maximum Concentration Actual Concentration Lead (Pb) 0.1% < 0.1% Mercury (Hg) 0.
Copyright Information © © Copyright ViewSonic Corporation, 2008. All rights reserved. Macintosh and Power Macintosh are registered trademarks of Apple Inc. Microsoft, Windows, Windows NT, and the Windows logo are registered trademarks of Microsoft Corporation in the United States and other countries. ViewSonic, the three birds logo, OnView, ViewMatch, and ViewMeter are registered trademarks of ViewSonic Corporation. VESA is a registered trademark of the Video Electronics Standards Association.
Notes on the AC Power Cord AC Power Cord must meet the requirement of countries where you use this projector. Please confirm your AC plug type with the graphics below and ensure that the proper AC Power Cord is used. If the supplied AC Power Cord does not match your AC outlet, please contact your sales dealer. This projector is equipped with a grounding type AC line plug. Please ensure that your outlet fits the plug. Do not defeat the safety purpose of this grounding type plug.
CONTENTS Introduction ................................................................................... 1 Projector Features........................................................................................................ 1 Package Contents........................................................................................................ 2 Projector Overview ....................................................................................................... 3 Using the Product ............
Introduction Projector Features The projector integrates high-performance optical engine projection and a user - friendly design to deliver high reliability and ease of use. The projector offers the following features: Single chip 0.55" Texas Instruments DLP® technology XGA (1024 x 768 pixels) Auto image re-sizing (Auto-Sync.
Package Contents When you unpack the projector, make sure you have all these components: Projector with Lens Cap AC Power Cord VGA Cable (D-SUB to D-SUB) Composite Video Cable S-Video Cable Remote Control (IR) AAA size batteries for remote control User’s Manual Quick Start Guide Projector Carrying Case VGA Component Adapter ViewSonic Save the original shipping carton and packing material; they will comein handy if you ever to ship your unit.
Projector Overview Front View 12 1 11 10 9 2 3 4 5 8 7 6 1 Lens cap 7 AC power socket 2 Elevator button 8 Speaker 3 Lens cap strap 9 Control panel 4 Projection lens 10 Zoom ring 5 Front IR remote control sensor 11 Focus ring 6 Ventilation holes 12 Lamp cover ViewSonic 3 PJD6220/PJD6230/PJD6240
Rear View 2 1 1 2 3 4 3 4 Connection ports Kensington lock Rear IR remote control sensor Ventilation holes Bottom View 1 2 3 1 2 3 Elevator foot Ceiling mount (M4 x L7.5mm) Tilt-adjustment foot ViewSonic This projector can be used with a ceiling mount for support. The ceiling mount is not included in the package.
Using the Product Control Panel LED 1 2 3 4 8 1 2 7 6 5 Lamp (Lamp LED indicator) Refer to “LED Indicator Messages”. Temp (Temperature LED indicator) Refer to “LED Indicator Messages”. Button Function 3 4 5 6 7 8 Four directional buttons Use four directional buttons to select items or make adjustments to your selection. Enter Enter to sub-menu and confirm the menu selection. Activate in Color Setting, Lamp Counter Reset and Factory Default menu operations.
Connection Ports 1 1 1 2 2 3 4 5 6 7 8 9 10 LAN For network control. Audio Out Connect to a speaker or other audio input equipment. 3 2 Computer Out Connect to a computer display, etc. 3 4 Audio In Connect an audio output from video equipment to this jack. 5 4 Computer In Connect image input signal (analog RGB or component) to this jack. 6 5 Computer In Connect image input signal (analog RGB or component) to this jack.
Remote Control 1 2 3 4 5 6 7 8 9 10 11 Power Turn the projector on or off. Four directional buttons -Use four directional buttons to select items or make adjustments to your selection. - The right button acts as Blank Screen function. Cut off the screen temporarily. Press again to cancel the Blank Screen function. 1 11 2 MENU Display or exit the on-screen display menus. 3 Laser Aim the remote at the viewing screen, press and hold this button to activate the laser pointer.
Installing the Batteries 1. Open the battery cover in the direction shown. 2. Install batteries as indicated by the diagram Inside the compartment. 3. Close the battery cover into position. ViewSonic Keep the batteries out of the reach of children. There is a danger of death by accidentally swallowing the batteries. Do not recharge the used batteries or expose the batteries to fire or water. Do not dispose of the used batteries along with household waste.
Remote Control Operation Point the remote control at the infrared remote sensor and press a button. Operating the projector from the front 10 15 5m 5m 7m Operating the projector from the rear 10 15 5m 5m 7m ViewSonic Do not point the laser pointer directly to the people's eyes (especiallyn small children). There is a danger of injuiry to the eyes.
Installation Connecting the Projector 1 VGA Cable (D-Sub to D-Sub) 5 VGA (D-Sub) to HDTV (RCA) Cable 2 Audio Cable 6 S-Video Cable 3 RS-232 Cable 7 Composite Video Cable 4 USB Cable 8 Internet Cable Laptop type 8 2 1 2 ViewSonic Desktop type 1 5 1 3 5 4 6 7 When connecting cable, power cords of both a projector and external equipment should be disconnected from AC outlet. The figure above is a sample connection.
Powering On/Off the Projector Powering On the Projector: 1. 2. 3. Remove the projector lens cap. Complete the AC power cord and peripheral signal cable(s) connections. Press button to turn on the projector. The projector takes a minute or so to warm up. 4. Turn on your source (computer, notebook, DVD, etc.). The projector automatically detects your source. If you are connecting multiple sources to the projector simultaneously, press the Source button.
Adjusting the Projector Adjusting the Projector Height Tilt-adjustment foot Elevator foot Elevator button The projector is equipped with an elevator foot to adjust the image height. To raise or lower the image: 1. 2. To raise or lower the image, press the elevator button and raise or lower the front of the projector. Release the button to lock the adjustment. To level the image on the screen, turn the tilt-adjustment foot to fine-tune the height.
Adjusting Projection Image Size Refer to the graphic and table below to determine the screen size and projection distance. 249.80 124.90 74.94 227.83 49.96 113.92 30.08 68.35 45.57 27.34 1.2m (Min.) 2.0m 3.0m 5.0m 10.0m (Max.) Projection Distance (meters) Wide (inches) Tele (inches) 1.2 30.08 27.34 2 49.96 45.57 3 74.94 68.35 5 124.90 113.92 10 249.80 227.
Menu Operation The projector has multilingual on-screen display menus that allow you to make image adjustments and change a variety of settings.
How to operate 1. 2. 3. 4. 5. 6. Press the Menu button on the control panel or the MENU button on the remote control to open the OSD menu. When OSD is displayed, use S / T to select any feature in the main menu. After selecting the desired main menu feature, press X to enter sub-menu for feature setting. Adjust the settings with W / X. Press the Menu buttonon the control panel or the MENU button on the remote control, the screen will return to the main menu.
Gamma Effect the represent of dark scenery. With greater gamma value, dark scenery will look brighter. Computer Image (Computer Mode) Frequency Adjust the timing of the projector relative to the computer. Tracking Adjust the phase of the projector relative to the computer. H Position (Horizontal Position) Adjust the image left or right within the projection area. V Position (Vertical Position) Adjust the image up or down within the projection area.
Lamp Counter Display the lamp’s elapsed operating time (in hours). Lamp Counter Reset Reset the lamp counter to 0 hours. Power Saving If no operation is performed for a specific period of time, the power to the projector is automatically turned off. Auto Source Automatically scan the input source. ECO Mode Use this function to dim the projector lamp light output which will lower power consumption and increase lamp life.
Network Control Select either RS232 or LAN for network control. If RS232 is selected, user will not able to control the projector via LAN network and vice versa. Network Config DHCP Enable: Assign an IP address to the projector from the DHCP server automatically. Disable: Assign an IP address manually. IP Address Select an IP address. Subnet Mask Select subnet mask number. Gateway Select the default gateway of the network connected to the projector.
Network Control This feature provides the ability to remotely control and manage the projector through the network. Note: 1024x768 viewing resolution is recommended. Preparation: 1. Connect one end of the internet cable to the LAN connector on projector. 2. Connect the other end of the internet cable to an available LAN connector on the RJ45 outlet. 3. Make sure the PC/NB is also connected to the internet. 4. Turn on the projector and computer. There are two ways to connect to the network control: A.
2. Select “Intel Protocol (TCP/IP)” and click “Properties”. 3. Set your IP address on your computer, and click OK. ● Click “Use the following IP address” ● IP address: 10.0.50.105, (set the last number different to the projector IP address). ● Subnet mask: 255.255.0.
4. Enter “http://10.0.50.100/” into the address bar of the web browser and press “Enter” key or click “Go” button. 5. After the connection is completed, the control screen will be as below Authority on the network control of Administrator & User: Item Status Date & Time Setting Control Panel Network Alert Setting Schedule ViewSonic Description Show current projector status and network configuration settings. Date & Time setting by user. Control the projector via network.
Login Enter “http://10.0.50.100/” into the address bar of the web browser and press “Enter” key or click “Go” button. If the administrative and user password is disabled, it will directly go into the Status page. If the Administrative & User password is enabled Select your User Name and enter password to login.
Status Information: All screen images in this manual are shown when you login with the Administrator ID. The image will differ if you login with User ID. Item IP Address Group Name Projector Name System Status Input Source Lamp Hours Filter Hours Projector Status Date(y/m/d) Time Description Show current IP address. Show group name. Show projector name. Show if projector is Power On or Inactive *. Show current input source. Show lamp used hours on current projector.
Control Panel Item Date Setting Time Setting Description Projector Name Update date setting on the projector. Update time setting on the projector. Click “Enter” button to save the settings. Show projector name on the current projector. Power Power On or Power Off the projector via network. Input Source Select input source. Picture Brightness Adjusts the brightness setting. Contrast Adjusts the contrast setting. Color Temperature Selects the color temperature setting.
Video Image Color Adjusts the color setting. Tint Adjusts the tint setting. Sharpness Adjusts the sharpness setting. Audio Volume Adjusts the volume setting. Mute Enable or disable the mute function. Setting Menu Position Adjusts the menu position. Projection Selects the projection setting. Auto Source Enable or disable the auto source function. ECO mode Enable or disable the ECO function. High Altitude Enable or disable the high altitude function.
Network Item Description Network DHCP Assign an IP address to the projector from the DHCP server automatically. Manual Assign an IP address manually. IP Address Setup IP address when DHCP is disable. Subnet Mask Setup subnet mask when DHCP is disable. Gateway Setup gateway when DHCP is disable. DNS Server Setup DNS server address when DHCP is disable. Group Name Create projector group. (Max length: 6 characters) Projector Name Create projector naming of the current projector.
Alert Setting Description Item Email Setting To Setup the mail alert attendee. (Max length: 40 characters) Cc Setup the backup mail alert attendee. (Max length: 40 characters) Subject Setup the subject of the alert e-mail. (Max length: 30 characters) From Setup the sender e-mail address. (Max length: 40 characters) SMTP Setting Server To enter the SMTP server (Mail server) name of the company. For example: mail.viewsonic.
Schedule The schedule function is divided into two scheduling categories, as shown below: Weekly Schedule: defines the date of each week will execute the command Click “Submit” button to create new schedule. To delete schedule, click “Cancel”. Specific Day: defines the month and day that will execute the command. Click “Submit” button to create new schedule. To delete schedule, click “Cancel”.
Logout: ViewSonic 29 PJD6220/PJD6230/PJD6240
Maintenance The projector needs proper maintenance. You should keep the lens clean as dust, dirt or spots will project on the screen and diminish image quality. If any other parts need replacing, contact your dealer or qualified service personnel. When cleaning any part of the projector, always switch off and unplug the projector first. Warning: Never open any of the covers on the projector. Dangerous electrical voltages inside the projector can cause severe injury.
Replacing the Lamp As the projector operates over time, the brightness of the projector lamp gradually decreases and the lamp becomes more susceptible to breakage. We recommend replacing the lamp if a warning message is displayed. Do not attempt to replace the lamp yourself. Contact the qualified service personnel for replacement. ViewSonic The lamp becomes high temperature after turning off the projector with the power button. If you touch the lamp, you may scald your finger.
1. 2. 3. 4. 5. 6. 7. 8. 9. Turn off the projector. If the projector is installed in a ceiling mount, remove it from the mount. Unplug the power cord. Loosen the screw in the side of the lamp cover and remove the cover. Remove the screws from the lamp module, raise the handle, and lift out the module. Insert the new lamp module into the projector and tighten the screws. Replace the lamp cover and tighten the screw. Turn on the projector.
Specifications Display Type Resolution (Pixels) Lens Screen Size Lamp Input / Output Source Speaker Video Compatibility Single 0.55" DLP panel XGA (1024 × 768) Manual Zoom (1.1x) 30” – 250” PJD6220: 180W; PJD6230: 200W; PJD6240: 260W D-Sub 15 pin, S-video, composite video, USB, RS-232, Audio In, Audio Out, LAN (RJ-45 connector) 10 W (5W x 2) NTSC 3.58, NTSC4.43 PAL-60, M, N SECAM, HDTV (480i/p, 576i/p, 720p, 1080i) Scanning Frequency Horizontal Freq. Vertical Freq.
Appendix LED Indicator Messages LED Type Color Status LAMP LED TEMP LED Green Off Flash - The projector is in standby mode. LAMP LED TEMP LED Green Green Solid Flash The projector system has some problems with its fan, so the projector cannot start up. LAMP LED TEMP LED Green Green Solid Solid The lamp is in good condition and is projecting at maximum brightness. LAMP LED TEMP LED Amber Green Solid Solid The lamp has reached its end of life and must be changed soon.
RS-232 Command and Configuration RS232 Serial Remote Control Command Item Description Baud Rate 19200 Parity Bit none Data Bit 8 Stop Bit 1 Assign Port COM1 Comment Power On Command Send String BE, EF, 10, 05, 00, C6, FF, 11, 11, 01, 00, 01, 00 Response 06 Comment Power Off Command Send String BE, EF, 03, 06, 00, DC, DB, 69, 00, 00, 00, 00, 00 Response 06 Source Command Send String BE, EF, 02, 06, 00, 57, D0, 2E, 00, 00, 00, 00, 00 Response 06 Comment Auto-Sync Command Send String BE, EF, 02, 06, 00, 86,
Down (for OSD) Command Send String BE, EF, 02, 06, 00, 0B, D2, 32, 00, 00, 00, 00, 00 Response 06 Comment Left (for OSD) Command Send String BE, EF, 02, 06, 00, DA, D3, 33, 00, 00, 00, 00, 00 Response 06 Comment Right (for OSD) Command Send String BE, EF, 02, 06, 00, 38, D2, 31, 00, 00, 00, 00, 00 Response 06 Comment Blank Screen Command Send String BE, EF, 02, 06, 00, DF, DF, 66, 00, 00, 00, 00, 00 Response 06 Comment Keystone Command Send String BE, EF, 02, 06, 00, 3D, DE, 64, 00, 00, 00, 00, 00 Response
ViewMatch Command BE,EF,03,06,00,38,5A,88,00,00,00,00,00 Send String Response 6 Comment Aspect Ratio Command Send String BE, EF, 03, 06, 00, 0D, DA, 68, 00, 00, 00, 00, 00 Response 06 Comment ECO On Command Send String BE, EF, 03, 06, 00, EF, DB, 6A, 00, 00, 00, 00, 00 Response 06 Comment ECO Off Command Send String BE, EF, 03, 06, 00, 3E, DA, 6B, 00, 00, 00, 00, 00 Response 06 Comment Auto Source On Command Send String BE, EF, 03, 06, 00, 89, DB, 6C, 00, 00, 00, 00, 00 Response 06 Comment Auto Source Off C
Firmware Version Command Send String BE, EF, 03, 06, 00, D5, D9, 70, 00, 00, 00, 00, 00 Response Version Comment System Status Command Send String BE, EF, 03, 06, 00, 04, D8, 71, 00, 00, 00, 00, 00 Response 03 :Projector ON (Normal Mode) Comment Volume Command Send String BE, EF, 02, 06, 00, F8, DC, 71, 00, 00, 00, 00, 00 Response 06 Comment Volume+ Command Send String BE, EF, 02, 06, 00, F1, DE, 68, 00, 00, 00, 00, 00 Response 06 Comment Volume-Command Send String BE, EF, 02, 06, 00, 20, DF, 69, 00, 00, 00
Change to S-Video Channel Command Send String BE, EF, 03, 19, 00, E8, 69, 01, 47, 02, CC, CC, 00 Response 06 Comment Change to Composite Video Channel Command Send String BE, EF, 03, 19, 00, 78, A8, 01, 47, 02, CC, CC, 00 Response 06 Comment Change to HDTV(Y-Pb-Pr) Channel Command Send String BE, EF, 03, 19, 00, DA, 2B, 01, 47, 02, CC, CC, 00 Response 06 Comment Change to Computer2(Analog RGB) Channel Command Send String BE, EF, 03, 19, 1E, 90, 72, 01, 47, 02, CC, CC, 00 Response 06 Comment * The output eff
Compatibility Modes Computer: Compatibility VGA Resolution 640 x 480 SVGA 800 x 600 XGA 1024 x 768 SXGA 1152 x 864 H-Sync [KHz] 31.5 37.9 37.5 43.3 35.2 37.9 48.1 46.9 53.7 48.4 56.5 60.0 68.7 64.0 67.5 60.0 75.0 64.0 47.8 60.3 68.6 49.7 62.8 1280 x 960 WXGA 1280 x 1024 1280 x 768 1280 x 800 V-Sync [Hz] 59.9 72.8 75.0 85.0 56.3 60.3 72.2 75.0 85.1 60.0 70.1 75.0 85.0 70.0 75.0 60.0 75.0 60.0 60.0 74.9 84.8 59.8 74.9 Video: Signal Horizontal Frequency (kHz) 480i 15.
Troubleshooting Refer to the symptoms and measures listed below before sending the projector forrepairs. If the problem persists, contact your local reseller or service center. Please refer to "Indicator Messages" as well. Start-up problems If no lights turn on: Be sure that the power cord is securely connected to the projector and the other end is plugged into an outlet with power. Press the power button again.
Customer Support For technical support or product service, see the table below or contact your reseller. Note : You will need the product serial number. T=Telephone Country/Region Web Site E-mail Australia/New Zealand www.viewsonic.com.au Canada www.viewsonic.com T (Toll-Free)= 1-866-463-4775 T (Toll)= 1-424-233-2533 F= 1-909-468-1202 Europe/Middle East/Baltic countries/North Africa www.viewsoniceurope.com Contact your reseller Hong Kong www.hk.viewsonic.com T= 852 3102 2900 service@hk.
Limited Warranty VIEWSONIC® PROJECTOR What the warranty covers: ViewSonic warrants its products to be free from defects in material and workmanship, under normal use, during the warranty period. If a product proves to be defective in material or workmanship during the warranty period, ViewSonic will, at its sole option, repair or replace the product with a like product. Replacement product or parts may include remanufactured or refurbished parts or components.
Limitation of implied warranties: There are no warranties, express or implied, which extend beyond the description contained herein including the implied warranty of merchantability and fitness for a particular purpose. Exclusion of damages: ViewSonic’s liability is limited to the cost of repair or replacement of the product. ViewSonic shall not be liable for: 1.
Mexico Limited Warranty ® VIEWSONIC PROJECTOR What the warranty covers: ViewSonic warrants its products to be free from defects in material and workmanship, under normal use, during the warranty period. If a product proves to be defective in material or workmanship during the warranty period, ViewSonic will, at its sole option, repair or replace the product with a like product. Replacement product or parts may include remanufactured or refurbished parts or components & accessories.
Contact Information for Sales & Authorized Service (Centro Autorizado de Servicio) within Mexico: Name, address, of manufacturer and importers: México, Av. de la Palma #8 Piso 2 Despacho 203, Corporativo Interpalmas, Col. San Fernando Huixquilucan, Estado de México Tel: (55) 3605-1099 http://www.viewsonic.com/la/soporte/index.htm NÚMERO GRATIS DE ASISTENCIA TÉCNICA PARA TODO MÉXICO: 001.866.823.2004 Hermosillo: Distribuciones y Servicios Computacionales SA de CV. Calle Juarez 284 local 2 Col.