PLED-W500 LED Projector User Guide MPORTANT: Please read this User Guide to obtain important information on installing and using your product in a safe manner, as well as registering your product for future service.
Compliance Information FCC Statement This device complies with part 15 of FCC Rules. Operation is subject to the following two conditions: (1) this device may not cause harmful interference, and (2) this device must accept any interference received, including interference that may cause undesired operation. This equipment has been tested and found to comply with the limits for a Class B digital device, pursuant to part 15 of the FCC Rules.
Important Safety Instructions 1. Read these instructions. 2. Keep these instructions. 3. Heed all warnings. 4. Follow all instructions. 5. Do not use this unit near water. 6. Clean with a soft, dry cloth. 7. Do not block any ventilation openings. Install the unit in accordance with the manufacturer’s instructions. 8. Do not install near any heat sources such as radiators, heat registers, stoves, or other GHYLFHV LQFOXGLQJ DPSOL¿HUV WKDW SURGXFH KHDW 9.
Declaration of RoHS Compliance This product has been designed and manufactured in compliance with Directive 2002/95/EC of the European Parliament and the Council on restriction of the use of certain hazardous substances in electrical and electronic equipment (RoHS Directive) and is deemed to comply with the maximum concentration values issued by the European Technical Adaptation Committee (TAC) as shown below: Proposed Maximum Concentration Substance Actual Concentration Lead (Pb) 0.1% < 0.
Copyright Information Copyright © ViewSonic® Corporation, 2011. All rights reserved. Macintosh and Power Macintosh are registered trademarks of Apple Inc. Microsoft, Windows, Windows NT, and the Windows logo are registered trademarks of Microsoft Corporation in the United States and other countries. ViewSonic, the three birds logo, OnView, ViewMatch, and ViewMeter are registered trademarks of ViewSonic Corporation. VESA is a registered trademark of the Video Electronics Standards Association.
Notes on the AC Power Cord AC Power Cord must meet the requirement of countries where you use this projector. Please FRQ¿UP \RXU $& SOXJ W\SH ZLWK WKH JUDSKLFV EHORZ DQG HQVXUH WKDW WKH SURSHU $& 3RZHU &RUG is used. If the supplied AC Power Cord does not match your AC outlet, please contact your sales dealer. This projector is equipped with a grounding type AC line plug.
Table of Contents Introduction OPTIONS......................................... 34 7 Package Overview ................................. 7 OPTIONS | LED Settings................. 36 Product Overview ................................... 8 OPTIONS | Advanced ...................... 37 Main Unit............................................ 8 Media Arena ......................................... 38 Control Panel ..................................... 9 How to operate ................................
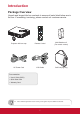
Introduction Package Overview Unpack and inspect the box contents to ensure all parts listed below are in the box. If something is missing, please contact our customer service.
Product Overview Main Unit SOURCE TEMP LAMP 3 MENU onic View S 4 1 5 2 (Front View) LAMP View S onic MENU TEMP SOURCE SD CA RD 6 USB S-VIDE HDMI O 7 VIDEO VGA AV IN MINI USB (Rear View) 9 8 (Bottom View) 1. Focus Ring 6. Power Socket 2. Zoom Lens 7. Input / Output Connection Ports 3. Power Button / LED Indicators 8. Elevator Foot 4. Control Panel 9. Rubber Feet 5.
Control Panel EN M e Vi LAMP U w c ni So SOURCE 1 2 3 4 TEMP 5 6 1. Lamp LED 2. / Power LED 3. Four directional select keys 4. Source 5. Menu 6.
Connection Ports 1 2 3 4 5 6 SD CARD USB HDMI VGA 7 8 S-VIDEO VIDEO 9 AV IN 10 MINI USB 1. Kensington™ Lock Port 2. Power Socket 3. SD Card Reader 4. USB Connector 5. HDMI Connector 6. VGA Connector (PC analog signal/HDTV/component video input) 7. S-Video Connector 8. Composite Video Input Connector 9. Audio/Video Input Connector 10.
Remote Control Power Laser 1 2 1. Power 25 HDMI PC 24 2. HDMI 3. SD/USB 4. Keystone 3 Video SD/USB 23 5. Enter 6. Volume - 4 7. Four Directional Select Keys 5 Enter 6 22 8. Keystone 9. Menu 7 10. My Button 8 9 My Button Menu 11. Previous/Rewind/Fast Forward/ Next Exit 21 12. Play/Pause/Stop 10 13. Freeze 11 14. Blank 12 15. Auto Sync 13 Freeze 14 Blank 15 Auto Sync 20 17. Color Mode Magnify Color Mode 16. Magnify +/- Aspect 19 Source 18 18. Source 19.
Installation Connecting to Computer/Notebook Computer Power socket 3 5 4 S-VIDEO SD CARD USB HDMI VGA VIDEO AV IN MINI USB 6 1 3 2 Notebook 1. Power Cord 4. VGA to DVI-A Cable * 2. HDMI Cable * 5. Audio Cable * 3. VGA Cable 6. USB Cable * (Mini B type to A type) Due to the difference in applications for each country, some regions may have different accessories.
Connecting to Video Sources DVD player, Set-top box, HDTV receiver S-Video output Power socket 5 4 3 S-VIDEO SD CARD USB HDMI VIDEO VGA AV IN MINI USB 1 6 2 DVD player Video output 1. Power Cord 4. Audio Cable * 2. HDMI Cable * 5. S-Video Cable * 3. VGA to HDTV (RCA) Cable * 6. Composite Video Cable * Due to the difference in applications for each country, some regions may have different accessories.
Connecting to Multi-media Devices Power socket 3 2 S-VIDEO SD CARD USB HDMI VGA VIDEO AV IN MINI USB 4 1 Notebook 1. Power Cord 3. USB Flash Drive * 2. SD Card * 4. USB Cable * (Mini B type to A type) Due to the difference in applications for each country, some regions may have different accessories.
Powering On/Off the Projector Powering On the Projector 1. Remove the lens cap. n 2. Securely connect the power cord and signal cable. When connected, the Power /(' ZLOO ÀDVK UHG 3. Turn on the lamp by pressing “ ” button on the control panel or on the remote control. The Power LED will turn blue. o 4. Turn on your source that you want to display on the screen (computer, notebook, video player, etc). The projector will detect the source automatically and will display on the screen. 5.
Powering Off the Projector 1. Press the “ ” button on the control panel or on the remote control to turn off the projector. The following message will be displayed on the screen. Press the “ ´ EXWWRQ DJDLQ WR FRQ¿UP 2. The Power LED will turn red and blink rapidly after the projector is turned off. And the fans will continue to operate for about 30 seconds to ensure that the system cools properly.
Adjusting the Projected Image Adjusting the Projector’s Height The projector is equipped with elevator foot for adjusting the image height. y To raise the image: 8VH VFUHZ LQ IRRW WR UDLVH WKH LPDJH WR WKH GHVLUHG KHLJKW DQJOH DQG ¿QH WXQH the display angle. n y To lower the image: 8VH VFUHZ LQ IRRW WR ORZHU WKH LPDJH WR WKH GHVLUHG KHLJKW DQJOH DQG ¿QH WXQH the display angle.
Adjusting the Projector’s Focus To focus the image, rotate the focus ring until the image is clear. Focus Ring Adjusting Projection Image Size Refer to the graphics and table show as below to determine the screen size and projection distance. y Adjusting the vertical image position Screen Lens Center Projection Distance Projection distance (m) = 1.4 x Screen size (m) x 0.848 Ex.: Projection distance (0.9m)=1.4 x Screen size (0.76) x 0.
User Controls Using the Control Panel EN M e Vi LAMP U w c ni So SOURCE TEMP Description Name Power Turn the projector on/off. Menu Launch the on-screen display (OSD). Source Select an input signal. Four Directional Select Keys 8VH ŸźŻŹ WR VHOHFW LWHPV RU PDNH DGMXVWPHQWV WR \RXU selection. Lamp LED Indicate the projector’s lamp status. Power LED Indicate the projector’s status. Temp LED Indicate the projector’s temperature status.
Using the Remote Control Power Laser 1 25 2 HDMI PC 24 3 SD/USB Video 23 4 5 Enter 6 22 7 8 9 My Button Menu Exit 21 10 11 12 13 Freeze 20 Magnify 14 Blank 15 Auto Sync Color Mode 16 17 20 Aspect 19 Source 18
Description Name 1 Power Turn the projector on/off. 2 HDMI Choose HDMI source. 3 SD/USB Choose SD/USB sources. 4 Keystone Adjust image distortion caused by tilting the projector. 5 Enter &RQ¿UP \RXU LWHP VHOHFWLRQ 6 Volume - Decrease the volume level. 7 Four Directional Select Keys 8VH ŸźŻŹ WR VHOHFW LWHPV RU PDNH DGMXVWPHQWV WR your selection. 8 Keystone Adjust image distortion caused by tilting the projector. 9 Menu Launch the on-screen display (OSD).
On-screen Display Menus The Projector has multilingual On-screen Display menus that allow you to make image adjustments and change a variety of settings. The projector will automatically detect the source. How to operate 1. To open the OSD menu, press the “Menu” button on the remote control or on the control panel. 2. :KHQ 26' LV GLVSOD\HG XVH WKH ŻŹ EXWWRQV WR VHOHFW DQ\ LWHP LQ WKH PDLQ PHQX :KLOH PDNLQJ D VHOHFWLRQ RQ D SDUWLFXODU SDJH SUHVV WKH ź EXWWRQ WR enter sub menu. 3.
Structure Main Menu PICTURE Sub Menu Settings Color Mode Wall Color Brightness Brightest / PC / Movie / Picture / User White / Light Yellow / Light Blue / Pink / Dark Green 0~100 Contrast 0~100 Sharpness 0~31 Saturation 0~100 Hue Advanced 0~100 Gamma 0/1/2 Color Temp.
PICTURE Color Mode 7KHUH DUH PDQ\ IDFWRU\ SUHVHWV RSWLPL]HG IRU YDULRXV W\SHV RI LPDJHV 8VH WKH Ż RU Ź EXWWRQ WR VHOHFW WKH LWHP ` Brightest: Maximum brightness from PC input. ` PC: For computer or notebook. ` Movie: For home theater. ` Picture: For graphic picture. ` 8VHU 8VHU GH¿QHG VHWWLQJV Wall Color Use this function to choose a proper color according to the wall. It will compensate the color deviation due to the wall color to show the correct image tone.
Sharpness Adjust the sharpness of the image. ` 3UHVV WKH Ż EXWWRQ WR GHFUHDVH WKH VKDUSQHVV ` 3UHVV WKH Ź EXWWRQ WR LQFUHDVH WKH VKDUSQHVV Saturation Adjust a video image from black and white to fully saturated color. ` 3UHVV WKH Ż EXWWRQ WR GHFUHDVH WKH DPRXQW RI VDWXUDWLRQ LQ WKH LPDJH ` 3UHVV WKH Ź EXWWRQ WR LQFUHDVH WKH DPRXQW RI VDWXUDWLRQ LQ WKH LPDJH Hue Adjust the color balance of red and green.
PICTURE | Advanced Gamma Effects the representation of dark scenery. With greater gamma value, dark scenery will look brighter. Color Temp. Adjust the color temperature. At higher temperature, the screen looks colder; at lower temperature, the screen looks warmer. Color Space Select an appropriate color matrix type from AUTO, RGB or YUV.
SCREEN Aspect Ratio ` AUTO: Automatically selects the appropriate display format. ` 4:3: This format is for 4×3 input sources. ` 16:9: This format is for 16×9 input sources, like HDTV and DVD enhanced for Wide screen TV. ` 16:10: This format is for 16×10 input sources, like widescreen laptops. Overscan Overscan function removes the noise in a video image. Overscan the image to remove video encoding noise on the edge of video source.
SETTING Language &KRRVH WKH PXOWLOLQJXDO 26' PHQX 3UHVV WKH Ż RU Ź EXWWRQ LQWR WKH VXE PHQX DQG WKHQ XVH WKH Ÿ RU ź EXWWRQ WR VHOHFW \RXU SUHIHUUHG ODQJXDJH 3UHVV “Enter” on WKH UHPRWH FRQWURO WR ¿QDOL]H WKH VHOHFWLRQ Orientation ` ` Desktop Front: This is the default selection. The image is projected straight on the screen. Desktop Rear: When selected, the image will appear reversed. Menu Location Choose the menu location on the display screen.
Signal Refer to page 30. Mute ` Choose “On” to turn mute on. ` Choose “Off” to turn mute off. Volume ` 3UHVV WKH Ż EXWWRQ WR GHFUHDVH WKH YROXPH ` 3UHVV WKH Ź EXWWRQ WR LQFUHDVH WKH YROXPH 3D ` Choose “On” to enable 3D function. ` Choose “Off” to disable 3D function. 3D Invert ` Choose “On” to invert left and right frame contents. ` Choose “Off” to display default frame contents. Advanced Refer to page 31.
SETTING | Signal (RGB) Phase Synchronize the signal timing of the display with the graphic card. If the image DSSHDUV WR EH XQVWDEOH RU ÀLFNHUV XVH WKLV IXQFWLRQ WR FRUUHFW LW Clock Change the display data frequency to match the frequency of your computer’s JUDSKLF FDUG 8VH WKLV IXQFWLRQ RQO\ LI WKH LPDJH DSSHDUV WR ÀLFNHU YHUWLFDOO\ H. Position ` 3UHVV WKH Ż EXWWRQ WR PRYH WKH LPDJH OHIW ` 3UHVV WKH Ź EXWWRQ WR PRYH WKH LPDJH ULJKW V.
SETTING | Advanced Logo Use this function to set the desired startup screen. If changes are made they will take effect the next time the projector is powered on. ` On: The default startup screen. ` Off: No logo is displayed. Closed Caption Use this function to enable close caption and activate the closed caption menu. Select an appropriate closed captions option: Off, CC1, CC2, CC3, CC4. Security Refer to page 32.
SETTING | Advanced | Security Security ` 2Q &KRRVH ³2Q´ WR XVH VHFXULW\ YHUL¿FDWLRQ ZKHQ WXUQLQJ RQ WKH SURMHFWRU ` Off: Choose “Off” to be able to switch on the projector without password YHUL¿FDWLRQ Change Password ` ` First time: y Press WKH Ź EXWWRQ to set the password. y The password has to be 6 digits. y Use number buttons on the remote control to enter your new password and then press “Enter” WR FRQ¿UP LW Change Password: y Press WKH Ź EXWWRQ to input the old password.
3DVVZRUG GHIDXOW YDOXH LV ³ ´ ¿UVW WLPH When you input the password, you must press the “Enter” button and other number button on the remote control at the same time.
OPTIONS Auto Source ` On: The projector will search for other signals if the current input signal is lost. ` Off: The projector will only search current input connection. Fan Mode ` AUTO: The built-in fans automatically run at a variable speed according to the internal temperature. ` High Altitude: The built-in fans run at high speed. The built-in fans run at a high speed. Select this option when using the projector at altitudes approximately 2500 feet/760 meters or higher.
Information Display the projector information for source, resolution, software version, color space and aspect ratio on the screen. Advanced Refer to page 37. LED Calibration Use this function to adjust LED color performance.
OPTIONS | LED Settings LED Hours Used Display the projection time. ECO Mode Choose “On” to dim the projector lamp which will lower power consumption and extend the lamp life. Choose “Off” to return to normal mode. Clear LED Hours Reset the lamp hour counter after replacing the lamp.
OPTIONS | Advanced Direct Power On Choose “On” to activate Direct Power mode. The projector will automatically power on when AC power is supplied, without pressing the “ ” buton on the projector control panel or on the remote control. Auto Power Off (min) Sets the countdown timer interval. The countdown timer will start, when there is no signal being sent to the projector.
Media Arena Media Arena is an interactive PC-less presentation solution. Through SD card reader, USB connector and internal memory, you can easily access various photo, video and music media formats (See format supported table). The stylish user interface gives you the best experience while playLQJ PHGLD ¿OHV How to operate 1. 7R RSHQ WKH 0HGLD $UHQD LQVHUW D 6' FDUG 86% ÀDVK GULYH WR WKH 6' FDUG reader /USB connector on the rear of the projector. 2.
Source Main Menu File Transfer/USB Display Internal Memory USB SD Card Photo Music Video 2I¿FH 5HDGHU Setup Connect PC File Transfer Source Main Menu File Transfer/ USB Display 39
Main Menu Sub Menu Settings 2I¿FH 5HDGHU $OO ,35 LQFOXGLQJ EXW QRW OLPLWHG WR FRS\ULJKW LQ WKH 3LFVHO 3URGXFWV LV RZQHG E\ 3LFVHO VXSSOLHUV 2. The End User may not: y Make copies of the Picsel Products or make them available for use by third parties. y 5HYHUVH HQJLQHHU GLVDVVHPEOH UHYHUVH WUDQVODWH RU LQ DQ\ ZD\ GHFRGH WKH 3LFVHO 3URGXFWV or any copy or part of it in order to derive any source code, save only as is permitted by any applicable law. 3.
Structure Main Menu Sub Menu Photo File List Music File List Video File List Office Reader File List Setup Photo Setting Music Setting Video Setting Settings Display Ratio Auto / Full Slideshow Duration 5 Sec. / 15 Sec. / 30 Sec. / 1 Min. / 5 Min. / 15 Min.
SETUP | Photo Setting Display Ratio Press Ż or Ź to select the display ratio. ` $XWR .HHS RULJLQDO DVSHFW UDWLR DQG UHVL]H WR ¿W KRUL]RQWDO RU YHUWLFDO GLUHFWLRQ RI the screen. ` Full: Fit full screen without keeping the original aspect ratio. Slideshow Duration Press Ż or Ź to select the slideshow duration. Slideshow Repeat ` Choose “On” to repeat slideshow always. ` Choose “Off” to stop slideshow when it goes to the last page.
SETUP | Music Setting Play Mode Press Ż or Ź to select the play mode. ` Once ` Repeat One ` Repeat ` Random Show Spectrum Choose “On” to show the spectrum plot while music is playing.
SETUP | Video Setting Display Ratio Press Ż or Ź to select the display ratio. ` $XWR .HHS RULJLQDO DVSHFW UDWLR DQG UHVL]H WR ¿W KRUL]RQWDO RU YHUWLFDO GLUHFWLRQ RI the screen. ` Full: Fit full screen without keeping the original aspect ratio. Play Mode Press Ż or Ź to select the play mode.
Internal Memory Internal memory is a form of computer data storage. File Transfer File Transfer can transfer your computer’s data to the projector’s internal memory by using a single USB cable (mini B type to A type). Your computer will detect the projector’s “Internal Memory” as a storage device. 1. Press the “Enter” to select “File Transfer”. 2. Connection: Connect the USB cable to the mini USB of projector and USB type A of the computer. 3.
Appendices Troubleshooting If you experience a problem with your projector, please refer to the following information. If a problem persists, please contact your local reseller or service center. Image Problems No image appears on-screen ` Ensure all the cables and power connections are correctly and securely connected as described in the “Installation” section. ` Ensure the pins of connectors are not crooked or broken. ` Check if the projection lamp has been securely installed.
- If the projector is still not projecting the whole image, you will also need to change the monitor display you are using. Refer to the following steps. 1. Select the “Change” under the “Monitor” tab. 2. Click on “Show all devices”. Next, select “Standard monitor types” under the SP box; choose the resolution mode you need under the “Models” box. 3. Verify that the resolution setting of the monitor display is lower than or equal to 1080p.
,PDJH KDV YHUWLFDO ÀLFNHULQJ EDU ` Use “Clock” to make an adjustment. Refer to the “SETTING | Signal” section for more information. ` &KHFN DQG UHFRQ¿JXUH WKH GLVSOD\ PRGH RI \RXU JUDSKLF FDUG WR PDNH LW compatible with the product. Image is out of focus ` Make sure the lens cap is removed. ` Adjust the “Focus Ring” on the projector lens. ` Make sure the projection screen is within the required distance of 1.71-9.84 feet (0.52-3.00 meters) from the projector.
Projector Problems The projector stops responding to all controls ` If possible, turn off the projector, then unplug the power cord and wait at least 20 seconds before reconnecting power. Multi-media Problems USB/SD read fail ` Please make sure the USB device or SD card is good and well inserted. Remove to try for several times if necessary. USB drive fail ` USB does not support USB hub function and which power consumption is over 500mA.
On Screen Messages y 3RZHU RII FRQ¿UP y Fan lock error y No source found y Out of display range y Mute y Thermal sensor error 50
Compatibility Modes y VGA Analog - PC signal Modes Resolution V. Frequency [Hz] H. Frequency [Hz] 640x480 60 31.5 640x480 72 37.9 640x480 75 37.5 640x480 85 43.3 800x600 56 35.1 800x600 60 37.9 800x600 72 48.1 800x600 75 46.9 800x600 85 53.7 1024x768 60 48.4 1024x768 70 56.5 1024x768 75 60.0 1024x768 85 68.7 1280x1024 60 64.0 1280x1024 72 77.0 1280x1024 75 80.0 1280x960 60 60.0 1280x960 75 75.2 1400x1050 60 65.
- Extended wide timing Modes Resolution V. Frequency [Hz] H. Frequency [Hz] 1280x768 60 47.8 1280x720 60 44.8 1280x800 60 49.6 1366x768 60 47.7 1440x900 60 59.9 1680x1050 60 65.3 Modes Resolution V. Frequency [Hz] H. Frequency [Hz] 480i 720x480(1440x480) 59.94(29.97) 15.7 576i 720x576(1440x576) 50(25) 15.6 480p 720x480 59.94 31.5 576p 720x576 50 31.3 720p 1280x720 60 45.0 720p 1280x720 50 37.5 1080i 1920x1080 60(30) 33.8 1080i 1920x1080 50(25) 28.
y HDMI Digital - PC signal Modes Resolution V. Frequency [Hz] H. Frequency [Hz] 640x480 60 31.5 640x480 72 37.9 640x480 75 37.5 640x480 85 43.3 800x600 56 35.1 800x600 60 37.9 800x600 72 48.1 800x600 75 46.9 800x600 85 53.7 1024x768 60 48.4 1024x768 70 56.5 1024x768 75 60.0 1024x768 85 68.7 1280x1024 60 64.0 1280x1024 72 77.0 1280x1024 75 80.0 1280x960 60 60.0 1280x960 75 75.2 1400x1050 60 65.
- Extended wide timing Modes Resolution V. Frequency [Hz] H. Frequency [Hz] 1280x768 60 47.8 1280x720 60 44.8 1280x800 60 49.6 1366x768 60 47.7 1440x900 60 59.9 1680x1050 60 65.3 Modes Resolution V. Frequency [Hz] H. Frequency [Hz] 480i 720x480(1440x480) 59.94(29.97) 15.7 576i 720x576(1440x576) 50(25) 15.6 480p 720x480 59.94 31.5 576p 720x576 50 31.3 720p 1280x720 60 45.0 720p 1280x720 50 37.5 1080i 1920x1080 60(30) 33.8 1080i 1920x1080 50(25) 28.
Multi-media Format Supported Supports JPEG picture formats JPEG Decode Thumbnails preview Supports BMP picture formats Supports MJPEG Video Decode and Movie Formats Supports H263, H264 Supports AVI, MOV movie formats Supports 3gp movie format Supports PCM, ADPCM audio formats Music Formats Supports WMA/OGG/MP3 Supports SD memory card Card Reader Interface Supports SDHC memory card Supports mass storage class USB Interface Supports USB2.
y Video Format File format AVI MKV DIVX Video format DIVX4/5/6 XVID MPEG-2/4 H.264 M-JPEG WMV3 MAX resolution MAX bit rate 1080P 20Mbps Frame rate Audio format Remark 30fps AC3 DTS MPEG1/2/3 PCM ADPCM AAC No support VC-1 AP H. 264 support less than 4 reference frames 30fps AC3 DTS MPEG1/2/3 LPCM AAC H. 264 support less than 4 reference frames - TS MPEG-2 H.264 DAT VOB MPG MPEG MPEG-1 MPEG-2 1080P 20Mbps 30fps MPEG1/2/3 AC3 DTS LPCM MOV MP4 3GP MPEG-4 H.264 H.
Ceiling Mount Installation If you wish to use a third party ceiling mount kit, please ensure the screws which DUH XVHG WR DWWDFK D PRXQW WR WKH SURMHFWRU PHHW WKH IROORZLQJ VSHFL¿FDWLRQV y Screw type: M3 - Diameter: 3 mm - Length: 25 mm Please note that damage resulting from incorrect installation will invalidate the warranty. 51.20 25.89 78.63 61.88 61.00 170.60 41.00 53.13 ViewSonic MENU SO U R C E TE P M M P LA 214.
6SHFL¿FDWLRQV Projection system DLP® Resolution WXGA (1280 x 800) Computer compatibility IBM PC and compatibles, Apple Macintosh, iMac and VESA standards: SXGA, XGA, SVGA, VGA, WXGA Video compatibility NTSC (3.58/4.43), PAL (B/D/G/H/I/M/N), SECAM (B/D/G/ K/K1/L), HDTV (480i, 576i, 480p, 576p, 720p, 1080i, 1080p) Aspect ratio Auto, 4:3, 16:9, 16:10 Displayable colors 1.07 billion colors Projection lens F# 1.5, f = 13.92 mm Projection screen size 30” - 80” Projection distance 0.9 m - 2.
Standard package contents y AC power cord x 1 y VGA cable x 1 y Remote control x 1 y AAA Batteries (for remote control) x 2 y Soft carrying bag x 1 y User’s guide (DVD) x 1 y Quick start card x 1 y Warranty card x 1 'HVLJQ DQG VSHFL¿FDWLRQV DUH VXEMHFW WR FKDQJH ZLWKRXW SULRU QRWLFH 59
Customer Support For technical support or product service, see the table below or contact your reseller. Note : You will need the product serial number. Country/Region Website Australia/New Zealand www.viewsonic.com.au Canada www.viewsonic.com Europe Hong Kong India Ireland (Eire) www.viewsoniceurope. com www.hk.viewsonic.com www.in.viewsonic.com www.viewsoniceurope. com/uk/ www.kr.viewsonic.com T = Telephone Email F = FAX AUS= 1800 880 818 service@au.viewsonic.
Limited Warranty ® VIEWSONIC PROJECTOR What the warranty covers: ViewSonic warrants its products to be free from defects in material and workmanship, under normal use, during the warranty period. If a product proves to be defective in material or workmanship during the warranty period, ViewSonic will, at its sole option, repair or replace the product with a like product. Replacement product or parts may include remanufactured or refurbished parts or components.
Exclusion of damages: ViewSonic’s liability is limited to the cost of repair or replacement of the product. ViewSonic shall not be liable for: 1. Damage to other property caused by any defects in the product, damages based upon inconvenience, ORVV RI XVH RI WKH SURGXFW ORVV RI WLPH ORVV RI SUR¿WV ORVV RI EXVLQHVV RSSRUWXQLW\ ORVV RI JRRGZLOO interference with business relationships, or other commercial loss, even if advised of the possibility of such damages. 2.
Mexico Limited Warranty ® VIEWSONIC PROJECTOR What the warranty covers: ViewSonic warrants its products to be free from defects in material and workmanship, under normal use, during the warranty period. If a product proves to be defective in material or workmanship during the warranty period, ViewSonic will, at its sole option, repair or replace the product with a like product. Replacement product or parts may include remanufactured or refurbished parts or components & accessories.
Contact Information for Sales & Authorized Service (Centro Autorizado de Servicio) within Mexico: Name, address, of manufacturer and importers: 0p[LFR $Y GH OD 3DOPD 3LVR 'HVSDFKR &RUSRUDWLYR ,QWHUSDOPDV &RO 6DQ )HUQDQGR +XL[TXLOXFDQ (VWDGR GH 0p[LFR 7HO KWWS ZZZ YLHZVRQLF FRP OD VRSRUWH LQGH[ KWP NÚMERO GRATIS DE ASISTENCIA TÉCNICA PARA TODO MÉXICO: 001.866.823.2004 Hermosillo: Distribuciones y Servicios Computacionales SA de CV.