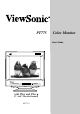
PT775 Color Monitor User’s Guide with Plug and Play 17" (16.
Copyright © ViewSonic® Corporation, 1998. All rights reserved. Macintosh is a registered trademarks of Apple Computer, Inc. Windows is a registered trademark of Microsoft Corporation. ViewSonic, the three birds logo, OnView, ARAG, SonicTron, ViewMatch, and ViewMeter are registered trademarks of ViewSonic Corporation. VESA is a registered trademark of the Video Electronics Standards Association (VESA). DPMS is a trademark of VESA. ENERGY STAR is a registered trademark of the U.S.
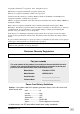
Power Cord Safety Guidelines (continued) AC PLUG CORD PRECAUTIIONS FOR THE UNITED KINGDOM FOR YOUR SAFETY PLEASE READ THE FOLLOWING TEXT CAREFULLY. IF THE FITTED MOULDED PLUG IS UNSUITABLE FOR THE SOCKET OUTLET THEN THE PLUG SHOULD BE CUT OFF AND DISPOSED OF SAFELY. THERE IS A DANGER OF SEVERE ELECTRICAL SHOCK IF THE CUT OFF PLUG IS INSERTED INTO AN APPROPRIATE SOCKET. If a new plug is to be fitted, please observe the wiring code as shown below. If in any doubt, please consult a qualified electrician.
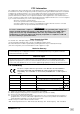
FCC Information This equipment has been tested and found to comply with the limits for a Class B digital device, pursuant to part 15 of the FCC Rules. These limits are designed to provide reasonable protection against harmful interference in a residential installation. This equipment generates, uses, and can radiate radio frequency energy, and if not installed and used in accordance with the instructions, may cause harmful interference to radio communications.
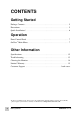
CONTENTS Getting Started Package Contents . . . . . . . . . . . . . . . . . . . . . . . . . . . . . . . . . . . . . . . . . . . . . . 5 Precautions . . . . . . . . . . . . . . . . . . . . . . . . . . . . . . . . . . . . . . . . . . . . . . . . . . . 5 Quick Installation* . . . . . . . . . . . . . . . . . . . . . . . . . . . . . . . . . . . . . . . . . . . . 6 Operation Front Control Panel . . . . . . . . . . . . . . . . . . . . . . . . . . . . . . . . . . . . . . . . . . . . 7 OnView® Main Menu . . . . . .
Getting Started Congratulations on your purchase of a ViewSonic PT775 monitor. Important! Save the original box and all packing material for future shipping needs. NOTE: This product was designed for operation in the magnetic fields of the geographical hemisphere where purchased. Also, the word "Windows®" in this user guide refers to the following Microsoft® operating systems: Windows '95, Windows '95 OSR 2.1, and Windows '98.
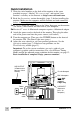
Quick Installation 1 Write the serial number on the back of the monitor in the space provided on page 1 labeled "For your records" and register your monitor's warranty on the Internet at: http//:www.viewsonic.com. 2 Read the Precautions section thoroughly (page 5) before installing the monitor. Make sure the computer and the monitor are both turned off before connecting any cables.
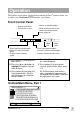
Operation The buttons on the Front Control Panel and the OnView® controls allow you to adjust your ViewSonic PT775 monitor (see below). Front Control Panel • Selects a highlighted option • Shows another control screen • Shows Input Select control screen (page 10) • Displays Main Menu • Exits control screens c Power LED • Scrolls down to highlight option • Decreases value of selected option • Displays Contrast control screen.
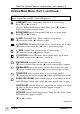
To exit the OnView® menu & save changes, press button [1]. OnView Main Menu, Part 1, continued NOTE: Press [2] to toggle between all controls that appear on the Main Menu in pairs (for example, Contrast/Brightness). CONTRAST adjusts foreground white level of screen image. Press [▼] or [▲] to adjust. Shortcut: Before displaying the Main Menu, press [▼] or [▲] to display the Contrast control screen. BRIGHTNESS adjusts background black level of screen image. Press [▼] or [▲] to adjust. H.
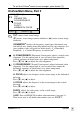
To exit the OnView® menu & save changes, press button [1]. OnView Main Menu, Part 2 MAIN MENU [ 2 ] TILT VIEWMETER CONVERGENCE FOCUS PURITY VIEWMATCH COLOR EXIT: 1 SELECT: 2 TILT rotates entire screen image. [▼] rotates screen image counter-clockwise, [▲] rotates screen image clockwise. VIEWMETER® displays the frequency signal input (horizontal scan and refresh rate) coming from the graphics card in your computer. See your graphics card's user guide for more details.
To exit the OnView® menu & save changes, press button [1]. OnView Main Menu, Part 2, continued VIEWMATCH® COLOR provides four color adjustment options: three preset color temperatures and USER COLOR which allows you to adjust the red, green, and blue individually. NOTE: The factory setting for the monitor is 9300K, the color temperature most frequently used in offices with fluorescent lights. Press [▼] or [▲] to select one of these color controls.
To exit the OnView® menu & save changes, press button [1]. OnView Main Menu, Part 3, continued MOIRE reduces vertical interference patterns that appear as ripples, waves, or unwanted background color textures. Press [▼] and [▲] to minimize interference patterns. NOTE: Interference patterns of this type are most noticeable when viewing images having closely spaced lines or finely detailed patterns.
Other Information Specifications CRT Type Screen Input Signal Video Sync 17" (16.0" viewable) diagonal 0.25mm aperture-grille pitch, 90° deflection ARAG® coating (anti-reflective, anti-glare) TM = 38% RGB analog (0.
Troubleshooting No power • Make sure front Power button (or switch) is ON. • Make sure A/C power cord is securely connected to back of monitor and to a power outlet. • Plug another electrical device (like a radio) into power outlet to verify that outlet is supplying proper voltage. Power on but no screen image • Make sure video cable supplied with monitor is tightly secured to video output port on back of computer.
Cleaning the Monitor • MAKE SURE THE MONITOR IS TURNED OFF. • NEVER SPRAY OR POUR ANY LIQUID DIRECTLY ONTO THE SCREEN OR CASE. To clean the screen 1 Wipe the screen with a clean, soft, lint-free cloth. This removes dust and other particles. 2 If still not clean, apply a small amount of non-ammonia, non-alcohol based glass cleaner onto a clean, soft, lint-free cloth, and wipe the screen. To clean the case 1 Use a soft, dry cloth.
LIMITED WARRANTY VIEWSONIC PT775 MONITORS What the warranty covers: ViewSonic® warrants its products to be free from defects in material and workmanship during the warranty period. If a product proves to be defective in material or workmanship during the warranty period, ViewSonic will at its sole option repair or replace the product with a like product. Replacement product or parts may include remanufactured or refurbished parts or components.
NOTES 16 Other Information ViewSonic PT775
For ViewSonic® Customer Support: U.S. and Canada only 1-800-688-6688 From outside U.S. and Canada 909-869-7976 From Europe + 44 (1293) 643-900 From Asian/Pacific Rim countries 886 (2) 248-4072 Internet E-Mail: vstech@viewsonic.com World Wide Web: http://www.viewsonic.