> Download the vColorTuner Software 1. 2. > Visit ViewSonic’s website to download the vColorTuner software: https://www.viewsonic.com/ After the download completes, install the software. Setup 1. Connect one end of a USB Type A cable to the projector’s service port, and the other end to your laptop. 2. Open the projector’s OSD Menu and go to : SYSTEM > Control Method > USB.
> Create a vColorTuner account 1. 2. Open the vColorTuner software. Sign up for a vColorTuner account. 3. Activate your account via the email link.
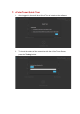
> vColorTuner Quick Tour 1. Once logged in, there will be a Quick Tour to introduce the software. 2. To check the status of the connection with the vColorTuner Server, press the Testing button.
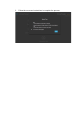
3. Follow the on-screen instructions to complete the process.
> Language The vColorTuner software supports a multi-language OSD. To adjust the language: 1. Select Language. 2. Choose your preferred on-screen language from the list provided, and click OK.
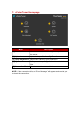
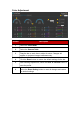
> vColorTuner Homepage Menu Description [1] Download Check, download, and exchange color profiles on the server. [2] Upload Upload color profiles from My Favorites. [3] Color Adjustment Adjust color values to your preference. [4] My Favorites Save your color profile(s) or check downloaded files. [5] Connection Test Check connection status with the server. NOTE: If the connection fails, an “Error Message” will appear and remind you to check the connection.
Download Number 1 2 3 Description Click the Apply button to preview your chosen profile. Click the Download button to save profiles to My Favorites. You may refer to Times to see which file is the most downloaded.
Upload Key in Profile Name and Description, then choose the file you want to upload to the cloud. After completion, you can start to share your file(s) with others.
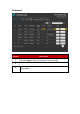
Color Adjustment Number Description 1 Select the Color Mode. 2 Select the Gamma Table. 3 Drag the bar on each item to adjust its value. Changes will appear on projected images instantaneously. 4 Click the Reset button to restore the default settings for the bar. 5 After finishing adjustments, select the Save as Favorite button to save the profile. 6 Select the Reset Setting button to reset all changes and restore the default settings.
My Favorites Here you can find files saved or downloaded from Color Adjustment or Download. To apply the selected profile to the projector, click the Apply button.
> Settings To change the password, select Setting. > Projector Info Selecting Projector Info provides the device information, including: Model Name, Serial Number, and Firmware Version.