DisplayIt!Xpress Installation and User Guide Revision 4.0v06 and above January, 2016 ©2014-2016 Best Wave, LLC Scottsdale, AZ – All Rights Reserved Worldwide Not to be reproduced in whole or part without express written permission.
Corporate Headquarters: Best Wave, LLC 10575 N. 114 Street, Suite 103 Scottsdale, AZ 85259 USA Phone: 480 368-8900 Fax: 480-368-8905 Web site: www.bestwave.com Support: support@bestwave.com Software License Information The Software described herein is the copyrighted property of Best Wave, LLC, Scottsdale, AZ. All users of the Software must agree to be bound by the terms and conditions described on-screen during the installation and activation process.
Table of Contents Chapter 1 – Introduction and Installation Introduction to DisplayIt!Xpress Installation on media players Windows media players Android Media Players Activation Windows players Activation Android players ............................................... 4 ............................................... 5 ............................................... 5 ............................................... 6 .............................................. 15 .......................................
DisplayIt!Xpress Chapter 1 Introduction & Installation DisplayIt!Xpress DisplayIt!Xpress is an exciting new way to create, update, and display content on a network of digital signs – with a simple 1-2-3 interface. “Just add PowerPoint!” is frequently used to describe the simplicity DisplayIt!Xpress. But don’t let the simplicity of DisplayIt!Xpress fool you. It is a powerful system that currently supports 8 categories of media files, specifically: Images – jpg, bmp, pct, tif, and png formats.
DisplayIt!Xpress Chapter 1 Introduction & Installation IMPORTANT NOTE: DisplayIt!Xpress must be connected to the Internet while in operation. It checks with our server several times each day, and if not authorized it will quit. If your security software prevents access to unauthorized web sites, the following sites should be allowed for proper operation: www.bestwave.info tgftp.nws.noaa.
DisplayIt!Xpresss C Chapter 1 Introduction & Installation Insta allation of o Display yIt!Xpress software s on Andro oid media a players A devvices that you y are using as a me edia player((s) must be connected d The Android to th he Internet.. IMPO ORTANT NOTE N for the t ViewSSonic NMP P-302w only To acccess Andro oid on the NMP-302w, N first complete the following 4 steps: hernet settings, and presss the 1.
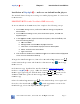
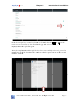
DisplayIt!Xpresss C Chapter 1 Introduction & Installation If an Install Blocked windo ow appearss, press the e Settings button. On the Securities scree en (Settingss screen on n the NMP-3 302w), turn n on the Un nknown Sourcces optionss and press the Ok buttton. Confirm that th he Unknown n Sources optio on has been n enabled. See the sccreen shotss on the nex xt three pa ages for exam mples of settting Unkno own Source es to Enable ed.
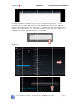
DisplayIt!Xpresss C Chapter 1 Introduction & Installation Andrroid 5: ©2014-20 016 Best Wavve, Scottsda ale AZ – All Rights R Reservved Page 8
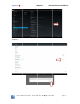
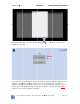
DisplayIt!Xpresss C Chapter 1 Introduction & Installation Presss the Escap pe key on th he keyboard d or the Ba ack button touch screen to o return to the Downlo oads app an nd select th he DispllayItXInstalller.apk file e again. or on the Afterr the Displa ayItXInstalle er.apk file has been successfullyy selected, press the Insta all button in n the first Installer I wiindow and the t Open button b in th he second Insta aller window w.
DisplayIt!Xpresss C Chapter 1 Introduction & Installation In the Installer app, press the Install DisplayIt!!Xpress butto on to continue the allation process. insta First, press the Install buttton on the first Player window and a the Don ne button he second Player P wind dow. Next, press the Install buttton on the first f on th Watccher window w and the Done D butto on on the se econd Watccher window w.
DisplayIt!Xpresss C Chapter 1 Introduction & Installation ©2014-20 016 Best Wavve, Scottsda ale AZ – All Rights R Reservved Page 11
DisplayIt!Xpresss C Chapter 1 Introduction & Installation ©2014-20 016 Best Wavve, Scottsda ale AZ – All Rights R Reservved Page 12
DisplayIt!Xpresss C Chapter 1 Introduction & Installation Afterr the Launccher app ap ppears, folllow the rem mainder of the Android d setup in the “Start “ up and Activation – Androiid Players” section on n page 16.
DisplayIt!Xpresss C Chapter 1 Introduction & Installation Starrt up and Activatio on – Wind dows Play yers When n DisplayItt!Xpress runss, you will see some important information n - like the IP ad ddress of th he compute er that it is running on n. If the IP changes itt may affecct comm munications with the player (dep pending on the updatiing method d in use). f time that t DisplayIt!Xpress iss run, you will w have 60 0 seconds to t enter The first your email addrress.
DisplayIt!Xpresss C Chapter 1 Introduction & Installation Starrt up and Activatio on – Andro oid Playe ers If you will be ussing Android media players with DisplayIt!Xpress, you should nload and install the Managemen M nt Console before settting up you ur players. down When n you first run the Ma anagement Console, yo ou will be prompted p t enter to your activation informatio on.
DisplayIt!Xpresss C Chapter 1 Introduction & Installation Depe ending on the update method choice you se elect, you will w see one e of two scree ens. For LA AN/WAN up pdating, you u will see this t screen next: Write e down the e IP Addresss and MAC Address A of the t player so that you u can enterr this information i n in the Ma anagement Console. Fill F in the email e addre ess with the e same e email add dress you ussed for registration on n the Management Co onsole.
DisplayIt!Xpress Chapter 1 Introduction & Installation Write down the MAC Address of the player so that you can enter this information in the Management Console. Fill in the email address with the same email address you used for registration on the Management Console. Remember email addresses must be entered in all lower case characters. Fill in the Server IP Address, Username, and Password as instructed by the administrator of the server you are using.
DisplayIt!Xpress Chapter 1 Introduction & Installation Activating DisplayIt!Xpress If your email address is not found on our activation server, you will be taken to the software activation screen, which looks like this: Fill out all the fields on the screen. If you have already licensed the software, enter the serial number(s) from your license cards. If you are just trying it out, click the temporary activation button – no serial numbers are required.
DisplayIt!Xpress Chapter 2 Management Console Using the Management Console Installation To install the Management Console, download it from the DisplayIt!Xpress page at www.bestwave.com . It is a standard Windows software application that will run on every Windows operating system from Windows 97 – Windows 10. The installer places a shortcut on your desktop to launch the software.
DisplayIt!Xpresss C Chapter 2 M Manageme ent Console Add d/Edit Displays D s c e Displays (Local ( Area a Networkss only) Searrching for compatible If you have alre eady installled the Disp playIt!Xpress player on n one or mo ore comp puters, and d they are connected c to your loccal network k (in the sam me subnet)), you may m use the “Find Pla ayers” featu ure to disco over them. This will verify v impo ortant inforrmation like e the IP add dress of the e player co omputer.
DisplayIt!Xpress Chapter 2 Management Console The “Enable transition effects…” button will apply a random transition to images as they are displayed. Leaving it off will cut from image to image. Transition effects are only available on Windows media player PCs. Changing Display Information or Deleting Displays To change any information for an existing display, click on the name of the display in the Display List, then make the necessary changes.
DisplayIt!Xpresss C Chapter 2 M Manageme ent Console Man naging Content C t ontent tab The Manage Co M Content tab is divided in nto logical sections ass shown herre: The Manage a buttonss divided in nto three se ections. Th he left secttion is for Across the top are ng, recalling or deletin ng playlistss.
DisplayIt!Xpresss C Chapter 2 M Manageme ent Console Selec cting a Display To se elect a disp play use the e pop-up menu to the right of the Display name n field. Mana aging the Playlist P y will see e the curre ent playlist.. You may add files to o Afterr selecting a Display, you this list l three ways, w drag a file icon from f a Windows Explo orer window w onto the “Dro op Media Filles Here” area, a click the t blue, butto on and type e in a URL.
DisplayIt!Xpresss C Chapter 2 M Manageme ent Console At th he top is the name of the media item you are a working g with. The Duration field will autom matically ha ave the deffault timing g that you set s in the “Add/Edit “ Displlays” tab. Or, if the file name ha as a time in n the front (i.e. 30_slideshow.pp ps) the durration field will have that t timing g in it. You may chan nge the timing for the file here without w cha anging the name n of the file. e propertie es are optio onal.
DisplayIt!Xpresss C Chapter 2 M Manageme ent Console IMPO ORTANT NOTE: N Micro osoft PowerPoint mustt be installed to use the t PowerPo oint duratio on button. ng a Playlisst Savin Thesse buttons are a for saviing a playlist, recalling it for use e later and deleting it when n it is no lo onger neede ed. Saved playlists ca an be place ed on anoth her display. Click king the Savve Playlist button willl show a dia alog box wh here you ca an enter the name e you would d like to usse to save the t playlist.
DisplayIt!Xpresss C Chapter 2 M Manageme ent Console Addiing Widgetss to the Display Thesse buttons are a used to o set up the e operation and placem ment of widgets: Therre are 4 Wid dgets, Cloccks, Weathe er, Calendar, and Text/News Feed ds. Initia ally, all of them t will be b off – which is shown n by the red marker at a the botto om of each h icon. Clicck on any off the icons to add it. When n a Widget is enabled, a green checkmark c w appearr at the botttom of the will e icon..
DisplayIt!Xpresss C Chapter 2 M Manageme ent Console Seleccting the Digital Clock k option alllows you to o select a co olor from the t popup in the properties p window. w In n this case, grey was selected: s So th he clock wo ould look lik ke this on the t screen:: Weatther The weather w ga adget in DissplayIt!Xpreess is extrem mely powerful.
DisplayIt!Xpresss C Chapter 2 M Manageme ent Console First, select one e of the three radio buttons b at the t top, Un nited Statess, Canada, or International. You mayy mix weath her from different sta ates, or eve en differentt coun ntries. In the above ex xample, we e have checcked United d States, se elected the state of Califfornia and chosen c Los Angeles an nd then the e state of New York and selected Centtral Park as our 2nd loccation. You u may selecct up to 5 weather w loccations.
DisplayIt!Xpresss C Chapter 2 M Manageme ent Console Wedn nesday, 23 Septemberr, 2015 and the short date d as 23/ /9/15. The e time woulld be 19:45. There arre buttons to t allow qu uick additio on of date and a time.
DisplayIt!Xpresss C Chapter 2 M Manageme ent Console Posittioning Gad dgets Therre are 8 possitions arou und the scre een that yo ou may position gadge ets. These are shown s as ta argets in the gadget properties window: w e, we have a full set of gadgets in use. You can reposiition by In this example dragg ging from one o target to t another,, or on top of an existting gadget – in which case they will be b switched d with each h other.
DisplayIt!Xpress Chapter 2 Management Console Status Indicator Colors Displays are listed on this screen, with a status color in front of their name that signifies the current status of that display. Green – The display has been communicating, and is updated with the most recent playlist that you set in the Manage Content tab. Yellow – The display has been communicating, but does not have the most recent playlist and gadget information yet.
DisplayIt!Xpress Chapter 2 Management Console Updating Methods There are 5 update methods. 1) Local or Wide-Area Network which works via FTP (File Transfer Protocol) using TCP/IP port 21 on Windows players and TCP/IP port 2221 on Android media players. 2) Pull from FTP server, which works only with Android media players. This uses TXP/IP port 2221 to pull content from an FTP server like Filezilla. You must install Filezilla on the same computer as the Management Console to use this method.
DisplayIt!Xpress Chapter 2 Management Console the player end may correspond to dozens or even hundreds of physical displays on the other end. In that case your display names in the Management Console should be descriptive of the real-world use. For example, you might want to name your displays, “California Factory Floors”, “California Employee Lounges”, “California Main Lobbies”, and so forth.
DisplayIt!Xpresss C Chapter 2 M Manageme ent Console Setttings m go to the t settingss screen byy selecting settings s fro om the DX pop-up p You may menu u in the top p left corne er of any otther screen n: You will w see the e settings screen as sh hown here: s are e divided in nto six area as. We willl discuss ea ach of these e in the The settings following sectio ons.
DisplayIt!Xpresss C Chapter 2 M Manageme ent Console Imme ediate will pop-up a tool t tip within a secon nd and is go ood for beg ginners using g the softw ware for the e first time.. ait 3 second ds before showing a to ool tip, and d is good fo or more Delayyed will wa expe erienced users. w turn offf tool tips for f experie enced users of Display yIt!Xpress.
DisplayIt!Xpresss C Chapter 2 M Manageme ent Console Thesse settings are a decided d by your network n adm ministratorr. Best Wavve does nott have e the abilityy to trouble eshoot thesse settings with w clientts, so please e don’t ask k! Some e networks will not evven allow emails e to be e sent from m applicatio ons this wayy, in wh hich case th his feature will not work. A worrkaround may be to usse an emaill forw warding servvice.
DisplayIt!Xpress Chapter 3 Media Creating Media Images Image files in multiple formats are supported. These include JPG, PNG, PCT, TIF, and BMP. PNG is actually the best overall format with high image quality and a small size that takes up less room on the display PC. Make sure that the edges of your images are not pure white, or DisplayIt!Xpress will cut them off during the import process. An easy way to do this is to add a thin color border, or a small dot in two of the corners of the image.
DisplayIt!Xpress Chapter 3 Media Excel (Windows PC Players only) You may use any Excel spreadsheet as content with DisplayIt!Xpress including Macro Enabled sheets (.xlsm). The sheet that will be shown on the display is the one that was showing when the spreadsheet was saved. For that reason it is a good idea to make a sheet specifically for this purpose. Macros do not run on the player because Excel Viewer does not allow them.
DisplayIt!Xpress Chapter 3 Media PDF documents (Windows PC Players only) DisplayIt!Xpress supports the use of Adobe PDF (Portable Document Format) files. It is important to realize that the PDF format is not optimal for digital signs. When a PDF comes onto the screen, controls will appear momentarily, which is not optimal in this environment. Also, Adobe Reader (which is what displays PDFs on screen), will not stretch smaller documents to fit the screen.