IMPORTANT! For all technical support issues, or if anything is missing as listed under Package Contents in this user guide, please contact ViewSonic before returning the product. See the Customer Support table in this guide for contact information.
Contents Getting Started Package Contents .................................................................. Optional Accessories .............................................................. Optional Warranties/Insurance ............................................... Precautions ............................................................................ 2 2 2 3 Knowing Your V1250 V1250 Tour ............................................................................. 4 Front View .....................
Battery Pack ........................................................................... 20 The Lithium-Ion Battery ....................................................... 20 Charging the Battery and Charging Time ............................ 20 Checking the Battery Level ................................................. 21 Prolonging the Battery’s Life and Usage Cycles ................. 21 Battery Warning .................................................................. 22 Removing the Battery Pack ......
Appendix Specifications ......................................................................... 54 Customer Support .................................................................. 55 Cleaning and Maintenance ..................................................... 56 DISCLAIMER ...................................................................... 56 Limited Warranty .................................................................... 57 Safety Guidelines ..................................................
Copyright © ViewSonic Corporation, 2003. All rights reserved. ViewSonic and the three birds logo are registered trademarks of ViewSonic Corporation. Microsoft, Windows, the Microsoft Internet Explorer logo graphic, Outlook, DirectX, DirectSound, Microsoft Word, MSN, Excel, and the Windows logo are either registered trademarks or trademarks of Microsoft Corporation in the United States and/or other countries. Wi-Fi is a registered trademark of Wireless Ethernet Compatibility Alliance (WECA).
Getting Started Congratulations on your purchase of a ViewSonic Convertible Tablet PC V1250. The V1250 is a fully functional PC with built-in LAN, and Wi-FiTM wireless connectivity. With your V1250 you will be able to organize and access important business and personal information. In addition, you will be able to send and receive e-mail and access the Internet. This user guide will help you set up your V1250 and introduce you to its many features.
Precautions • For best viewing conditions view the screen from a distance of 15" to 18". • NEVER REMOVE THE REAR COVER. Your V1250 contains high voltage parts. You may suffer serious injury if you touch these parts. • Avoid exposing the screen to direct sunlight or another heat source. The screen should be facing away from direct sunlight to reduce glare. • Always handle your V1250 with care; dropping your V1250 could void the warranty.
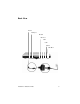
Knowing Your V1250 V1250 Tour This section shows the following views of visible ports and buttons: Front View Back View Left View Bottom View Front View Open latch LCD Display Microphone Security Key (Ctrl-Alt-Del) Wireless On/Off Charging status Rotate HD access Wireless ON/OFF Journal Sleep Power Auto-brightness sensor ViewSonic Tablet PC V1250 4
Back View DC IN VGA port Modem Ethernet USB USB Mic IN Audio OUT ViewSonic Tablet PC V1250 5
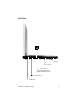
Left View Stylus slot PC card slot SD Secure Disk, or MS Memory Stick slot, or MMC Multi Media Card IEEE 1394 Firewire Power ON latch ViewSonic Tablet PC V1250 6
Bottom View Battery Pack Latch Battery Pack Compartment Screw Memory Expansion Slot Hard Drive Expansion Slot Docking Station Port Connection ViewSonic Tablet PC V1250 7
Converting to a Tablet To convert the V1250 to a tablet, do the following. 1. Push in and slide the latch to the left while gently opening the display screen. Open the display to a vertical position as shown below. 2. Turn the display screen clockwise around in a half circle until you see the back of the display.
3. Press and slide the latch to the right. 4. Align the two white marks shown below as you close the display flat against the keyboard and the tablet clicks into place. 5. Now you have a Tablet PC. For more information on using the Tablet PC, see the V1250 User Guide.
Performance Features High Performance Processor The V1250 is equipped with a Mobile Intel® Pentium M Processor. Intel 855 GM with 400 MHz Processor Side Bus. Meets Intel Centrino convertible tablet platform criteria with 12.1 LCD and EM type digitizer. Convert to PC Innovative and patented convertible notebook-to-tablet PC design. Input Supports inking and pen input for easy note-taking, form-filling, and e-book application. BIOS-level signature verification (written password) for security.
Bright LCD Touch-screen Display The system is equipped with 12.1 inch TFT XVGA touch-screen display panel for clear text and brilliant colors. Built-in light sensor for auto-adjustment of LCD brightness to save battery life. Wireless LAN, Fast Ethernet and Modem Connectivity For network access capability, the V1250 provides a built-in Wi-Fi LAN adapter, a Fast Ethernet adapter, and a 56K modem.
Software Included • Windows® XP Tablet PC Edition which includes: • Microsoft® Internet Explorer • Microsoft Outlook Express • Microsoft Windows Media Player • Adobe Acrobat Reader • Microsoft eBook Reader • Citrix® ICA® Client • Colligo Software – Eval • Franklin Planner – Eval • Alias Wavefront – Eval • Panda AntiVirus – Eval • Power One Finance Calculator • Zinio Reader – Eval Indicators – LED Status Indicators The LED Status Indicators on the top of the V1250 display the operating status of your V1250.
Using the Keyboard For more information, see the Special Keys – Function Table below.
Using the Touch Pad The Touch pad shown below acts like a mouse with special control keys.
Storage Hard Disk Drive Your V1250 offers a user-removable Hard Disk Drive. To replace, do the following: 1 Using a medium-size screwdriver, remove the screw holding the HD Bay cover. 2 Carefully remove the cover to expose the Hard Drive then slow pull it out using the plastic tab provided. 3 Remove the two screws holding the Hard Drive holder. 4 Install the Hard Drive holder to the new hard drive and replace the screws. 5 Replace the HD Bay cover and re-install the screw.
Display Your V1250 uses a high performance 12.1-inch active matrix TFT panel that will display millions of colors at 1024 x 768 resolution. Caution: Do not place heavy objects on the LCD panel. Doing so may damage the display. Extending the Life of the TFT Display Device Observe the following guidelines to maximize the life of the display. 1 Set the Brightness to the lowest comfortable setting. 2 When working at your desk, connect your V1250 to an external monitor and disable the internal display.
4 Click Apply or OK. Screen Rotation To rotate the screen from Portrait to Landscape mode or vice versa, press the Rotate button ( ) on the Tablet PC. See the Front View shown earlier in this user guide.
XP Control Panels Your V1250 running on XP has two ways to view the Control Panel as shown below: the Category View and the Classic View.
Audio Adjusting the Audio Adjust Windows® audio features by pressing [Fn] on your keyboard and the up key [ ] or [Fn] and the down key [ ]. Or, from the speaker symbol in the task bar or the control panel. For more information on keyboard shortcuts including Mute audio, see the Special Function Key table.
Battery Pack The Lithium-Ion Battery Your V1250 uses a removable Lithium-Ion battery pack that provides power when you don’t have access to an AC outlet. Handling Tips • Do not touch the metal ends of the battery connector. • Do not expose battery packs to temperatures below 32 degrees Fahrenheit (0 degree Celsius) or above 140 degrees Fahrenheit (60 degrees Celsius). Doing so may adversely affect the battery pack.
Checking the Battery Level You can check the remaining battery power in the Windows® battery status indicator located at the lower right-hand corner of the task tray as shown on the right. The Battery Status icon only appears in the task tray while the unit is running on battery power but not while the unit is running off an external power source through the AC Adapter. You can also access the power meter by clicking the Power Options icon in the Windows Control Panel.
Battery Warning Low Battery Warning The low battery condition occurs when the Battery Power falls to 6%. At this point, a Warning Bubble appears from the task tray along with a short beep as a reminder. Critical Battery Warning The Critical Battery Warning occurs when the Battery Power falls to 3%. At this point, a Warning Bubble appears on the Task Tray along with a short beep.
Removing the Battery Pack To remove the Battery Pack 1 Lay the Tablet PC face down on a soft flat surface such as a towel on a table top. CAUTION: Do not scratch the LCD display screen. 2 Slide the Battery Latch to the left as shown below. Put your thumb in the Battery thumb hole and pull the Battery Pack out.
Windows XP Power Management In addition to the V1250’s built-in power management BIOS utility, Windows® XP also offers a similar power management feature. To access this feature, click the Windows Start button > Control Panel > Performance and Maintenance > Power Options. The Power Options Properties screen appears as shown below. The Windows power management allows you to enter time-out values for the display and hard disk.
Power Saving Options When battery power reaches critical low (3% remaining), the system enters either one of the two power saving modes: • Stand By mode • Hibernate Mode - Save To Disk Stand By Mode In Stand By mode, hardware devices, such as display panel and hard disk, are turned off to conserve energy. Click Start > select Turn Off Computer > click Stand By. To use the V1250 again, press the Power On button.
Using your V1250 Initial Setup 1 Charge the battery With the V1250 still turned off, let the battery fully charge the first time for up to 2.5 hours. Open the unit as shown in the one-page insert that came in the package. Caution: The battery’s overall life may be impacted if the battery is not fully charged before using the V1250. (1) Align the notches in the battery compartment as shown below. (2) Gently press the battery down into the battery compartment until it clicks into place.
2 Connect the power cord (1) With the V1250 turned off, plug AC/DC Adapter to the Power Port on the back of the Tablet PC. (2) Plug in Power Cord to AC/DC Adapter. (3) Plug the power cord into an AC wall outlet. 3 AC Plug LED 1 DC-IN Connector 2 AC Adapter AC Power Cable AC Adapter DC-IN Connector The DC-in connector inserts into the power jack on the V1250. LED The LED light on the top of the adapter appears green when the V1250 is plugged into an AC power source.
3 Turn the V1250 on Slide the Power ON button. Slide the power on button once to turn the unit on. If the unit is already on, then sliding the button powers the unit off. When the V1250 is plugged into an AC power outlet, the battery charges as you use the V1250. For more information, see the Battery Power and Management section and Connecting the Battery section in the user guide.
Booting up for the first time To get started with your V1250, do any or all of the following: 1 To familiarize yourself with the features and parts of the V1250, see the V1250 Features section in this guide. 2 For more information on using the V1250, click on Start > All Programs > Tablet PC > Tablet PC Tutorials, or 3 Go to Microsoft Help. 4 To see the User Guide, go to your hard drive on C:\V1250\UG.
Calibrating the touch screen Although your touch screen is already factory-calibrated, there may be times when the V1250 screen will need to be recalibrated for higher accuracy. The touch screen is a thin membrane on top of the LCD display that responds to mechanical pressure on the screen’s surface. The cursor on the screen is controlled using the stylus. If you notice the stylus tip touch-point not matching up with the cursor, you can recalibrate the touch screen.
Connectivity For information on the ports, see the previous sections on the Back View and Side View. Modem Your V1250 comes equipped with a 56 Kbps V.90 internal fax/ modem. This enables you to access networks and to send and receive e-mail through a standard telephone line. Connecting the Modem 1 Plug one end of the phone line into the modem port located on the back of the V1250. See the figure of the Back View in this user guide. 2 Plug the other end of the line into an analog phone wall outlet.
2 Connect the other end of the cable to either an Ethernet outlet jack or to an RJ-45 port on a UTP concentrator or hub in the network. Cabling Restrictions for Networks The following restrictions should be observed for 100BASE-T networks: • The maximum cable run length should be 100 meters (328 feet). • For 100 Mbps operation, use Category 5 wiring and connections. Consult a Windows® manual for the software installation, configuration, and operation of the network.
USB Your V1250 offers 2 High Speed USB 2.0 ports that allows you to connect USB compliant devices such as Mice, Keyboards, Cameras, External Hard/Optical Drives, etc. 1394 Firewire Your V1250 has a 1394 Firewire port that allows you to connect IEEE 1394 compliant devices like Digital Video Cameras, External Hard/Optical Drives, etc. Expansion PC Card The V1250 offers a Type II PC card slot that supports CardBus and PCMCIA compliant devices.
Upgrading the System Memory Many applications will run faster when the system’s memory capacity is increased. The V1250 provides one expansion socket located on the back of the system. You can increase memory by adding a Small Outline Dual In-line Memory Module, commonly known as a SODIMM. Module capacity can be 256 MB or 512 MB. Note: Your V1250 has been tested with a wide range of memory products on the market. However, not all memory modules are compatible. Go to www.viewsonic.
4 Locate the memory expansion slot cover on the back of the Tablet PC shown below. Remove the screw. Lift the memory door off the system. Attention: Notice the notch on the extracted module. The notch’s off-center placement allows the module to fit into the socket only in one orientation. The replacement module will be similarly notched to help you place it properly into its slot. To install the new module, place it into the memory socket. The module will only fit in one orientation.
Security IMPORTANT! It is highly recommended that both Numeric and Written passwords are set up. Using the Security Lock Use a standard Kensington lock. Using Passwords Using Passwords in Windows You can setup Windows XP to enable the password protection feature: 1 Click on Start->Control Panel->User Accounts 2 Click on your User Name and then click on Create a Password. 3 Follow the directions on screen and click create password. Your Windows account is now password protected.
e. Click OK. Your BIOS level numeric password is now set. 4 Setting up a Signature Password a. Turn the V1250 ON and then tap on the screen using the stylus when the ViewSonic Bird Logo comes up. b. On the drop down menu, select Change Password. c. Select Written Password. d. Using your Stylus, enter your signature and click Learn. Do this 5 times. e. Your Signature Authentication is now set.
Using Accessories Accessories are optional and can be purchased through our website or an authorized retailer. Docking Station Tablet PC Docking Station AC Power Adapter with power cord(s) (depends on region where purchased) 1 Connect the AC Power Adapter The Docking Station allows you to run your Tablet PC from a standard AC power outlet. Connect the AC adapter and power cord as shown below.
2 Connect peripheral devices The Tablet PC Dock adds one-touch access to common computer peripherals, network connectivity, integrated CDROM and AC adapter. For more information see the User Guide that came with your Tablet PC.
4 Dock the Tablet PC Set the Tablet PC down on the Docking Station aligning with the four guides shown below. Press the Tablet down onto the docking station until it clicks into place.
5 Recharge the spare battery Slide the battery into the Docking Station. Usage Charge LED Status Battery Charged System (low) OFF System Battery Ext. battery (low) ON (charging) OFF (Full) Ext. Battery System (low + Ext. Battery (low) OFF (charging system) ON (charging ext. battery OFF (both full) System Battery will charge first to full then switch to the Ext.
Troubleshooting An Initial Check List Check out these items first: Check to see if the problem persists when all the external devices are removed. Check to see that the green light indicator on the AC adapter is lit. Check to see that the power cords are completely and firmly plugged to the wall outlet and to the V1250. Check to see that the V1250 power indicator is on. Check for any incorrect or loose cable connections. Make sure the latches on the connectors catch securely at their receptacles.
Audio Problems Speaker - no output • The Audio-output may have been set to mute. Double-click the speaker icon in the task tray to see if the speaker has been muted. • Most audio problems are softwarerelated. Sound cannot be recorded Check the Mute Setting - Doubleclick the speaker icon on the lower right corner of the task tray to see if the microphone might have been muted. 1 From the Volume Control screen, click Options and select Properties. 2 Select Recording and click OK.
Abnormal Sounds ViewSonic Tablet PC V1250 If the hard drive is making abnormal whining noises: • Archive files or programs that you no longer use by moving them to an alternate storage medium (floppy disk, optical recordable disk, tape, etc.) or uninstall programs that are no longer used. • Many browsers store files on the hard drive as a cache to speed up the performance. Check the program’s Online Help for instructions on decreasing the cache size or on removing temporary Internet files.
Drive is Full If the hard disk drive has reached its capacity: • Archive files or programs that you no longer use by moving them to an alternate storage medium (floppy disk, optical recordable disk, tape, etc.) or uninstall programs that are no longer used. • Many browsers store files on the hard drive as a cache to speed up the performance. Check the program’s Online Help for instructions on decreasing the cache size or on removing temporary Internet files.
Display Problems If the display panel remains blank (black) when the system is turned on: Make sure the V1250 is not in the power saving mode (Stand By). In these modes, the display is turned off to conserve energy but not the system. A steady green Power LED shows that the system is on but the display is in stand by. To wake up the system, press the power button. For more information, see The Power On/Power Management Button section.
Screen is Difficult to Read The display resolution should be set to 800 x 600 for optimal viewing. If an external monitor is connected, you can change the resolution from the Category View or the Classic View. See the section XP Control Panels about both views. From the Classic View 1 Click Start > click Control Panel > double-click the Display icon. The Display Properties screen appears. 2 Click the Settings tab > Advanced > Adapter tab > List All Modes. Select a resolution > click OK three times.
Memory Problems Increased Memory is not Recognized Insufficient Memory Error Message ViewSonic Tablet PC V1250 If the boot up screen does not show additional memory installed: • Certain brands of memory module may not be compatible with your system. Go to www.viewsonic.com for a list of compatible SODIMM. • The memory module may not have been installed properly. Go back to the memory section to review the details of this operation. • The memory module may be defective.
Modem Problems Connection Difficulties • Be sure to disable Call Waiting. • Excessive line noise might cause the connection to be dropped. To check line noise, put the regular phone handset on the line and place a phone call. If you do hear abnormal noise, try to make the modem connection with a different line or contact your local telephone company for service.
PC Card Problems 100 Mbps Mode Nonresponsi ve If the Ethernet adapter does not appear to operate in the 100 Mbps transmission mode: • Make sure the hub you are using supports 100 Mbps operation. • Make sure that your RJ-45 cable meets the 100BASE-T requirements. • Make sure the Ethernet cable is connected to the hub socket that supports 100BASE-T mode, not 10BASE-T. The hub may have both 10BASE-T and 100BASE-T sockets.
Performance Problems PC Card Removal Locks Up Windows If Windows Crashes or Freezes after removing the PC Card: Make sure the PC Card is not in use before removing it. Click on the PC Card icon at the lower right corner of the task tray, select the card you wish to stop, then click OK. In a few seconds, Windows will prompt you to remove the card.
Program Slowing If the program appears stopped or runs very slowly: • Press the Security Key button (CTRL+ALT+DEL) then click on the Task Manager to see if the application is still responding. • Restart the V1250. • This may be normal for Windows when it is processing other CPUintensive programs in the background. • You may be running too many applications. Try to close some applications or increase available system memory for higher performance.
Printing Problems Recharge Failure The battery does not charge: • Make sure the AC adapter is plugged into a working power source. • The battery charge indicator LED on the V1250 should be lit when you plug in the AC adapter. • Make sure the battery module is fully inserted in its bay and that the battery latch is in its locked position. • If the battery is operating at a very high temperature, it may not accept a charge. Sleep Mode The screen does not come out of sleep mode.
Appendix Specifications Processor Processor Core Logic Chipset Mobile Intel® Pentium M Processor 1GHz ULV or higher: 1MB Level 2 Cache on die Intel 855GM with 400 MHz Processor Side Bus and ICH4 Southbridge Meets Intel Centrino Platform criteria Storage Capacity Hard Disk Drive 30GB or higher Enhance-IDE Hard Disk drive Patented HDD Shock Protection Design Optional External Combo Optical Drive IEEE1394 Compliant System Memory Memory Type SDRAM PC2100/PC2700 2.
Environmental Temperature Operating: 5° ~ 35°C (41°~ 95°F) Non-operating: -10° ~ 60°C (-4° ~140°F) Humidity Operating: 10% ~ 90% Non-operating: 10% ~ 90% Altitude Operating: 0 ~ 3000m; Non-operating: 0 ~ 12,000m Shock Operating: 25G/3ms; Non-operating: 180G/3ms Vibration Operating: 0.4G; Non-operating: 0.8G Note: Product Specifications are subject to change without notice. Customer Support For technical support or product service, see the table below or contact your reseller.
Cleaning and Maintenance • Make sure the V1250 is turned off. • Never spray or pour any liquid directly onto the screen or case. • Never immerse the V1250 in any liquid. To clean the screen 1 Wipe the screen with a clean, soft, lint-free cloth. This removes dust and other particles. 2 If still not clean, apply a small amount of non-ammonia, non-alcohol based glass cleaner onto a clean, soft, lint-free cloth, and wipe the screen. To clean the case 1 Use a soft, dry cloth.
Limited Warranty Tablet PC Products What the warranty covers: ViewSonic® warrants its Tablet PC products to be free from defects in material and workmanship during the warranty period. If a Tablet PC product proves to be defective in material or workmanship during the warranty period, ViewSonic will, at its sole option, repair or replace the product with a like product. Replacement product or parts may include remanufactured or refurbished parts or components.
Safety Guidelines CAUTION: The socket-outlet should be installed near the equipment and be easily accessible. CAUTION: Use a power cable that is properly grounded. Always use the appropriate AC cord that is certified for the individual country. Some examples are listed below: USA................. UL Canada............. CSA Germany .......... VDE Switzerland ..... SEV Britain ............. BASE/BS Japan ...............
Compliance and Safety Notices Radio Frequency Interference (RFI) Compliance United States Compliance Notice This equipment has been tested and found to comply with the limits for a Class B digital device, pursuant to Part 15 of the Federal Communications Commission (FCC) Rules. These limits are designed to provide reasonable protection against harmful interference in a residential installation.
European Compliance Notice Products with the CE Marking comply with both the EMC Directive (89/336/ EEC) and the Low Voltage Directive (73/23/EEC) issued by the Commission of the European Community.
Safety Notices Battery Safety Notice • • • • • • • • • The battery pack is intended for use only with this device. Do not disassemble the pack. Do not dispose of the battery pack in fire or water. To avoid risk of fire, burns, or damage to your battery pack, do not allow a metal object to touch the battery contacts. Handle a damaged or leaking battery with extreme care. If you come in contact with the electrolyte, wash the exposed area with soap and water.
ViewSonic Corporation