
User Guide


4
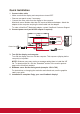
Quick Installation
1. Connect video cable
• Make sure both the display and computer are turned OFF.
• Remove rear panel covers if necessary.
• Connect the video cable from the display to the computer.
Macintosh users: Models older than G3 require a Macintosh adapter. Attach the
adapter to the computer and plug the video cable into the adapter.
To order a ViewSonic
®
Macintosh adapter, contact ViewSonic Customer Support.
2. Connect power cord (and AC/DC adapter if required)
D-Sub
Audio in
HDMI
Power Cord
3. Turn ON the display and computer
Turn ON the display, then turn ON the computer. This sequence (display before
computer) is important.
NOTE: Windows users may receive a message asking them to install the INF
file. To download the file, visit the “Download” section of the monitor product
page on the ViewSonic website.
4. Windows users: Set the timing mode (example: 1024 x 768)
For instructions on changing the resolution and refresh rate, see the graphics
card’s user guide.
5. Installation is complete. Enjoy your new ViewSonic display!