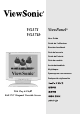
VG171 VG171b ViewPanel® User Guide Guide de l’utilisateur Benutzerhandbuch Guía del usuario Guida dell’utente Guia do usuário Användarhandbok Käyttöopas Руководство пользователя Podręcznik użytkownika With Plug & Play Full 17.
Contents Product Registration..............................................................2 For Your Records ..................................................................2 Getting Started Package Contents .................................................................3 Precautions ...........................................................................3 Quick Installation ...................................................................4 Using the ViewPanel Setting the Timing Mode ...........
Copyright © ViewSonic Corporation, 2002. All rights reserved. Macintosh and Power Macintosh are registered trademarks of Apple Computer, Inc. Microsoft, Windows, Windows NT, and the Windows logo are registered trademarks of Microsoft Corporation in the United States and other countries. ViewSonic, the three birds logo, OnView, ViewMatch, and ViewMeter are registered trademarks of ViewSonic Corporation. VESA is a registered trademark of the Video Electronics Standards Association.
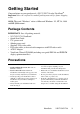
Getting Started Congratulations on your purchase of a VG171/VG171b color ViewPanel®. Important! Save the original box and all packing material for future shipping needs. NOTE: The word “Windows” refers to Microsoft Windows ‘95, NT, 98, 2000 and ME (Millennium). Package Contents IMPORTANT: Save all packing material. • VG171/VG171b ViewPanel • Quick Start Guide • U.S.
Quick Installation 1 Connect video cable Make sure both the ViewPanel® and computer are turned OFF. • Remove the lower back cover and lift up the upper back cover. • Connect the video cable to the computer then to the ViewPanel. Both analog and digital ports are available on the back of the ViewPanel for your convenience. Macintosh users: Models older than G3 require a Macintosh adapter. Attach the adapter to the computer and plug the video cable into the adapter.
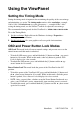
Using the ViewPanel Setting the Timing Mode Setting the timing mode is important for maximizing the quality of the screen image and minimizing eye strain. The timing mode consists of the resolution (example 1280 x 1024) and refresh rate (or vertical frequency — example 60 Hz). After setting the timing mode, use the OnView® controls to adjust the screen image.
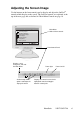
Adjusting the Screen Image Use the buttons on the front control panel to display and adjust the OnView® controls which display on the screen. The OnView controls are explained at the top of the next page and are defined in "Main Menu Controls on page 10. Auto Image Adjust Main Menu With OnView controls Contrast / Brightness Manual Image Adjust Color Adjust Advanced Menu Setup Menu Memory Recall Front Control Panel Displays, saves changes to, and exits the Main Menu.
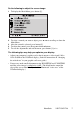
Do the following to adjust the screen image: 1 To display the Main Menu, press button [1]. 2 To select a control you want to adjust, press ▲ or ▼ to scroll up or down the Main Menu. After the control is selected, press button [2]. To adjust the control, press the up ▲ or down ▼ buttons. To save the adjustments and exit the menu, press button [1] twice.
Main Menu Controls Adjust the menu items shown below by using the up ▲ and down ▼ buttons. Control Explanation Auto Image Adjust automatically sizes, centers, and fine tunes the video signal to eliminate waviness and distortion. Press the [2] button to obtain a sharper image. NOTE: Auto Image Adjust works with most common video cards. If this function does not work on your ViewPanel display, then lower the video refresh rate to 60 Hz and set the resolution to its pre-set value.
Control Explanation Color Adjust displays the Color Adjust Menu explained below. Color Adjust provides three color adjustment modes (color temperature, user color, gamma). Color temperature – improves colors including skin tones. 9300K – for a colder, more blue image. 6500K – for a warmer, more red image. 5400K — Adds green to the screen image for a darker color. 5000K — Adds blue and green to the screen image for a darker color. User Color – Individual adjustments for red, green, and blue.
Control Explanation Scaling adjusts the video input signal to the screen size using the following options. 1:1 adjusts the video signal so that the height and width of the picture are the same. Fill all adjusts the video signal to fill the screen. Fill Aspect Ratio maintains the correct video signal proportions for different resolutions. Sharpness adjusts the clarity and focus of the screen image. Backlight extends the range of the brightness adjustment.
Control Explanation OSD Timeout sets the length of time an on-screen display screen is displayed. For example, with a “15 second” setting, if a control is not pushed within 15 seconds, the display screen disappears. OSD Message On/Off Allows you to enable or disable the message. That appear when the input source or timing is change. OSD Background turns the OSD background clear so that open applications can be seen while making OSD adjustments.
Other Information Specifications LCD Type Color Filter Glass surface Input signal Video Sync RGB analog (0.7/1.
Troubleshooting No power • Make sure power button (or switch) is ON. • Make sure A/C power cord is securely connected to the DC power supply and the power supply is firmly connected to the ViewPanel®. • Plug another electrical device (like a radio) into the power outlet to verify that the outlet is supplying proper voltage. Power on but no screen image • Make sure the video cable supplied with the ViewPanel is tightly secured to the video output port on the back of the computer.
Customer Support For technical support or product service, see the table below or contact your reseller. NOTE: You will need the product serial number. Country/ Region Web site T = Telephone Email F = FAX United States viewsonic.com/ support T: (800) 688-6688 F: (909) 468-1202 service.us@ viewsonic.com Canada viewsonic.com/ support T: (800) 688-6688 F: (909) 468-1202 service.ca@ viewsonic.com United Kingdom viewsoniceurope.com T: 0800 833 648 F: (01293) 643910 service.eu@ viewsoniceurope.
Cleaning the ViewPanel • MAKE SURE THE VIEWPANEL® IS TURNED OFF. • NEVER SPRAY OR POUR ANY LIQUID DIRECTLY ONTO THE SCREEN OR CASE. To clean the screen: 1 2 Wipe the screen with a clean, soft, lint-free cloth. This removes dust and other particles. If still not clean, apply a small amount of non-ammonia, non-alcohol based glass cleaner onto a clean, soft, lint-free cloth, and wipe the screen. To clean the case: 1 2 Use a soft, dry cloth.
Limited Warranty VIEWSONIC LCD VIEWPANEL® What the warranty covers: ViewSonic® warrants its products to be free from defects in material and workmanship during the warranty period. If a product proves to be defective in material or workmanship during the warranty period, ViewSonic will, at its sole option, repair or replace the product with a like product. Replacement product or parts may include remanufactured or refurbished parts or components.
Appendix Safety Guidelines Warning: This device must be operated with the original power supply, part number: LSE9901B1250, UP06031120A, 0217B1248, UP04821120B. CAUTION: The socket-outlet shall be installed near the equipment and shall be easily accessible. CAUTION: Use a power cable that is properly grounded. Always use the appropriate AC cord that is certified for the individual country. Some examples are listed below: Switzerland.......... SEV Britain.................. BASE/BS Japan....................
Compliance Information for U.S.A. This equipment has been tested and found to comply with the limits for a Class B digital device, pursuant to part 15 of the FCC Rules. These limits are designed to provide reasonable protection against harmful interference in a residential installation. This equipment generates, uses, and can radiate radio frequency energy, and if not installed and used in accordance with the instructions, may cause harmful interference to radio communications.
ViewSonic Corporation