ViewPad 7e User Guide IMPORTANT: Please read this User Guide to obtain important information on installing and using your product in a safe manner, as well as registering your product for future service. Warranty information contained in this User Guide will describe your limited coverage from ViewSonic Corporation, which is also found on our web site at http://www. viewsonic.com in English, or in specific languages using the Regional selection box in the upper right corner of our website.
Compliance Information FCC Statement The following statement applies to all products that have received FCC approval. Applicable products bear the FCC logo, and/or an FCC ID in the format FCC ID: GSSVS14359 on the product label.This device complies with part 15 of the FCC Rules. Operation is subject to the following two conditions: (1) This device may not cause harmful interference, and (2) This device must accept any interference received, including interference that may cause undesired operation.
Please read before proceeding • Use only the batteries and power adapter provided by the manufacturer. The use of unauthorized accessories may void your warranty. • Do not store your device in temperatures higher than 50°C (122°F). • The operating temperature for this device is from 0°C (32°F) to 40°C (104°F). CE SAR Information This device MEETS GUIDELINES FOR EXPOSURE TO RADIO WAVES. Your mobile device is a radio transmitter and receiver.
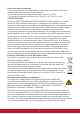
Identification mark: CE0984 (UL-CCS) CE This equipment may be operated in: AT BE BG CH CY CZ DE DK EE ES FI FR GB GR HU IE IT IS LI LT LU LV MT NL NO PL PT RO SE SI SK TR We, hereby, declare that this cellular, Wi-Fi, & Bluetooth radio is in compliance with the essential requirements and other relevant provisions of Directive 1999/5/EC. Products with 2.4-GHz Wireless LAN Devices France For 2.4-GHz wireless LAN operation of this product, certain restrictions apply.
Important Safety Instructions 1. DO NOT place objects on top of the device, as objects may scratch the screen. 2. DO NOT expose the device to dirty or dusty environments. 3. DO NOT place the device on an uneven or unstable surface. 4. DO NOT insert any foreign objects into the device. 5. DO NOT expose the device to strong magnetic or electrical field. 6. DO NOT expose the device to direct sunlight as it can damage the LCD Screen. Keep it away from heat sources. 7.
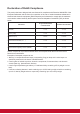
Declaration of RoHS Compliance This product has been designed and manufactured in compliance with Directive 2002/95/EC of the European Parliament and the Council on restriction of the use of certain hazardous substances in electrical and electronic equipment (RoHS Directive) and is deemed to comply with the maximum concentration values issued by the European Technical Adaptation Committee (TAC) as shown below: Proposed Maximum Concentration Actual Concentration Lead (Pb) 0.1% < 0.1% Mercury (Hg) 0.
Copyright Information Copyright © ViewSonic® Corporation, 2011. All rights reserved. Android is a trademark of Google Inc. Use of this trademark is subject to Google Permissions. This product has an Android™ platform based on Linux, which can be expanded by a variety of JME-based application SW. All products used in this device and trademarks mentioned herein are trademarks or registered trademarks of their respective owners.
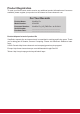
Product Registration To meet your future needs, and to receive any additional product information as it becomes available, please register your product on the Internet at: www.viewsonic.com. For Your Records Product Name: Model Number: Document Number: Serial Number: Purchase Date: ViewPad 7e VS14359 ViewPad 7e_UG_ENG Rev.
Features 1. Android 2.3 platform can be expanded with many third-party apps 2. TFT screen with 800x600 pixel resolution 3. Portrait and landscape viewing with G-Sensor rotation 4. 2 cameras for taking photos and recording videos 5. Android Launcher or ViewScene 3D view mode 6. Automatic brightness adjustment 7. Web browsing, instant messaging and e-mail 8. Built-in e-reader and online e-book store 9.
Chapter 1: Getting Started................................................................. 1 1.1 Your Device............................................................................................1 1.2 Accessories............................................................................................3 1.3 Installing Memory Card.........................................................................3 1.4 Charging Battery...............................................................................
Chapter 5: Using Bluetooth............................................................... 17 5.1 Connecting to Bluetooth Devices........................................................17 Chapter 6: Searching on Device....................................................... 18 6.1 Searching Contents on Device.............................................................18 6.2 Searching the Web................................................................................
8.16 Alert Machine.......................................................................................23 8.17 Dropbox................................................................................................23 8.18 Note Everything...................................................................................23 8.19 Sketcher...............................................................................................24 8.20 Tunein Radio...........................................................
Chapter 1: Getting Started 1.
Rear DC jack Mini USB Micro HDMI slot Camera Speaker Micro SD slot Part Name DC jack Mini USB port Micro HDMI port Camera Speaker Micro SD slo Description Connect the AC power adapter Connect the USB cable Connect the HDMI cable Take photos and record videos Audio output Insert a Micro SD Memory Card 2
1.2 Accessories Your package comes with the following items. If any of them is missing, please contact your retailer. • ViewPad 7e • AC adapter with US/EU/UK plug • USB cable • Quick Start Guide • Safety Information 1.3 Installing Memory Card You need a Micro SD card to store photo, music, videos and other data. To install the memory card 1. Insert the Micro SD card as shown. Make sure the golden contacts are facing down. To remove the memory card 1.
1.4 Charging Battery When you first tale your ViewPad out of the box, the battery is only partially charged. To fully charge the battery, charge it for 2 hours. Charge the battery 1. Connect one end of the AC adaptor to the DC jack on top of the device. 2. Plug the other end of the AC adaptor to the wall outlet to start charging. icon is displayed on When the battery is charging and the device is turned on, the the status bar. When the battery is fully charged, the icon is displayed on the status bar.
1.6 Turning Device On or Off Turn device on or off After installing the memory card and charging the battery, the device is ready to be turned on. Turn on your device Press and hold the Power button turns on. on the left top of your device until the device display Turn off your device 1. Press and hold the Power button until a pop-up window appears. 2. Tap Power off, and then select OK to confirm.
Chapter 2: The Basics 2.1 Home Screen From the Home screen, you can quickly access common features and view battery and connection status. Set Screen Mode You can set up your Home screen either in Android launcher or ViewScene 3D mode. After turning on your device or pressing , a pop-up window appears. You can select and set either Launcher or ViewScene 3D as your desired mode by default. Launcher mode ViewScene 3D mode Extended Home Screen Swipe your finger to the left or right across the Home screen.
Shortcut Icons The shortcut icons allow you to easily access an application from the Home screen. You can add your favorite applications to the Home screen and arrange the icons as you desire. Add a shortcut icon 1. Tap and hold a blank area on the Home screen. Or, press Menu 2. Tap Shortcuts. , and then tap Add to display the options menu. 3. Tap Applications to display the list of applications. 4. Tap to add the items that you want to appear on the Home screen. Move a shortcut icon 1.
Widgets Widgets allow you to receive live and personalized updates right on the Home screen. You can add, delete and move widgets just like you can with shortcut icons. Add a widget You may add and customize the Widgets on the Home screen as you like. 1. Tap and hold a blank area on the Home screen. Or, press Menu 2. Tap Widgets. , and then tap Add to display the options menu. A list of all available widgets is displayed. 3. Tap to select the widget you want to add on the Home screen. Move a widget 1.
You can swipe the screen up or down to view more applications, and tap the desired icon to access the application. Tap to go back to Home screen. Setting Wallpaper You can customize the wallpaper of your Home screen with a default wallpaper or with pictures taken with your ViewPad. Live Wallpapers are animated or interactive wallpapers. Set wallpaper from Live Wallpaper gallery 1. From the Home screen, press Menu , and then tap Wallpaper. The Select wallpaper from is displayed on the screen. 2.
Set wallpaper from Wallpaper gallery 1. From the Home screen, press Menu , and then tap Wallpaper. The Select wallpaper from is displayed on the screen. 2. Tap Wallpapers. 3. All default wallpapers are displayed. Swipe your finger left or right to browse and preview the wallpaper on screen. 4. Tap Set wallpaper to set the previewed wallpaper as wallpaper. 2.2 Entering Text On-Screen Keyboard The on-screen keyboard appears when an application requires text input, such as writing emails and URL addresses.
Numbers and Symbols You can tap the keys to enter the characters, tap or to enter characters with upper or lower case letter, and tap to display the numeric and symbol keyboard. Setting Input Method 1. Tap and hold a text field until a pop-up window appears. 2. Tap Input method > the desired input method. 2.3 Transferring Contents You can transfer your own contents stored in your computer to the device.
Transferring Your Data After going into the USB drive mode, you will see 2 disks on your computer, one is for the internal memory of your device and the other is for the Micro SD memory card inserted in the device. You can select the disk in which you’d like your documents stored. You can add files into the device, and also can copy, move and delete files already in the device. The ViewPad 7e supports the following media formats: Photo: JPEG, BMP, TIFF, PNG Music: MP3, WAV Audio: (H263/MPEG-4).
Chapter 3: Using Email You can use your device to send and receive email messages via your internet email accounts just as you do with a computer. 3.1 Setting up an Internet Email Account 1. On the Home screen, tap > Email. 2. Enter your email address and password in its respective entry box. 3. Tap Next. 4. Enter your email account name and password. 5. Tap Done. 3.2 Composing and Sending an Email 1. On the Home screen, tap > Email. 2. Enter your email account and password to login in. 3.
3.3 Receiving an Email Emails are automatically received in your Inbox when the device connects to a wireless network. 1. On the Home screen, tap > Email. 2. Enter your email account and password to log in. 3. Tap a message to view its content. You can view email attachment by tapping Open or download it by tapping Save.
Chapter 4: Using Internet 4.1 Setting up Wi-Fi This device only uses Wi-Fi connection. You need to connect to a wireless network before surfing the internet or using the related applications that require internet connection. To turn Wi-Fi on or off 1. From the Home screen, tap > Settings >Wireless & networks. 2. Tap Wi-Fi check box to turn Wi-Fi function on or off. To connect to a Wi-Fi network 1. Turn Wi-Fi on. 2. Tap Wi-Fi settings > Network notification to start detecting networks. 3.
4.2 Accessing the Web Your device allows you to access any internet web. 1. On the Home screen, tap or > Browser. 2. Tap the text field, and the keyboard pops up. 3. Enter the URL, and then tap Go to enter the website. 4. Scroll the page up or down to view more information. If you want the current page as your home page while browsing the web, please press Menu , and then tap More > Settings > Set home page.
Chapter 5: Using Bluetooth Bluetooth modes On: Bluetooth is turned on. Your ViewPad detects other Bluetooth devices, but your device is not visible to others. Discoverable: Bluetooth is turned on and your device is visible to other Bluetooth devices. Off: Bluetooth is turned off. To turn Bluetooth on or off 1. From the Home screen, tap > Settings > Wireless & networks. 2. Tap Bluetooth check box to activate the Bluetooth function. 3.
Chapter 6: Searching on Device Your device allows you to take advantage of powerful search capabilities for searching documents and apps on your device, as well as searching the web. 6.1 Searching Contents on Device 1. On the Home screen, tap > Search. 2. Enter the key words or phrase in the text field. 3. Tap Go to start searching. 6.2 Searching the Web 1. On the Home screen, tap > Search. 2. Enter the URL address in the text field. 3. Tap Go to start searching.
Chapter 7: Multimedia Applications 7.1 Taking Photos and Videos Your device is equipped with a 0.3 megapixels front camera and a 3.0 megapixels main camera for you to take photos and record videos. Taking a Photo 1. On the Home screen, tap > Camera. 2. Aim the device at the desired subject. 3. Tap to take the photo. Recording a Video 1. On the Home screen, tap 2. Tap > Camera. to go to the video mode. 3. Aim the device at the desired subject. 4. Tap to start recording, and tap to stop recording.
7.2 Playing Photos and Videos The photos and videos you took or recorded are saved in the respective folder categories in Gallery by default. Viewing Photos 1. On the Home screen, tap > Gallery. 2. Tap Photos to view the images in thumbnails. 3. Tap an image to view it in full screen. 4. Swipe your finger to left or right to view the previous or next image. Tap Slideshow, the images will play one by one automatically in slideshow mode.
7.3 Playing Music You can play the music stored in your device or Micro SD card inserted. Playing Music 1. On the Home screen, tap > Music. 2. Select the desired track from the Songs list or Playlists to play it. 3. Press the Volume button to increase or decrease the playing sound. During playing, you can press Menu Item to add it to the desired playing list or delete it.
Chapter 8: Applications 8.1 Email Use your device to send and receive email messages via your internet email accounts just as you do with a computer. 8.2 Browser Browse web pages on your device, and bookmark your desired pages. 8.3 Camera Your device has two cameras, and you can take photos and videos by using the camera either on the front or back of your device. 8.4 Music You can enjoy your music stored in your SD on your device. 8.
8.10 Calculator Perform basic arithmetic functions, such as addition, subtraction, multiplication, and division on your device. 8.11 Calendar Create and track schedule or appointments on your device. 8.12 Clock Set up alarms on your device. 8.13 Search Search information in your device and websites by using your device. 8.14 Downloads View and delete the files you have downloaded from the web pages. 8.
8.19 Sketcher Create beautiful drawings with the sketchpad app, featuring a variety of textured brushes and colors. 8.20 Tunein Radio Listen to your favorite AM/FM and Internet radio stations from around the globe. You can browse by category, genre or location, search for artists, and bookmark your favorite stations. 8.21 Twitter The official Twitter client for Android keeps you connected to your friends and followers on the popular social networking service. 8.
Chapter 9: Managing Your Device From the Home screen, tap > Settings to view and adjust the settings of your ViewPad. Settings menu is categorized into: Wireless & networks, Sound, Display, Location & security, Applications, Accounts & sync, Privacy, Storage, Language & keyboard, Voice input & output, Accessibility, Date & time, and About device. 9.
9.
9.8 Storage Application Description Format SD card Format SD card Internal device storage Show available device storage 9.9 Language & Keyboard Application Select language Touch Pal Description Set the on-screen display language for your device Configure on-screen keyboard settings 9.10 Voice input & output Application Text-to-speech settings Description Set the text-to-speech settings 9.
Specifications Screen Aspect Ratio 4:3 Resolution (Pixels) Connectivity USB 800x600 Wi-Fi 802.11 b/g/n Bluetooth Power Battery 2.1with EDR AC Adapter Input power: 100-240V USB 2.0 3300mAh, 3.7V. rechargeable battery Output power: 5V/2 A Model: PSAA10R-050YYY(Y=0-9, A-Z, blank or alphanumeric) Trade mark: PHIHONG Memory card Internal memory eMMC iNand 4GB External memory File Formats Photo Micro SD Music MP3, WAV Audio Temperature Operating (H263/MPEG-4).3GP, WMV, Flash,(H264/MPEG-4).
Customer Support For technical support or product service, see the table below or contact your reseller. NOTE: You will need the product serial number. Country/Region Website T = Telephone F = FAX Email Australia/New Zealand www.viewsonic.com.au AUS= 1800 880 818 NZ= 0800 008 822 service@au.viewsonic.com Canada www.viewsonic.com T (Toll-Free)= 1-866-463-4775 T (Toll)= 1-424-233-2533 F= 1-909-468-3757 service.ca@viewsonic.com Europe www.viewsoniceurope. com www.viewsoniceurope.
Limited Warranty VIEWSONIC® ViewPad What the warranty covers: ViewSonic warrants its products to be free from defects in material and workmanship, under normal use, during the warranty period. If a product proves to be defective in material or workmanship during the warranty period, ViewSonic will, at its sole option, repair or replace the product with a like product. Replacement product or parts may include remanufactured or refurbished parts or components.
Limitation of implied warranties: There are no warranties, express or implied, which extend beyond the description contained herein including the implied warranty of merchantability and fitness for a particular purpose. Exclusion of damages: ViewSonic’s liability is limited to the cost of repair or replacement of the product. ViewSonic shall not be liable for: 1.
30