903 1HWZRUN PHGLD SOD\HU 8VHU *XLGH *XLGH GH O¶XWLOLVDWHXU *XtD GHO XVXDULR %HGLHQXQJVDQOHLWXQJ *XLGD GHOO¶XWHQWH 3RGUĊF]QLN XĪ\WNRZQLND 3\ɤɨɜɨɞɫɬɜɨ ɩɨɥɶɡɨɜɚɬɟɥɹ պ̙͋)ᒅ˛* ሢ၊࿁ĩ⇷ྃĪ 0RGHO 1R 96
&RPSOLDQFH ,QIRUPDWLRQ )&& 6WDWHPHQW 7KLV GHYLFH FRPSOLHV ZLWK SDUW RI )&& 5XOHV 2SHUDWLRQ LV VXEMHFW WR WKH IROORZLQJ WZR FRQGLWLRQV WKLV GHYLFH PD\ QRW FDXVH KDUPIXO LQWHUIHUHQFH DQG WKLV GHYLFH PXVW DFFHSW DQ\ LQWHUIHUHQFH UHFHLYHG LQFOXGLQJ LQWHUIHUHQFH WKDW PD\ FDXVH XQGHVLUHG RSHUDWLRQ 7KLV HTXLSPHQW KDV EHHQ WHVWHG DQG IRXQG WR FRPSO\ ZLWK WKH OLPLWV IRU D &ODVV % GLJLWDO GHYLFH SXUVXDQW WR SDUW RI WKH )&& 5XOHV 7KHVH OLPLWV DUH GHVLJQHG WR SURYLGH UHDVRQDEOH SURWHFWLRQ DJDL
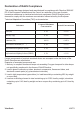
'HFODUDWLRQ RI 5R+6 &RPSOLDQFH 7KLV SURGXFW KDV EHHQ GHVLJQHG DQG PDQXIDFWXUHG LQ FRPSOLDQFH ZLWK 'LUHFWLYH (& RI WKH (XURSHDQ 3DUOLDPHQW DQG WKH &RXQFLO RQ UHVWULFWLRQ RI WKH XVH RI FHUWDLQ KD]DUGRXV VXEVWDQFHV LQ HOHFWULFDO DQG HOHFWURQLF HTXLSPHQW 5R+6 'LUHFWLYH DQG LV GHHPHG WR FRPSO\ ZLWK WKH PD[LPXP FRQFHQWUDWLRQ YDOXHV LVVXHG E\ WKH (XURSHDQ 7HFKQLFDO $GDSWDWLRQ &RPPLWWHH 7$& DV VKRZQ EHORZ 3URSRVHG 0D[LPXP &RQFHQWUDWLRQ $FWXDO &RQFHQWUDWLRQ /HDG 3E 0HUFXU\ +J
&RS\ULJKW ,QIRUPDWLRQ &RS\ULJKW 9LHZ6RQLF &RUSRUDWLRQ $OO ULJKWV UHVHUYHG 9LHZ6RQLF WKH WKUHH ELUGV ORJR 2Q9LHZ 9LHZ0DWFK DQG 9LHZ0HWHU DUH UHJLVWHUHG WUDGHPDUNV RI 9LHZ6RQLF &RUSRUDWLRQ 'LVFODLPHU 9LHZ6RQLF &RUSRUDWLRQ VKDOO QRW EH OLDEOH IRU WHFKQLFDO RU HGLWRULDO HUURUV RU RPLVVLRQV FRQWDLQHG KHUHLQ QRU IRU LQFLGHQWDO RU FRQVHTXHQWLDO GDPDJHV UHVXOWLQJ IURP IXUQLVKLQJ WKLV PDWHULDO RU WKH SHUIRUPDQFH RU XVH RI WKLV SURGXFW ,Q WKH LQWHUHVW RI FRQWLQXLQJ SURGXFW LPSURYHPHQW 9LHZ6RQL
CONTENTS Introduction .............................................................................1 Features ................................................................................................1 System Requirements .............................................................................1 The Remote Control..................................................................2 Buttons ..................................................................................................
Introduction Introduction Features Plays back Blu-ray ISO/H.264/WMV/VC-1/Xvid/MPEG-1/MPEG-2/RM/RMVB movie files, MP3/WMA/OGG/FLAC/AAC music files, JPEG/BMP/GIF/PNG photo and graphic files. Supports NTFS/FAT32 file system. Supports both NTSC and PAL TV systems. Supports 1080p video output. Supports HDMI and component video output. Supports Music Slideshow Supports external USB storage media playback. Supports playback via SAMBA Ethernet protocol. Supports USB wireless dongle.
Parts and Functions The Remote Control Buttons ○1 STANDBY: Activate this device / Return to Standby ○2 INFO: Display file properties / played time ○3 TV SYS Switch output TV system to NTSC/PAL ○4 No function SELECT: ○5 AUDIO: Switch audio tracks in a movie ○6 SUBTITLE: Switch DVD subtitles; Switch Xvid subtitle On/Off ○7 REPEAT: Change the repeat mode ○8 HOME: Return to Home Menu ○9 RETURN: Return to parental folder ○ MENU: 10 ○ 11 : ○ 12 Display DVD menu; Show menu dialogue box
Parts and Functions Parts and Functions ○1 USB type A connector: Connect the USB mass storage devices/ USB wireless dongle with this device using a USB cable. ○2 Power LED: (Blue) Blinking: Received a remote control signal. Off: Power off. On: Power on. Fast blinking: Booting up/ Accessing data through PC connection. ○3 Power switch: Press this button to turn on this device. Press and hold this button for about 3 seconds to turn off this device.
Quick Start Quick Start Read before use. 1. Do not operate electronics with wet hands. 2. Do not operate this device in a bathroom or near water. 3. Do not bend cables in a sharp angle. 4. Keep this device and cables out of reach of children. 5. Keep this device and its accessories away from heat sources. How do I use this device? This device plays media contents stored in its internal HDD, in an external USB storage connected to it, or on a server via SAMBA Ethernet protocol.
PC Connection PC Connection OS Support This device supports Microsoft® Windows® 7 / Windows Vista™ / Windows® XP SP2. Some USB 2.0 Host Controllers may require updated device driver files to operate properly. If you have problems with your USB connection, visit the Windows Update web site to make sure you have the latest Service Packs and device drivers installed on your PC before contacting technical support. Connecting via USB 1.
PC Connection Upgrading Firmware 1. Please consult your local distributor or vendor website for a firmware file. 2. Save the firmware file to the root folder of an USB mass storage device. Note: Do not copy the firmware file to a folder, else the update will not work 3. Connect this device to a TV and then connect the USB mass storage device to this device. 4. Press the 5.
Network Connection Network Connection Connecting Wired Ethernet 1. Use a RJ45 Ethernet cable to connect this device to a network router, hub, or switch; or connect this device to the Ethernet port on a networked computer. 2. If you have not already done so, connect this device to your TV. 3. Connect the power supply to this device. 4. Press the Power Switch on the front panel to turn on this device. 5. Activate this device by pressing the STANDBY button on the remote control.
Network Connection 9. Select Wireless and press the ENTER button. 10. This device will list available wireless networks. Select your network and press the ENTER button. Note: To enter a username and password to login to a network volume, press the ENTER button on the remote control. This will bring up a virtual keyboard on this device TV display. Use the remote control cursor buttons and the ENTER button to select the necessary characters.
Network Connection Accessing Shared Folders on PC 1. Make sure the Workgroup of your PC are set as WORKGROUP. 2. From your Windows 7/Windows Vista PC, go to: Control Panel > Network and Internet > Network and Sharing Center.
Network Connection 3. (For Windows 7) Click on Change advanced sharing settings.
Network Connection 4. (For Windows 7) Select Turn on network discovery, Turn on file and printer sharing, Turn on sharing so anyone with network access can read and write files in the Public folders and Turn off password protected sharing.
Network Connection 5. (For Windows Vista) Click to turn on Network discovery, File sharing and Media sharing, and click to turn off Password protected sharing.
Network Connection 6. Right click on the folder you wish to share and select Properties. 7. Go to tab Sharing and click Share.
Network Connection 8. Click the drop-down list to choose Everyone and click Add. Make sure that Everyone is in the list and click Share button.
Network Connection Mapping Network Drive from PC 1. Open Windows Explorer and go to Tools → Map Network Drive. 2. Assign the drive letter you like to use and key in \\ip_address\MEDIA_HDD at the folder section. Then click Finish. The IP address of this device can be found in Setup → Network. 3. An extra drive letter will appear in your Windows Explorer of My Computer. BitTorrent 1. If you have not already done so, connect this device to the Internet. 2.
Network Connection BitTorrent Download 1. Click Add New Torrent button. 2. Select a torrent file from your PC and then click Yes. 3. The select torrent file will be displayed. Check the box of a torrent file, and then you can select Start, Stop, Delete, Refresh, Down, and Up setting of this file. 4. Click Setting to set download/upload rate, seed setting, and simultaneous setting of your download. Visit Neighbor This function works with Microsoft IE browser only.
TV Connection TV Connection Connecting to AV Equipments HDMI Connection The HDMI connector can output both digital audio/video signals. Many HDTV sets and digital AV receivers support this type of connection. To a TV: To an AV receiver: Note: Some TV sets are equipped with DVI input ports, which will receive video signals only, but these DVI ports use HDMI connectors instead of standard DVI connectors.
TV Connection Note: Some TV sets are equipped with separate composite and component audio inputs. Be sure that you have connected the correct one. Green Red Blue Red White SCART Video Connection If your TV is equipped with SCART input, connect the Composite connectors to a SCART adapter to output the audio/video signal. (SCART adapter not provided) Optical Audio Connection For a high quality digital audio, connect this connector to an AV receiver which equips a digital audio decoder.
TV Connection Note: • Always remove USB cable before activating this device. • When using the remote control, point the remote control towards the front of this device. When turning the HDD into Standby mode, please avoid moving it for 2-3 minutes due to spin down of the device. Moving the HDD while it is still spinning may damage it. We are not liable for any data loss or damage caused by inappropriate or careless use. It is recommended to unplug the unit from the power socket completely when not in use.
Setup Using the AV Playback Function When this device is connected to a TV and activated for playback, the Home Menu will display on the TV screen. You can also jump to the Home Menu during playback or while browsing other menus by pressing the HOME button on the remote control. You can use the cursor buttons on the remote control to navigate through menus, options, or files. Press the ENTER button to open a folder, select an option, or play a file.
Setup NET Browse shared network volumes via SAMBA protocol when this device is connected to network. UPNP Browse media files in a UPnP AV MediaServer in the same LAN with this device. Playing Media Files from HDD/USB 1. Select a location to browse for the media file you want to play. Select HDD if the file is saved on the internal HDD or USB if the file is located on an external USB device connected to this device. 2.
Setup 3. If you want to play music with your slideshow, copy the music tracks to the same folder or subfolder as the image files. Name the music tracks in the order you would like them to play, for example, track01, track02, track03, etc. The option in Setup → Misc → Background Music must be set as On. Playing a DVD Folder A DVD folder contains complete files for a DVD movie. This device can play back a movie from a DVD folder just like playing back a DVD disc.
Setup Setup Select SETUP in Home Menu to enter Setup Menu. Use the cursor buttons to select items. ENTER button to enter a submenu or to confirm a selection. Press the Press the RETURN button to return to previous folder. Press the HOME button to return to Home Menu. Misc Slideshow Interval Set time to display each photo during slideshow. Transition Effect Set fade or transition options for slideshow display.
Setup Network When this device is connected to a network, the Network setup menu will display the IP address for either wired network with DHCP or wireless network. Wired DHCP: Manual: IP address for this device will be automatically assigned by the Network. Use to manually assign the IP Address, Subnet Mask, and Default Gateway used by this device. Use number pad on the remote control to enter the desired addresses. Wireless Available SSIDs will be shown. Input Authentic code to gain access.
Appendix Specifications HARD DRIVE SUPPORT Internal Storage 3.5” SATA I/ SATA II HDD File System NTFS/ FAT32 INTERFACE USB 2.0 USB 2.0 type A host port x 2 USB 2.0 type B device port x 1 Ethernet 10/100M RJ45 connector x 1 Wireless Ready Wireless 802.11g (Realtek RTL8187B controller only) (not included) 802.
Specifications are subject to change without prior notice. It is recommended to unplug the unit from the power socket completely when not in use. Always check that files have been copied to the device successfully. Always keep two copies of important files (an original and a backup). We are not liable for data loss or damage during file transfer or while store on the device. When turning the HDD into Standby mode, please avoid moving it for 2-3 minutes due to spin down of the device.
&XVWRPHU 6XSSRUW )RU WHFKQLFDO VXSSRUW RU SURGXFW VHUYLFH VHH WKH WDEOH EHORZ RU FRQWDFW \RXU UHVHOOHU 1RWH
/LPLWHG :DUUDQW\ 9LHZ6RQLF 1HWZRUN 0HGLD 3OD\HU :KDW WKH ZDUUDQW\ FRYHUV 9LHZ6RQLF ZDUUDQWV LWV SURGXFWV WR EH IUHH IURP GHIHFWV LQ PDWHULDO DQG ZRUNPDQVKLS XQGHU QRUPDO XVH GXULQJ WKH ZDUUDQW\ SHULRG ,I D SURGXFW SURYHV WR EH GHIHFWLYH LQ PDWHULDO RU ZRUNPDQVKLS GXULQJ WKH ZDUUDQW\ SHULRG 9LHZ6RQLF ZLOO DW LWV VROH RSWLRQ UHSDLU RU UHSODFH WKH SURGXFW ZLWK D OLNH SURGXFW 5HSODFHPHQW SURGXFW RU SDUWV PD\ LQFOXGH UHPDQXIDFWXUHG RU UHIXUELVKHG SDUWV RU FRPSRQHQWV +RZ ORQJ WKH ZDUUDQW\ LV HIIHFWL