ViewSonic ® VNB104 NetBook - User Guide Model No.
Important Safety Instructions 1. DO NOT press or touch the LCD Screen. DO NOT place notebook PC with small items, they may scratch LCD Screen or penetrate the vents of notebook PC. 2. DO NOT expose notebook PC to dirty or dusty environment. Keep the environment clean and dry. 3. DO NOT place notebook PC on uneven or unstable work surface. 4. DO NOT place or drop objects on the top of notebook PC. DO NOT shove any foreign objects into notebook PC. DO NOT close with force the LCD Screen lid. 5.
Declaration of RoHS Compliance This product has been designed and manufactured in compliance with Directive 2002/95/EC of the European Parliament and the Council on restriction of the use of certain hazardous substances in electrical and electronic equipment (RoHS Directive) and is deemed to comply with the maximum concentration values issued by the European Technical Adaptation Committee (TAC) as shown below: Substance Proposed Maximum Concentration Actual Concentration Lead (Pb) 0,1% < 0,1% Mercury
Copyright Information Copyright © ViewSonic® Corporation, 2010. All rights reserved. Microsoft®, Windows®, Windows NT®, and the Windows® logo are registered trademarks of Microsoft® Corporation in the United States and other countries. ViewSonic®, the three birds logo, OnView®, ViewMatch™, and ViewMeter® are registered trademarks of ViewSonic® Corporation. Intel®, Pentium®, and Atom™ are registered trademarks of Intel Corporation.
Contents 1. Introduction to each part ............................................................................................. 1 (1) Top components ................................................................................................. 2 (2) Bottom components ............................................................................................ 4 (3) Left components.................................................................................................. 6 (4) Right components .
1. Introduction to each part Top components Bottom components Right components Left components Back components Note: The pictures and icons in this manual are just for reference, which may differ from the product you bought.
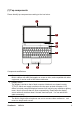
(1) Top components Please identify top components according to the icon below. 1 2 3 4 5 7 6 Components and Buttons 1 2 3 Camera (optional pc type) Built-in camera can take photographs or screen a video, and compatible with other equipment, it can be used to hold video conference. Display screen The display is similar to that of desk computer. Notebook use dynamic matrix TFTLCD, which can supply excellent menu the same as desk computer.
4 5 6 7 Power indicator Indicates when PC is powered on. Keyboard The keyboard of notebook is standard size; you can put your both hands on it, making using more comfortable. There are two Windows function buttons; it is easier to browse Windows operation system. Touchpad Touchpad and buttons are finger operation device, supplying the same function as the mouse of computer.
(2) Bottom components Please identify the components of notebook referring to the icon below. 1 3 2 5 4 1 2 3 4 5 Battery Battery will charge automatically when plugging AC power, while cutting off the Ac power, the notebook will be supplied by battery. Thus, no matter where and when you can use it. Battery life will be different because of usage and specification. Please do not disassemble battery series privately; the battery can be replaced by warrant manufacture as single discreteness.
Warning! The PC bottom will become very hot when using .So you should be careful while the notebook is using or has been used just now. It is natural that the notebook becomes hot when using or charging. Do not lay it on the soft surface like bed or sofa, or else heat of notebook will spread out abnormally. To prevent scalding, please don’t lay the notebook on legs or other part of your body. Importance! If End-user dismantles the CPU or hard disk of notebook privately, the quality of products will be lost.
(3) Left components Please consult the icon below to identify left components of the computer. 1 2 3 1 2 3 4 4 Output of the external display Display port named D-sub with 15 feet supports equipment which is compatible with standard of VGA, such as display or projection facility and so on; people can look on through a larger external screen. USB port (2.0/1.1) Universal serial bus is compatible with USB 2.0 or 1.
(4) Right components Please consult the icon below to identify right components of the computer. 1 1 2 3 4 5 6 2 3 4 5 6 Microphone input jack Single voice microhpone jack (1/8inch) can be connected with external microhpones or output signal from audio device.Internal microhpone will automatically stop by using the jack.The function can be used in video meeting, oral record or simple audio record.
2. BIOS Setup This chapter provides a description of the BIOS setup utility. The BIOS setup menus and available selections may vary from those of your product. For specific information on the BIOS for your product, please contact ViewSonic®. The BIOS setup utility provides a built-in Setup program, which allows the user to modify the basic system configuration and hardware parameters. The modified data will be stored in a battery-backed CMOS, so that data will be retained even when the power is turned off.
Date—date from 1 to 31. Year—year, set up by users. Use [ENTER], [TAB] or [SHIFT-TAB] to select a field. Use [+] or [-] to input the value. ► System Time This item allows you to configure the desired time. Use [ENTER], [TAB] or [SHIFT-TAB] to select a field. Use [+] or [-] to input the value. The three fields of the setting are : : respectively. Advanced Menu ► CPU Configuration Configure advanced CPU settings Module Version: 3F.
BOOT (boot screen and boot device order set) ► Boot Settings Configuration/Boot Device Priority Press to go to relative submenu. Boot Settings Configuration ► Quick Boot This item is used to quickly boot when power on. ► Quiet Boot This item is used to set whether to display the boot logo. ► AddOn ROM Display Mode This item is used to control PXE rom. ► Bootup Num-Lock [On] This item is used to select power-on state for numlock.
► 1st Boot Device/2nd Boot Device These items are used to specify the boot sequence from the available devices.
Security Menu You can setup a user password like this: Security->User Password->setting password two times and exit after saving. Then you must input password before entry into system. When you want to cancel password in BIOS, please select Security->User Password then input former password times and exit after saving. ► Change Supervisor Password Select this item to set or change the supervisor password. The Supervisor Password item on top of the screen displays the default Not Installed.
Exit Menu ► Save Changes and Exit Exit system setup after saving the changes. Once you are finished making your selections, choose this option from the Exit menu to ensure the values you selected are saved to the CMOS RAM. The CMOS RAM is sustained by an onboard backup battery and stays on even when the PC is turned off. When you select this option, a confirmation window appears. Select [OK] to save changes and exit. ► Discard Changes and Exit Exit system setup without saving any changes.
Update BIOS 1. Please affirm exact type of your notebook and download the newest version of BIOS. 2. Upgrade BIOS using “WINFLASH” application program which can be found in accessory CD. 3. Saving BIOS file temporarily to some place (etc: Root directory C :\). 4. Click “start” and find file “WINFLASH” and link. a. Select new BIOS file. b. Affirm information of BIOS selected, checking notebook type、version、data. c. Click “Flash” startup BIOS upgrade program. d. click “Exit ” after updating. e. Reboot system.
3. First use Power supply system Using keyboard Using touchpad Memory devices Network Connections Note: The pictures and icons in this manual are just for reference, which may differ from the product you bought.
Power supply system Using alternating current power Both battery and adaptor can supply power to notebook. Power adapter convert AC into DC via socket. That means one can connect power line to any socket of 100v-120v or 220v-240v without setting switch or using power commutator. Different country may need different normal interface using to connect AC power line along with. Small skill: One can buy a notebook trip suite, containing power supply and modem adapter, which can use in any country.
Loading and taking out battery pack Your notebook may not load the battery pack, if just not, please install battery pack following below steps. Importance! Don’t try to take out battery pack when open notebook, do that may led to loss the data. Just use battery pack and adapter itself or admitted to the computer by manufacture or dealer, otherwise may damage notebook. Battery protection Like other charge battery, the battery pack of notebook limits charge times.
Power on self test (POST) When turning on notebook, system runs a series of software controlling diagnoses test which is power on self test. Software control POST was regarded as a part of permanent configures. POST contains hardware configures record which was established by BIOS setting used to diagnose system. If POST finds disaccord between the record and hardware, screen will show an information clew you should run BIOS setting to correct conflict. Mostly the record in correct when buy notebook.
Charge for battery pack You must charge for battery pack when travelling out. Battery pack begins to charge as soon as plug adaptor into outer power. Please full charge before first use battery pack. New battery pack should charge continuously and cut outer power. It will need several hours to full charge when power off notebook while double when power on. Note: If the temperature or battery voltage is too high, the battery will stop charging. BIOS supply intelligent charge function.
Standby and Hibernation functions (energy saving state) You can find the electricity managing in Windows >Control panel>Power options. Besides you can select standby/hibernation or shut down for pressing the power switch or closing the lid. Standby and hibernation can help close some components to save power. When resuming operation, system will return to the primary state. “Shut down” will close all the operations and ask if we want to save the unsaved files.
Turn off equipment Note: unsaved information will be lost when turning off equipment. Shutdown command will close all the open programs (including operating system), then turn off the display and equipment. z At any of the following conditions you should turn off equipment: z When replacing batteries or maintaining inner components of equipment. z When connecting to external hardware devices which is not connected with the USB port.
Using Keyboard 1 Esc Exit program 2 Hotkeys (F1~F12) Functions vary according to software 3 Insert (Num Lk) Insert text(number lock) 4 Delete(Scr Lk) Delete button can also be used to enter BIOS during POST 5 Backspace 6 Enter 7 8 9 Direction keys Shift Move the cursor in the text and figures on the screen. This button is mainly used with other keys. Ctrl This button is mainly used with other keys.
Switches display output between the display screen, external monitor (if connected) and both Decreases the screen brightness Increases the screen brightness Open or close touch pad Open or close the camera Decreases the sound volume Increases the sound volume Sets the sound volume mute NA Windows keys The keyboard has two keys that perform Windows-specific functions.
Using touchpad Only a finger tip can control the touchpad. Because it is induced by static, it can’t be induced by any implement instead of fingers. Main function of touchpad is replacing normal mouse of desk computer, which can be used to position the cursor anywhere you want to scroll, or choose the items on the display with your finger tip. The examples along with graphs for using the touchpad in a right way are indicated in the following.
Handling the touchpad Touchpad is the panel induced by press. It would be injured without proper maintenance. Please notice the following measures. 1. Try to avoid making any harmful substances such as dust, liquid or oil, contact the touchpad. 2. Don’t touch the touchpad with dirty or wet hands. 3. Do not scratch the touchpad with nails or any hardy things. 4. Do not put any heavy object on the touchpad or the button of it.
Hard Disk Drive Hard Disk Drive has larger capability and faster operation speed than floppy driver and CD-ROM.The notebook has a removable type of Hard Disk Drive (63.5mm wide,9.5mm high). Actual Hard Disk Drive support S.M.A.R.T.(self-check and reporting technology),it can self-check before Hard Disk Drive has error or failure.Abouting changing or upgrading,please consult accredited sevice center or retailer. Importance! Hard Disk Drive will damage when the notebook deal with unadvisable method.
Network Connections Equipment to support the following types of Internet access: ● Cable – it can use RJ-45 (network) jack to connect to the broadband network to access the Internet. ● Wireless - while adopting mobile Internet access, you can use the wireless connection. Connect to the wired network LAN connection (LAN) needs the 8-pin RJ-45 network cable (separately purchase).
Appendix Operating system and Software FAQ Glossary and Brachylogy NOTE: The pictures and icons in this manual are just for reference, which may differ from the product you bought. Operating system and software Notebook sustains XP operating system. Sustaining software Please contact with local franchiser to download drive program and application program online if you want to upgrade or exchange your CD.
Frequently asked questions Hardware question-CD driver CD-ROM can’t read or write compact disk 1. Upgrade BIOS as newest version and try again. 2. Please choose better CD and try again after upgrade BIOS 3. Please ask help from local service center if the question is still exist Unknown reason-system instability. Don’t resume from hibernation 1. Remove upgrade install section after bought (RAM, Hard Disk Drive, WLAN, Bluetooth). 2. Please try to recover MS system former if it isn’t the reason above. 3.
Service, standard, function and price How to check if the notebook has been installed with inner wireless network card? Click “control panel” > equipment manager. You can see the notebook installed with inner wireless network card or not in the menu “network adapter”. Hardware problem – power on/off Unable to open the computer Diagnose: 1. 2. 3. 4. 5. 6. 7.
Software-BIOS Update BIOS 1. Please affirm exact type of your notebook and download the newest version of BIOS. 2. Upgrade BIOS using “WINFLASH” application program which can be found in accessory CD. 3. Saving BIOS file temporarily to some place (etc: Root directory C :\). 4. Click “start” and find file “WINFLASH” and link. a. b. c. d. e. Select new BIOS file. Affirm information of BIOS selected, checking notebook type, version, and data. Click “Flash” startup BIOS upgrade program.
Glossary and Brachylogy BIOS DHCP DNS IP LAN MMC MS SD TCP TFT USB UIM VGA Wi-Fi ViewSonic Basic Input/Output System Dynamic Host Configuration Protocol Domain Name Service Internet Protocol Local Area Network Multimedia card Memory Stick Secure Digital Card Transfer Control Protocol Thin Film Transistor Universal Serial Bus User Identity Module Video Graphics Array Wireless Fidelity VNB104 32
Customer Support For technical support or product service, see the table below or contact your reseller. NOTE: You will need the product serial number. Country/Region Website T = Telephone F = FAX Email Australia/New Zealand www.viewsonic.com.au AUS= 1800 880 818 NZ= 0800 008 822 service@au.viewsonic.com Canada www.viewsonic.com T (Toll-Free)= 1-866-463-4775 T (Toll)= 1-424-233-2533 F= 1-909-468-3757 service.ca@viewsonic.com Europe www.viewsoniceurope.com www.viewsoniceurope.
Limited Warranty VIEWSONIC® NETBOOK What the warranty covers: ViewSonic warrants its products to be free from defects in material and workmanship during the warranty period. If a product proves to be defective in material or workmanship during the warranty period, ViewSonic will, at its sole option, repair or replace the product with a similar product. Replacement Product or parts may include remanufactured or refurbished parts or components.
Limitation of implied warranties: There are no warranties, express or implied, which extend beyond the description contained herein including the implied warranty of merchantability and fitness for a particular purpose. Exclusion of damages: ViewSonic’s liability is limited to the cost of repair or replacement of the product. ViewSonic shall not be liable for: 1.