ViewSonic ® VPC191 All-in-One PC - User Guide - Guide de l’utilisateur - Guía del usuario - Guia do usuário - Pyководство пользователя - 使用手冊(简中) Model No.
Compliance Information For U.S.A. This device complies with part 15 of FCC Rules. Operation is subject to the following two conditions: (1) this device may not cause harmful interference, and (2) this device must accept any interference received, including interference that may cause undesired operation. This equipment has been tested and found to comply with the limits for a Class B digital device, pursuant to part 15 of the FCC Rules.
Important Safety Instructions 1. Read these instructions completely before using the equipment. 2. Keep these instructions in a safe place. 3. Heed all warnings. 4. Follow all instructions. 5. Do not use this equipment near water. Warning: To reduce the risk of fire or electric shock, do not expose this apparatus to rain or moisture. 6. Clean with a soft, dry cloth. 7. Do not block any ventilation openings. Install the equipment in accordance with the manufacturer’s instructions. 8.
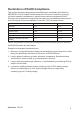
Declaration of RoHS Compliance This product has been designed and manufactured in compliance with Directive 2002/95/EC of the European Parliament and the Council on restriction of the use of certain hazardous substances in electrical and electronic equipment (RoHS Directive) and is deemed to comply with the maximum concentration values issued by the European Technical Adaptation Committee (TAC) as shown below: Substance Proposed Maximum Concentration Actual Concentration Lead (Pb) 0,1% < 0,1% Mercury (
Copyright Information Copyright © ViewSonic® Corporation, 2011. All rights reserved. Microsoft®, Windows®, Windows NT®, and the Windows® logo are registered trademarks of Microsoft® Corporation in the United States and other countries. ViewSonic®, the three birds logo, OnView®, ViewMatch™, and ViewMeter® are registered trademarks of ViewSonic® Corporation. Intel®, Pentium®, and Atom™ are registered trademarks of Intel Corporation.
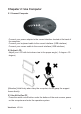
Contents Chapter 1 Recognize Computer Front View.........................................................................................2 Left/Right/Look-down View...............................................................3 Back View.........................................................................................4 Chapter 2 Use Computer Connect Computer............................................................................5 Adjust LCD .......................................................
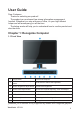
User Guide Dear Customer: Thanks for selecting our product! The product you purchased has strong information management function. Whenever you stay at home or office, it's your high efficient helper and will accompany you all the time. The below words will help you to understand how to use the product and also the skills. Chapter 1: Recognize Computer 1.
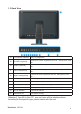
1.2 Left/Right/Look-down View 9 Supporting Frame Support the main LCD 10 Card Reader Support SD/MMC/MS/MS PRO Card 11 USB interface Connect to keyboard, mouse and printer, etc. 12 ODD Insert disc, stall program and play music, etc. 13 Internal Mic. Video meeting, dub and recording [Attention] Your All-In-One PC may not have all the interface above according to the specific type, please check with the real.
1.3 Back View 14 TV Interface (optional) Play TV programme 15 S-VIDEO (optional) Connect to Video equipment such as , Set-top box, DVD etc. 16 VIDEO (optional) Connect to Video equipment such as , Set-top box, DVD etc. 17 Left Track(optional) Connect to Audio equipment such as , Set-top box, DVD etc. 18 Right Track(optional) Connect to Audio equipment such as , Set-top box, DVD etc. 19 Audio output interface Audio output, connect to earphone 20 Mic.
Chapeter 2: Use Computer 2.1 Connect Computer · Connect your power adapter to the correct interface located at the back of the computer. · Connect your keyboard cable to the correct interface (USB interface) · Connect your mouse cable to the correct interface (USB interface) 2.2 Adjust LCD · Adjust your LCD with look-down view to the proper angle ( -3 degree ~25 degree) [Attention] Hold firmly when carry the computer, do not grasp the support frame directly. 2.
Chapter 3:Install Operation System and Driver 3.1 Install the Operation System Before installing OS, you need set USB-CD/DVD to the boot device according to the following instructions. Open the computer, when display test, press [F2] key to enter the BIOS Setup screen.
3.2 Other settings of SCU Main menu: Set system time and date, check the related information such as: BIOS, EC, MB version, System Memory, and the extended Memory, etc. Sata Port: Sata port connect sata device information. The specific operation can be found in the System promoted screens.
Advanced menu: Conduct the following superior settings. Legacy USB: under the DOS system, set if the USB device can be used. Summary screen: set whether it need to display the system configuration during boot-time. Boot-time Diagnostic Screen: in the POST process to set the image display mode or the text isplay mode. PXE OPROM : network card start switch. Sata Controller Mode Option : set the HDD working mode. If install the Windows XP, need disabled AHCI.
Security menu: the security setting to enter the system. Supervisor password is: to display whether has settings when entering the Setup utility; if has setting, it will display Set, if doesn't have setting, it display Clear. User password is: to display whether has settings when entering the Setup utility; if has setting, it will display Set, if doesn't have setting, it display Clear. Set User Password: set the password to enter Setup utility.
Exit menu: exit the BIOS Setup after completed the relevant setup. Exit Saving Changes:store the value and exit. Exit Discarding Changes: without storing the value and exit. Load Setup Defaults:restore the factory value. Discard Changes: discard this setting, and return to the last setting. Save Changes:save the setting. 3.3 Install the Driver program Please use the CD attached with the machine to operate in accordance with the CD operation interface. Option 1: Computer-specific driver.
Customer Support For technical support or product service, see the table below or contact your reseller. NOTE: You will need the product serial number. Country/Region Website T = Telephone F = FAX Email Australia/New Zealand www.viewsonic.com.au AUS= 1800 880 818 NZ= 0800 008 822 service@au.viewsonic.com Canada www.viewsonic.com T (Toll-Free)= 1-866-463-4775 T (Toll)= 1-424-233-2533 F= 1-909-468-3757 service.ca@viewsonic.com Europe www.viewsoniceurope. com www.viewsoniceurope.
Limited Warranty VIEWSONIC® ALL-IN-ONE PC What the warranty covers: ViewSonic warrants its products to be free from defects in material and workmanship during the warranty period. If a product proves to be defective in material or workmanship during the warranty period, ViewSonic will, at its sole option, repair or replace the product with a similar product. Replacement Product or parts may include remanufactured or refurbished parts or components.
Limitation of implied warranties: There are no warranties, express or implied, which extend beyond the description contained herein including the implied warranty of merchantability and fitness for a particular purpose. Exclusion of damages: ViewSonic’s liability is limited to the cost of repair or replacement of the product. ViewSonic shall not be liable for: 1.