ViewSonic ® N2752w LCD TV - User Guide - Guide de l’utilisateur - Guía del usuario ViewSonic ® Model No.
Compliance Information ................................................................................. 1 Important Safety Instructions .......................................................................... 2 Copyright Information ...................................................................................... 3 Product Registration ........................................................................................ 3 Antenna Installation Instructions .........................................
ENGLISH Compliance Information This equipment has been tested and found to comply with the limits for a Class B digital device, pursuant to part 15 of the FCC Rules. These limits are designed to provide reasonable protection against harmful interference in a residential installation. This equipment generates, uses, and can radiate radio frequency energy, and if not installed and used in accordance with the instructions, may cause harmful interference to radio communications.
1. Read these instructions completely before using the equipment. 2. Keep these instructions in a safe place. 3. Heed all warnings. 4. Follow all instructions. 5. Do not use this equipment near water. Warning: To reduce the risk of fire or electric shock, do not expose this apparatus to rain or moisture. 6. Clean with a soft, dry cloth. If further cleaning is required, see “Cleaning the LCD TV” in this guide for further instructions. 7. Do not block any ventilation openings.
Copyright Information Copyright © ViewSonic Corporation, 2006. All rights reserved. ® ENGLISH ViewSonic, the three birds logo, OnView, ViewMatch, and ViewMeter are registered trademarks of ViewSonic Corporation. Disclaimer:ViewSonic Corporation shall not be liable for technical or editorial errors or omissions contained herein; nor for incidental or consequential damages resulting from furnishing this material, or the performance or use of this product.
1.
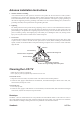
Getting Started Congratulations on your purchase of a ViewSonic® LCD TV. Important! Save the original box and all packing material for future shipping needs. ENGLISH Package Contents Your LCD TV package includes: • LCD TV • Power Cord • VGA Cable • Quick Start Guide • 44-Key Remote Control with batteries • RCA Cable • ViewSonic User Guide Fixing ViewSonic LCD TV to the Wall The LCD TV can be wall-mounted or freestanding.
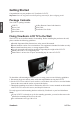
1 2 3 4 7 5 ENGLISH Front View of the Product 6 8 1 Volume Down Decrease sound volume or adjust a highlighted control while in OSD menu. 2 Volume Up Increase sound volume or adjust a highlighted control while in OSD menu. 3 Menu Turn OSD menu ON/OFF. 4 CH Down Channel down when source is at TV/DTV or select a control while in OSD menu. 5 CH Up Channel up when source is at TV/DTV or select a control while in OSD menu. 6 ENTER To highlight a control in OSD menu.
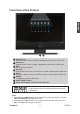
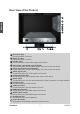
Rear View of the Product A ENGLISH B C D E F G I H A Analog TV input Connect to NTSC TV source. B Digital TV input Connect to ATSC TV source. C S-Video input Connect this port to the S-Video output of A/V device. D AV/ S-Video signal Audio input (left/right) Connect this port to the RCA audio output connectors of your A/V device. E YPbPr signal Audio input (left/right) Connect this port to the RCA audio output connectors of your A/V device.
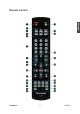
ENGLISH Remote Control ViewSonic 8 N2752w
ENGLISH Remote control button function as follow 1 POWER Power ON/OFF 2 MTS Select Mono, Stereo or SAP in TV / Select audio language in DTV 3 INFO Display current information 4 SLEEP Set TV Sleep timer 5 SOUND Select sound modes 6 0~9, 100/- number button Directly channel select 7 VOL+ and VOL- Adjust volume UP/DOWN 8 GUIDE Show electronic program guide (EPG) 9 FAV.
Installation ENGLISH 1. Insert Remote Control Batteries 1 Remove the battery cover by pulling then lifting the knob on the cover. 2 Insert the batteries, corresponding to the (+) and (-) markings on the battery compartment. 3 Reattach the battery cover. CAUTION • Only use the specified AAA batteries. • Do not mix new and old batteries. This may result in cracking or leakage, which may pose a risk of fire or lead to personal injury. • Insert batteries according to (+) and (-) markings.
2) DTV: Connect the LCD TV to the cable with DTV signals and preset DTV channels into memory with AUTO SCAN function in DTV menu (see page 21). ENGLISH Antenna (not supplied) 3. Connecting to DVD / Set Top Box Connect Video/ Audio cables from compatible devices into the back panel of LCD TV.
3) With YPbPr cable: Audio in Cable (not supplied) VCR or DVD Player 4) With HDMI cable: HDMI Cable (not supplied) VCR or DVD Player (DVD Player should have the HDMI output terminal) 4. Connecting to External Stereo System to Listen to LCD TV Sound Connect the audio output terminal of the LCD TV to audio in terminal of the stereo system (stereo system sold separately).
5. Connecting to the Headphone Connect the headphone to the headphone output terminal of the LCD TV. (Headphone sold separately). ENGLISH Headphone (not supplied) 6. Connecting to a Computer Connect the VGA cable from VGA output of computer to the VGA terminal input of your LCD TV. PC VGA 15 Pin Cable 7. PC Audio In Connect the Audio cable (green) from audio output of your computer to the audio input terminal (green) of the LCD TV.
8. Connecting to A/V Device with SPDIF input Connect SPDIF optical cable from A/V device into the SPDIF output connector of LCD TV. ENGLISH Audio Cable (not supplied) A/V Device SPDIF Optical Cable Stereo System 9. Connecting with the power cord Connect the power cord to the AC inlet on the back of your LCD TV, after all connections have been completed, and plug the other end of the power cord into a correctly grounded electrical outlet.
Basic Operation ENGLISH To operate your LCD TV, you may use the TV remote control or top panel buttons to select input source, change channels, or adjust volume. Turning on the LCD TV Before using the LCD TV: 1. Connect external equipment properly. 2. Insert the power plug, and the power LED indicator will light red. Power On/Off To turn the LCD TV on/off: Press the POWER button under the LCD TV, or press the POWER button on your remote control to turn on/off the TV.
ENGLISH DTV Guide To see the electronic program guide of the channel, press the GUIDE button on your remote control. It will display the background information related to the channel program. Picture Press the PICTURE button on the remote control to switch between the Smart Picture modes of User, Cinema, Sport, Vivid, and Hi-Bright. Sound Press the SOUND button on the remote control to switch between the Smart Sound modes of User, Rock, POP, Live, Dance, Techno, Classic, and Soft.
ENGLISH Zoom Press ZOOM button repeatedly to select the screen size. You can select from 1/8, 1/4, 1/2, 1, x2, x4, and x8. Favorite Channel You can press FAV.CH button to watch your favorite channels. Use FAV.A/D button to add the current channel to your favorite channels, or to delete it from your favorite channels. You can add up to 10 favorite channels. Freeze Picture Press FREEZE button to freeze picture. However, the sound still continues.
OSD Functions ADVANCED OPERATION — OSD MENU Video Menu — Adjusting the picture quality ENGLISH Video Menu is active in all but the VGA input source. • Contrast: To adjust contrast of video. (right: Max, left: Min). • Brightness: To adjust luminance of video. (right: Max, left: Min). • Color: To adjust color. (right: brilliant color, left: pale color). • Tint: To adjust tint level. (right: greenish tone, left: reddish tone). • Sharpness: To adjust picture sharpness. (right: sharper, left: softer).
TV Menu — To set up for TV ENGLISH It is only active in TV source. • Tuner Mode: To select Cable or Air as the TV source. • Auto Scan: To auto scan the TV channels. Press ENTER to start auto scanning TV channels. Press ENTER again at any time to interrupt scanning. • TV: To select the TV channel to be skipped. Press ◄► to change channel. • Channel Add/Del.: Select Delete to skip the channel appointed, or select Add to restore the channel appointed.
The factory default of the password is “0000”. To enable parental control, input the password, press ▼ button to focus on “ok” key, and press ENTER. (select Cancel if you want to exit) After entering, the following screen will be shown. Channel Lock: To lock channels. Use ◄► to select the channel you want to lock, and then press ENTER to lock or unlock it. Change Password: To change the password, press ENTER and enter the password again. Press ENTER, and the following screen appears.
DTV Menu — To set up DTV settings ENGLISH It is only active in DTV sources. • Audio Language: To select an audio language from English, French, or Spanish. • Time Zone: To select Time Zones. • SPDIF Type: To select the type of audio transfer file format. • Auto Scan: Press ENTER to start scanning DTV channels automatically. Press MENU at any time to cancel Auto Scan. • Manual Scan: To scan the DTV channels manually. Press ENTER and select Scan Mode with ◄►.
ENGLISH When in Add-on Mode, Press ENTER to start scanning all channels, and press MENU at anytime to cancel scanning. When in Range Mode, use ▲▼ and number buttons to set the scanning range. Press ENTER to start scanning, and press MENU at anytime to cancel scanning. • Channel Skip: To skip channels when viewing channels with CH ▲ and ▼. Press ENTER, and then use ENTER to check/uncheck the channel you want to skip.
• Channel Block: Press ENTER to enter the password and block/unblock the channel(s). • Caption: To select closed caption signal formats and set up caption modes. (CC1~CC4, ENGLISH Service1~Service 6) Use ▲▼ to select Analog Closed Caption or Digital Closed Caption, and then use ◄► to select caption types. Move the cursor to Caption Style, and press ENTER. Use ◄► to select Caption Style from As Broadcaster or Custom.
VGA Menu — To set up for computer ENGLISH It is only active in VGA sources. • Auto Adjust: Press ENTER to auto adjust picture’s horizontal position, vertical position, fine tune and H-Size. • Contrast: To adjust contrast of the video. • Brightness: To adjust luminance of the video. • Fine Tune: To adjust the delay time of data and clock to reduce noise in picture. • Manual Clock: To adjust the horizontal pixel clock of the video. • H. Position: To adjust the horizontal position of the picture. • V.
• Block MPAA Rating: To adjust movie blocking level in the US. You can select between ENGLISH NONE, G, PG, PG-13, R, NC-17, or X. The movie Ratings in the US are defined as following. G General audience R PG Parental guidance suggested NC-17 No one 17 and under limited PG-13 Parents strongly cautioned X Restricted Adult audience only Use ENTER button to block or unblock the ratings, and use MENU to exit. • Block TV Rating: To adjust TV blocking level in the US.
• Canadian English Rating: To adjust blocking level in English-speaking region of Canada. ENGLISH You can select between CE_E, CE_C, CE_C8, CE_G, CE_PG, CE_14, and CE_18. The TV Ratings in English-speaking region of Canada are defined as following.
PIP/POP PIP/POP button allows you to watch two screens from different sources at the same time. (PIP is picture in picture; POP is picture out of picture) Press PIP/POP on the remote control repeatedly. The screen will change from normal screen → PIP screen → POP screen. POP Screen ENGLISH PIP Screen • PIP Input Source Select 1. Press P.INPUT button to select input source for sub-screen as following.
• PIP Size Select: Press P.SIZE to select the size of sub-screen. The function only acts on PIP. • PIP Position Select: Press P.POS to select the position of sub-screen. The function only ENGLISH acts on PIP. Note that the screen indexed with the pink frame is the screen you select to set up. Use ◄► to move the index between the main screen and the sub-screen.
Other Information Specifications ENGLISH LCD Type Color Filter Glass surface Input signal RGB 27” TFT Active Matrix RGB 0.4365 (H) x 0.4365 (V) mm pixel RGB vertical stripe Anti-Glare Audio RGB analog (0.7/1.
No power • Make sure the LCD TV is properly connected. • Make sure the AC power cord is properly connected. • Make sure the AC power is ON, DC power button is ON (Green LED). • Plug another electrical device (like a radio) to the power outlet to verify that the outlet is supplying the proper voltage. Poor or no picture • The TV station may be experiencing problems. Try another channel. • The Cable TV signal may be scrambled or encoded. Please contact your local cable operator.
Customer Support For technical support or product service, see the table below or contact your reseller. ENGLISH Note: You will need the product serial number. Country/ Region Web Site T=Telephone F=Fax Email United States www.viewsonic.com/support/ T= (800) 688 6688 F= (909) 468 1202 service.us@viewsonic.com Canada www.viewsonic.com/support/ T= (866) 463 4775 service.ca@viewsonic.
Limited Warranty VIEWSONIC® LCD TV How long the warranty is effective: ViewSonic LCD TVs are warranted for one (1) year for all parts excluding the light source and one (1) year for labor from the date of the first customer purchase. Who the warranty protects: This warranty is valid only for the first consumer purchaser. What the warranty does not cover: 1. Any product on which the serial number has been defaced, modified or removed. 2. Damage, deterioration or malfunction resulting from: a.
ViewSonic ®