22-Inch Full-HD LCD Display - User Guide - ሢ၊࿁ Model No.
ńŰůŵŦůŵŴ Important Safety Instructions .................................................................................................................................................1 Declaration of RoHS Compliance ..........................................................................................................................................2 Copyright Information......................................................................................................................................
Important Safety Instructions 1. Read these instructions completely before using the equipment. 2. Keep these instructions in a safe place. 3. Heed all warnings. 4. Follow all instructions. 5. Do not use this equipment near water. Warning: 7R UHGXFH WKH ULVN RI ¿UH RU HOHFWULF VKRFN do not expose this apparatus to rain or moisture. &OHDQ ZLWK D VRIW GU\ FORWK ,I IXUWKHU FOHDQLQJ LV UHTXLUHG VHH ³&OHDQLQJ WKH /&' 79´ LQ this guide for further instructions.
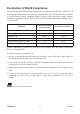
Declaration of RoHS Compliance This product has been designed and manufactured in compliance with Directive 2002/95/EC of the European Parliament and the Council on restriction of the use of certain hazardous substances LQ HOHFWULFDO DQG HOHFWURQLF HTXLSPHQW 5R+6 'LUHFWLYH DQG LV GHHPHG WR FRPSO\ ZLWK WKH PD[LPXP FRQFHQWUDWLRQ YDOXHV LVVXHG E\ WKH (XURSHDQ 7HFKQLFDO $GDSWDWLRQ &RPPLWWHH 7$& DV VKRZQ EHORZ Proposed Maximum Concentration Actual Concentration /HDG 3E 0.1% < 0.
Copyright Information &RS\ULJKW 9LHZ6RQLF &RUSRUDWLRQ $OO ULJKWV UHVHUYHG 9LHZ6RQLF WKH WKUHH ELUGV ORJR 2Q9LHZ 9LHZ0DWFK DQG 9LHZ0HWHU DUH UHJLVWHUHG WUDGHPDUNV RI 9LHZ6RQLF &RUSRUDWLRQ 'LVFODLPHU 9LHZ6RQLF &RUSRUDWLRQ VKDOO QRW EH OLDEOH IRU WHFKQLFDO RU HGLWRULDO HUURUV RU omissions contained herein; nor for incidental or consequential damages resulting from furnishing WKLV PDWHULDO RU WKH SHUIRUPDQFH RU XVH RI WKLV SURGXFW ,Q WKH LQWHUHVW RI FRQWLQXLQJ SURGXFW LPSURYHPHQW
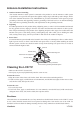
Antenna Installation Instructions 1.
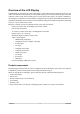
Overview of the LCD Display Congratulation in purchasing the LCD Color Display. This product has been designed to provide you with a rich audio and video experience. This monitor enables you to watch broadcast or cable television ,channels, connect VCR, VCD or DVD player to watch your favorites movies, or connect a computer to use the display as a monitor.
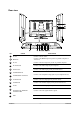
Front view Power Indicator LED 1 SOURCE Switch among the input source. 2 MENU 3UHVV WKH EXWWRQ WR HQWHU 2Q 6FUHHQ 'LVSOD\ 26' 3 VOL +/- 䔌ܹ⑤ 䙌ஂ Increase or decrease the volume. 1 2 ䷇䞣 4 CH S/T ䷇䞣 3 Increase or decrease channel number. 䙌ৄ 䙌ৄ 4 Power indicator LED indicates if the LCD power is turned on (blue) or in stand-by state (orange).
Rear view 11 12 13 䔌ܹ⑤ 䙌 ䷇䞣 ䷇䞣 䙌ৄ 䙌ৄ 1 NO 2 3 4 5 6 7 8 9 10 ITEM FUNCTION 1 AC-IN Connect to the AC outlet. 2 HDMI IN Connect to the HDMI output of your PC or portable computer or A/V device. 3 PC -IN Connect to the VGA output of your PC or portable computer. 4 PC AUDIO IN Connect to the audio output of your computer. 5 AUDIO OUT Connect to the audio input jack of your Audio device.
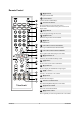
Remote Control 1 Ⴋྛ POWER Turn power ON or OFF. 2 COLOR KEYS 1 Context sensitive OSD hotkeys. 3 SOURCE HOTKEYS 2 Press the hotkeys to select the input source. Press DTV once for DTV source; press twice to enter digital radio. 3 4 ঝ๖ FREEZE Freeze the present image on the screen. 5 ӱඈ RETURN Switch to the previous viewed channel. 6 ᚔ EXIT Exit OSD menus. 4 5 7 OSD MENU UP/FAST FORWARD Move up in OSD menus/fast forward media.
17 ଉဴྛ SOURCE Select the video source signal. 18 ኵԅᗤ NUMBER KEYS 17 Press the number keys to enter channel numbers. 19 ቶᒉᄍ WIDE Switch the display mode between various wide modes. 20 OSD MENU LEFT/SKIP BACKWARD Move left in OSD menus/skip to previous media 21 *8,'( 21/< ,1 '79 26' 0(18 Enter the program guide of DTV OSD. 18 22 OSD MENU DOWN/REWIND Move down in OSD menus/rewind media. 23 ᒵᓜ CHANNEL ST Press the S or T keys to increase or decrease the channel number.
Getting started 3OHDVH UHIHU WR WKH IROORZLQJ VHFWLRQV IRU GHWDLOHG LQVWUXFWLRQV DERXW FRQQHFWLQJ WKH DXGLR YLGHR $9 device of your LCD Display and view your favorite programmes or movies .These sections describe the basic procedures required to set up your Display for easy and convenient viewing. Inserting the remote control batteries Insert the two AAA batteries provided into the remote control as described below: 1.
Cable Connections PC Connector VGA DVI Supported Resolutions Standard Resolution Hor. Total Hor. Freq. (KHz) DOS VESA VESA VESA VESA MAC VESA VESA VESA VESA 720x400@70Hz 640x480@60Hz 640x480@75Hz 800x600@60Hz 800x600@75Hz 832x624@75Hz 1024x768@60Hz 1024x768@75Hz 1280x1024@60Hz [ # +] 5 900 800 840 1056 1056 1152 1344 1312 1688 2080 31.47 31.46 37.50 37.87 46.87 48.943 48.36 60.02 63.98 66.587 Hor. Ver. Ver. Freq. Ver.
Other Connections 1 1 2 2 3 4 5 HDMI Connect to devices with HDMI output such as Blu-ray players, DVD players, Cable boxes, VCR / VCD players, PCs, and portable PCs. Audio cable Connect to devices with audio output such as DVD recorders, VCRs, and Home theater audio equipment. 3 Component cable Connect to devices such as DVD players, Digital TV receivers, and Digital satellite receivers. 4 A/V connector Connect to devices with A/V output such as VCRs, VCD players, and DVD players.
Notes: Refer to these notes before connecting any audio / video equipment to this Display: • Refer to the manuals of your Display, stereo, or other equipment. • Disconnect all equipment from the power outlets. Connect the equipment to the power outlets only after you have completed connecting everything. Never make or change connections when equipment still connected to a power outlet. • Connect DVD player directly to the Display.
Basic Operation 䔌ܹ⑤ 1 5 Turn the LCD Display ON Press the POWER key to turn on or off the power of the LCD Display. The indicate light is blue as power ON and orange as power OFF. 䙌ஂ ䷇䞣 2 3 ䷇䞣 Press ᒵѮ Ÿź RU ᒵᓜ Ÿź NH\ WR LQFUHDVH RU decrease the channel number. 䙌ৄ 3 2 䙌ৄ Select Channel Adjust Volume Press ॱ໔ NH\ WR LQFUHDVH RU GHFUHDVH the volume. 5 1 4 Press ᓗॱ key to disable the audio output.
6 MTS Press ᚖᇭ key to switch monaural and stereo modes. This function enable you to receive a second language or unrelated audio. 7 WIDE Press ቶᒉᄍ key repeatedly to switch the display modes: 16:9, 4:3, Full, Panorama, Crop, Standard. Only DTV and PC Modes support changes to aspect ratio. 8 SLEEP TIMER Press ᆃ repeatedly to set the sleep timer from 15 to 60 mins. 9 Sound Mode Press ॱਝ key repeatedly to select sound mode.
Using the OSD Menu 7KH 2Q 6FUHHQ 'LVSOD\ 26' PHQX V\VWHP SURYLGHV D TXLFN DQG VLPSOH PHWKRG WR DGMXVW /&' 'LVSOD\ base setting. OSD menu can be viewed using both the remote control and the control buttons on the control panel. 1 Press ᒵ key on the control panel or Ҭᓃ key on the remote control to view OSD menu. 2 Press ST key to select the function. 3 Press X key to enter the sub menu. 4 Press ST key to select the item and press WX to adjust.
Picture Adjustment The Picture adjustment enable you to adjust Brightness, Contrast, Sharpness, Color, Hue, Color Temp, and Dynamic Contrast. 1 2 3 Press ᒵ key on the control panel or Ҭᓃ key on the remote control to view OSD menu. Press ST key to select [Picture] mode. Press WX RU NH\ WR VHOHFW 3LFWXUH 0RGH LWHP Press WX or +/- key to select User, Standard, Vivid, Soft. In preset Picture Modes, it is allowed to adjust each subpicture-item setting.
4 Press ᒵ key on the control panel or Ҭᓃ key on the remote control to exit OSD menu. %ULJKWQHVV DGMXVWPHQW $GMXVW WKH levels of light on your screen. It should be used in conjunction with the contrast option. &RQWUDVW DGMXVWPHQW $GMXVW WKH GLIference between the dark and light level on your screen. 6KDUSQHVV DGMXVWPHQW $GMXVW WKH sharpness level on your screen. &RORU DGMXVWPHQW FKDQJH WKH GRPLnant color intensity on your screen.
Sound Adjustment The Sound adjustment enable user to adjust volume, treble, bass, balance, speaker output and surround setting. 1 2 3 Press ᒵ key on the control panel or Ҭᓃ key on the remote control to view OSD menu. Press ST key to select [Sound] mode. Press WX or +/- key to enter sub-menu. Press WX NH\ WR VHOHFW 6RXQG 0RGH In preset Audio Modes, it is allowed to adjust each subaudio-item setting. Press ST key to select item and press WX key or +/- key to adjust setting.
4 5 Press WX or +/- key to select Standard, Music, Movie, Speech, User. Press ᒵ key on the control panel or Ҭᓃ key on the remote control to exit OSD menu. 7UHEOH DGMXVWPHQW $GMXVW WKH KLJK frequency content in audio output. %DVV DGMXVWPHQW $GMXVW WKH ORZ IUHquency content in audio output. %DODQFH DGMXVWPHQW %DODQFH WKH YROume of right and left speakers.
TV Tuner Adjustment • The Tuner Adjustment enable user to adjust the setting of tuner function. • Tuner Adjustment only can be operated in TV mode. 1 2 3 4 ViewSonic Press ᒵ key on the control panel or Ҭᓃ key on the remote control to view OSD menu. Press ST key to select [Channel] mode. Press WX or +/- key to enter sub-menu. Press ST NH\ WR VHOHFW &KDQQHO Press WX key to search Channels manually. Press ST NH\ WR VHOHFW &$79 $LU DQG SUHVV X to set the channel signal system for Air or Cable.
5 6 7 ViewSonic Press ST NH\ WR VHOHFW $XWR 6HDUFK LWHP DQG SUHVV X to start scaning channels. Press ST NH\ WR VHOHFW 6NLS LWHP DQG SUHVV X to skip channels where no signal is detected. Press ᒵ key on the control panel or Ҭᓃ key on the remote control to exit OSD menu.
DTV OSD Functions 7KH '79 26' 2Q 6FUHHQ 'LVSOD\ PHQX SUHVHQW XVHU D FRQVLVWHQW ORRN DQG IHHO WKURXJKRXW 8VHU FDQ adjust the DTV channel system setting in this menu. First time enter DTV OSD, the DTV channel system will be automatically search all channels. Press ᒵ key on the control panel or Ҭᓃ key on the remote control to view OSD menu.
DTV Channel Management 1 2 3 Press ST NH\ WR VHOHFW &KDQQHO 0DQDJHPHQW Press X key to enter the Channel Manager submenu. Press ST NH\ WR VHOHFW &KDQQHO 2UJDQL]HU Press X to enter the Channel Organizer screen. Select a channel using ST keys and use the colored buttons on the remote control to organize the listed channels: • Press [Red] to set the selected channel as a Favorite. • Press [Green] to Delete the selected channel. • Press [Yellow] to Skip the selected channel.
4 Press ST NH\ WR VHOHFW &KDQQHO *URXSLQJ Press X to enter the Channel Grouping screen. Select a channel using ST keys and add the channel to groups by pressing the corresponding numeric key on the remote. For example, select channel 02 and press [2] on the remote to add channel 02 to the News group.
DTV Functions 1 2 3 ViewSonic Press ST NH\ WR VHOHFW $XWR 6HDUFK LWHP DQG SUHVV X to start scaning channels. Discovered TV and Radio channels are displayed in the corresponding panels. Press ST NH\ WR VHOHFW 0DQXDO 6HDUFK Press X key to enter the Manual Search screen. Press WX to select a channel to scan. The signal strength and quality are displayed at the bottom of the screen. Press [PLAY] to add the selected channel to the channel list.
Press WX to select Auto or Manual: Auto—automatically adjusts the date and time. Manual—enter the date and time manually using the Calender screen. 4 • Press [Red] to set the Year. • Press [Green] to set the Month. • Press [Yellow] to set the Day. 3UHVV >3/$<@ WR FRQ¿UP Enter the Time using STWX and press [PLAY] to FRQ¿UP Press ST NH\ WR VHOHFW 9HUVLRQ 7KH 9HUVLRQ ¿HOG LV GLVSOD\ RQO\ \RX FDQQRW PDNH changes to the Version displayed.
PC Setup The PC Setup adjustment enable you to adjust PC mode settings: Auto Adjust, H Position, V Position, Phase, and Clock (make sure the input source is in 3& PRGH 1 2 3 4 Press ᒵ key on the control panel or Ҭᓃ key on the remote control to view OSD menu. Press ST key to select [PC Setup] mode. Press WX or +/- key to enter sub-menu. Press ST NH\ WR VHOHFW $XWR $GMXVW Press X key to auto adjust screen to the best position. Press ST key to select PC Setup parameters.
Setup Adjustment • The setup Adjustment enable you to adjust OSD Language, OSD Time, Aspect, Background, and Backlight. • User can reset all OSD setting in this option. 1 2 3 4 ViewSonic Press ᒵ key on the control panel or Ҭᓃ key on the remote control to view OSD menu. Press ST key to select [Setup] mode. Press WX or +/- key to enter sub-menu. Press ST NH\ WR VHOHFW /DQJXDJH Press WX key to select English or Traditional Chinese.
Aspect Ratio Auto—automatically selects the best aspect ratio for the input source. 16:9—A wide-screen aspect ratio for video. 4:3 6WDQGDUG 79 VFUHHQ SURSRUWLRQDOly four units wide for every three units high, no matter the size of the screen. 5 Press ST NH\ WR VHOHFW $VSHFW Press WX key or +/- to switch image size: 16:9, 4:3, Full, Panorama, Crop, or Standard. 6 Press ST NH\ WR VHOHFW %DFNJURXQG Press WX key to turn on the optional blue background.
Using a USB Source ,QVHUW D 86% NH\ FRQWDLQLQJ YDOLG ¿OH IRUPDWV LQWR WKH VORW RQ WKH GLVSOD\ DQG SUHVV ᒯΣྛ on the control SDQHO RU >86%@ RQ WKH UHPRWH FRQWURO WR VHOHFW 86% VRXUFH Supported File Formats PHOTO VIDEO AUDIO Device File System ViewSonic JPEG File types: *.JPG &RPSDWLEOH )LOH )RUPDW -3(* %DVHOLQH Maximum Resolution: 4992 x 3328 pixels BMP File types: *.BMP Compatible File Format: MS Windows V3.
Select a media type using the colored buttons on the remote control: • 3UHVV >5HG@ WR SOD\ 0RYLH ¿OHV • Press [Green] to SOD\ 0XVLF ¿OHV • Press [Yellow] to view 3KRWR ¿OHV Although all media formats are shown in all media modes, only media associated with the selected mode can be played. For example, Music files such as .MP3s cannot be played in Movie mode. Press the ST NH\V WR PRYH EHWZHHQ IROGHUV DQG ¿OHV RQ WKH FXUUHQW VFUHHQ DQG WX to select items. Press X to play the selected media.
Program Guide Press [GUIDE] key on the remote control and wait for few seconds, LCD Display will show the program guide subpage. The Program Guide can be devided into 6 parts: 'DWH DQG WLPH 6KRZ WKH FXUUHQW GDWH DQG WLPH E\ GD\ PRQWK \HDU '' 00 <<<< 2. Time range: EPG can show program list within 2 hour range. Current program will be shown in the ¿UVW EORFN 3. Channel menu: Shows all channel name . 4. Program List: Descend the manifestation program name in time zone according to the program length.
Other Information Toubleshooting No power • Make sure the Display and the power cord are connected correctly. • Check if you pressed POWER on the remote control unit. If the indicator in the front panel is red, press POWER in the remote control or the front control panel. No picture • Connect to local CATV system equipment, and make sure the signal is unlocked. • Make sure the Display and the Audio/Video signal input devices are connected correctly.
Customer Support For technical support or product service, see the table below or contact your reseller. You will need the product serial number. Country/ Website Region Taiwan www.viewsonic.com.tw T=Telephone E-mail F= Fax T=886 2 2246 3456 F=886 2 2249 1751 service@tw.viewsonic.com Toll Free=0800 061 198 Hong Kong www.hk.viewsonic.com/support/ T= 852 3102 2900 ViewSonic 35 service@hk.viewsonic.
Limited Warranty VIEWSONIC® LCD Display What the warranty covers: ViewSonic warrants its products to be free from defects in material and workmanship, under normal use, during the warranty period. If a product proves to be defective in material or workmanship during the warranty period, ViewSonic will, at its sole option, repair or replace the product with a like product. Replacement product or parts may include remanufactured or refurbished parts or components.