ViewSonic ® VPC220 All-in-One PC - User Guide - Guide de l’utilisateur - Guía del usuario - Pyководство пользователя - Kullanιcι kιlavuzu Model No.
Compliance Information For U.S.A. This device complies with part 15 of FCC Rules. Operation is subject to the following two conditions: (1) this device may not cause harmful interference, and (2) this device must accept any interference received, including interference that may cause undesired operation. This equipment has been tested and found to comply with the limits for a Class B digital device, pursuant to part 15 of the FCC Rules.
Industry Canada Notice This wireless module device complies with Canadian RSS-210.To prevent radio interference to the licensed service, this device is intended to be operated indoors and away from windows to provide maximum shielding. Equipment (or its transmitting antenna) that is installed outdoors is subject to licensing.
Important Safety Instructions 1. Read these instructions completely before using the equipment. 2. Keep these instructions in a safe place. 3. Heed all warnings. 4. Follow all instructions. 5. Do not use this equipment near water. Warning: To reduce the risk of fire or electric shock, do not expose this apparatus to rain or moisture. 6. Clean with a soft, dry cloth. 7. Do not block any ventilation openings. Install the equipment in accordance with the manufacturer’s instructions. 8.
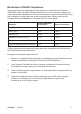
Declaration of RoHS Compliance This product has been designed and manufactured in compliance with Directive 2002/95/EC of the European Parliament and the Council on restriction of the use of certain hazardous substances in electrical and electronic equipment (RoHS Directive) and is deemed to comply with the maximum concentration values issued by the European Technical Adaptation Committee (TAC) as shown below: Substance Proposed Maximum Concentration Actual Concentration Lead (Pb) 0,1% < 0,1% Mercury
Copyright Information Copyright © ViewSonic® Corporation, 2010. All rights reserved. Microsoft®, Windows®, Windows NT®, and the Windows® logo are registered trademarks of Microsoft® Corporation in the United States and other countries. ViewSonic®, the three birds logo, OnView®, ViewMatch™, and ViewMeter® are registered trademarks of ViewSonic® Corporation. Intel®, Pentium®, and Atom™ are registered trademarks of Intel Corporation. Award® is a registered trademark of Phoenix Technologies Ltd.
Table of Contents Getting Started............................................................................................................ 1 Package Contents................................................................................................. 1 System Overview................................................................................................... 2 Safety and Comfort Tips........................................................................................
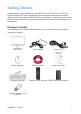
Getting Started Congratulations on your purchase of this All-In-One PC! This All-in-One PC is an inclusive desktop PC that is designed for quick installation and easy use without taking up much desk space. With its built-in components, it is flexible yet economical, providing users with maximum computing experience without compromising system performance. Package Contents Your package comes with the following items. If any of them are missing, please contact your retailer.
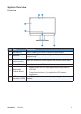
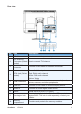
System Overview Front view No. Item Description 1 Microphone Use for chatting and other interactive applications. 2 Webcam Use for taking pictures, recording videos, and video conferencing. 3 Touch Screen (select model) Touch the screen to select objects and perform other tasks. 4 Power Button Press to power on / off the device. 5 Brightness Control Button 6 LED The LED turns blue when the corresponding function is (wireless / HDD) enabled ViewSonic VPC220 1.
Rear view No. Item Description 1 DC-IN connector Use to connect the power adapter 2 PAL Antenna Connector (Select Use to connect TV Antenna. model) 3 RJ45 / LAN connector Connect a LAN cable for network connection. 4 RCA Jack (Select model) For audio/video input Red: Right audio channel White: Left audio channel Yellow: Video 5 USB connectors Connect USB devices such as a mouse, keyboard, printer, scanner, and other peripherals. 6 VGA-out Connect a VGA cable to external display device.
Side views No. Item Description 1 Card reader Slot Supports memory cards including XD, SD, MS, MS Pro, or MMC cards. 2 Microphone Connector Connect an external microphone. 3 Headphone connector Connect speakers or headphones. 4 USB connector Connect USB devices such as a mouse, keyboard, printer, and other peripherals. 5 Optical disk Drive Plays or records DVD or CD disc. 6 Eject button Press to eject the tray from the disc drive.
Safety and Comfort Tips This device is designed to be a complete plug-and-play system and easy to use without taking up much desk space. However, choosing a good workspace is important if you have to work with your computer for a long period of time. • Your work area should have enough illumination. • hoose the proper desk and chair and adjust their height to fit your posture C when operating. • hen sitting on the chair, adjust the chair’s back (if available) to support your W back comfortably.
Having Good Work Habits Having good work habits is important if you have to work with your computer for long periods of time; otherwise, it may cause discomfort or injury to you. When working with your computer, it is better to divide your work periods and to take frequent short breaks. During the short breaks, do the following relaxing exercises: • At regular, 10-minute intervals, lift up your eyes and look straight ahead at least 5 meters away. • Do some stretching exercises.
Setting Up Your Computer This chapter will guide you in installing necessary and additional components to maximimize the system performance of your All-in-One PC. Connecting External Devices The I/O (input/output) ports on the device allow you to connect peripheral devices. All devices listed here are for reference only. Connecting USB Devices This computer provides USB ports for connecting various USB devices, such as mouse, keyboard, digital camera, printer, and external storage device.
Connecting Communication Devices Using the LAN The RJ-45 connector of the computer allows you to connect the LAN (local area network) devices, such as a hub, switch and gateway, to build a network connection. For more instructions or detailed steps on connecting to the LAN, please ask your MIS staff or network manager for help. VGA HDMI Video Internet Using the Wireless LAN This computer is equipped with wireless LAN module that supports the IEEE 802.11 standard to achieve high speed data transmission.
Connecting Video Equipment Connect an HDMI digital video device using an HDMI cable (not included with purchase). VGA HDMI Video Select the signal source Follow below steps while you are inserting the HDMI cable: 1. The input signal select On-Screen Display (OSD) menu will display automatically. 2. Press control button to choose PC or HDMI, the signal source will switch after 2 sec. 3. Conversely if you don’t choose a signal source, the OSD menu will automatically disappear after 2 sec.
Adjusting LCD Screen Brightness You can adjust the brightness by pressing the Brightness control buttons on the front side of the computer. • To increase the brightness, press • To decrease the brightness, press . . Connecting External Display Devices Connect an external monitor or other standard VGA-compatible device (such as projector, television, etc) using a VGA cable (not included with purchase).
Connecting Audio Components Connecting to Headset Plug the stereo headphone cable into the headphone connector of your computer. Connecting a Microphone Plug the microphone cable into the microphone connector of your computer. Tilting the Screen 1. Place the computer on a stable surface, such as a table. 2. Pull the bottom of the screen outwards, the screen can be tilted about 10º~35º to suit your preference.
Connecting the Power Supply VGA HDMI Video 1. Connect the power adapter to the DC-IN connector of the computer. 2. Connect the power cord to the power adapter. 3. Plug the power cord into an electrical outlet. Note • When disconnecting the power, always unplug the power cord from the electrical outlet first. Use the cord’s head to unplug, never pull the cable. Using the Card Reader The card reader supports SD, MMC, MS, and XD memory cards. Inserting a memory card 1.
Removing a memory card 1. Push the card gently to eject it. 2. Pull the card out from the slot. Note • Before removing a memory card, use the configuration utility on the taskbar to stop the memory card operation. Failure to do so may result in data loss. Using the Optical Disk Drive 1. Press the Eject button on the drive. 2. Gently pull out the disc tray. 3. With the label side facing forward, place the disc in the center of the disc tray. 4. Gently push the disc tray back into the disk slot. 5.
Using the TV Tuner (Select model) The TV Tuner includes the IR receiver, Remoter Controller and an application ViewSonic. Overview of the Remote Controller No. Description 1 2 3 4 5 6 7 8 Turn on/off the application Turn on/off the sound. Use numeric button to select a channel Display TV full screen Change between available audio modes Main Screen: Use the arrow button to navigate all on-screen items.
Main screen: A shortcut to the main menu –“TV” 9 10 11 12 13 14 15 Teletext Mode: Jump to the teletext page of the corresponding color according to this button View Teletext / Close caption information View EPG information. ( the function is only for digital TV) Record the current program Play the selected file and freeze the playback temporarily Go to the previous item in the playlist.
Starting the TV Tuner Running for the first time When you run for the first time, a setup wizard will automatically appear and take you through all necessary setting step by step. You can just follow the dialog box to complete the setting easily. IF you want to re-configure all the settings again, go to the main page and select Select General Run Wizard Again TV Under the TV main menu, you can enjoy watching TV, record your favorite program and so on.
Recording a TV Program and Playing it When watching TV, Select to stop. To play it, to record a program immediately, and then select 1. Select TV Recorded Files. 2. Chose desired file. 3. Select Play. 4. Double click the small TV monitor to switch to the full-screen. Video You can view recorded video or other video files. Playing Video files 1. Select Video. 2. Select video file in the list or select More Videos to choose other folders.
Music Playing Music 1. Select Music Add Music and then select the desired folder. 2. Choose the tracks you wish to play and then select OK to go back. 3. Then you can see the added file displayed.
System Operations This chapter provides you with the basic information on system operations such as network settings, adjusting LCD screen and resolution, using the touch screen, and power management. Connecting to Internet Connecting to LAN 1. Plug one end of the network cable to the LAN connector at the rear of your computer. 2. Connect the other end to a network hub or a wall socket. 3. Press the Power button to turn on the computer. 4. Click Start > Control Panel.
5. Select Network and Internet > Connect to the Internet. 6. Check Show connection options that this computer is not set up to use, and select Broadband (PPPoE).
7. Enter the information for your Internet service provider (ISP). For details on the required data, contact your internet service provider. 8. To establish a LAN connection, click Connect.
Connecting to Wireless LAN 1. Press the Power button to turn on the computer. 2. Click Start > Control Panel. 3. Select Network and Internet > Connect to the Internet.
4. Select Wireless. 5. If the WLAN connection are available, the computer displays a list of available WLAN connection, and select a connection from the list. Otherwise, select Open Network and Sharing Center to establish a new connection. 6. Select Set up a new connection or network.
7. Select Manually connect to a wireless network, and click Next. 8. Enter the information for the wireless network. 9. The new WLAN connection is now completed, and click Close. To change the WLAN settings, click Change connection settings.
Adjusting LCD Screen Resolution 1. Click Start > Control Panel. 2. Select Appearance and Personalization > Adjust screen resolution. 3. Select the desired resolution setting. Click on the pull-down menu to see more options. 4. Click OK.
Using the Touch Screen (Optional) Calibrating the Screen To ensure touch accuracy, calibrate the screen. 1. Click Start > Control Panel. 2. Select Harware and Sound > Calibrate the screen for pen or touch input. 3. Click Calibrate. 4. Follow the on-screen instructions to complete screen calibration.
Using the On-Screen Keyboard Click the icon on the taskbar to activate the on-screen keyboard. Handwriting icon Keyboard icon Standard keyboard Expanded keyboard • Tap the keys on the keyboard just as you would on a hardware keyboard. • To toggle between standard and expanded keyboard, click Tools > Show expanded keyboard. • When keys are pressed, the on-screen keyboard predicts the word as you type. Word suggestions appear on top of the keyboard. Click a word to select it.
Power Management Using the Power Plan To improve energy efficiency, you can use the power plan to reduce the amount of power your computer uses, maximize the performance, or balance the two. 1. Click Start > Control Panel. 2. Select System and Security > Power Options. 3. Select a power plan. 4. To adjust the selected power plan settings, click Change plan settings.
Using the Power Saving Mode When you are not using the computer, turn off the computer or set the computer to enter sleep mode. To wake up the computer from sleep mode, do one of the following: • Press the Power button. • Move the mouse. • Press any key on the keyboard. Note Energy Saving Tip: • If the computer is left idle for a period of time, press the Power button to turn off the LCD screen, or set the computer to enter sleep mode. • Set the Windows power plan to “power saver”.
BIOS Setup Utility BIOS Setup Utility is a program for the BIOS (Basic Input/Output System) setting of the computer which identifies the types of installed devices and establishes special features. This chapter guides you on how to use the BIOS Setup Utility. Using BIOS Setup You many need to run the BIOS Setup when: • An error message appears on the screen during the system booting up and is requested to run SETUP. • You want to change the default setting for customized features.
Function Key Description Load the Optimal defaults. Save changes and reboot the computer. Tab Select the next field. <-> Select the previous value/setting within a field. <+> Select the next value/setting within a field. or Move the cursor to the top/bottom of the window. or Move the cursor to the next/previous page. BIOS Setup Menu The BIOS Setup Utility is divided into five menu categories: Main, Advanced, Boot, Security, and Exit.
Advanced Menu View and configure CPU, IDE, USB, power, chipset, and hardware health settings. Note • If you are not familiar with these settings, it is recommended to use the default configuration for the Advanced Menu options. Setting the wrong values may cause the system to malfunction. CPU Configuration The CPU Configuration displays your All-in-One PC’s CPU specification, such as the module version, manufacturer, frequency, speed among others.
• You can run demanding applications simultaneously without slowing down system response time. For example, you can run multimedia applications or play the latest games and still perform a virus scan in the background. • You can have faster Internet applications. • It is compatible with 32-bit applications and also ready for the future 64-bit technology. IDE Configuration The IDE Configuration displays the status of IDE devices installed in your All- inOne PC.
Note • If you are not familiar with these configurations, it is recommended to allow BIOS to auto detect the devices. Do not manually change these settings to ensure system performance. USB Configuration The USB Configuration sub-menu allows you to configure the USB Configuration and USB Mass Storage Device settings. Select USB Mass Storage Device Configuration and press [Enter] to launch the USB Mass Storage Device Configuration screen.
Power Configuration The Power Configuration sub-menu allows you to configure the mode to restore on AC power loss. Chipset Configuration The Chipset Configuration sub-menu allows you to enable or disable PXE booting.
Hardware Health Configuration This sub-menu displays the hardware condition of your All-in-One PC. Boot Menu Set up boot type and boot sequence. Note • The available sub-menu options may vary depending on the installed devices on your All-in-One PC.
Boot Settings Configuration With this sub-menu, you can configure the type of system boot to execute. • Quick Boot: Enable Quick Boot to allow BIOS to skip certain tests while booting. This will decrease the time needed to boot the system. • Quiet Boot: When disabled, the normal POST (Power On Self Test) messages are displayed when the system boots up. When enabled, ViewSonic logo is displayed instead. • Bootup Num-Lock: Turn the “Power-on state for Numlock” on or off.
To change the specified device, press [Enter] to select an available device from the list. Boot Menu When the ViewSonic® logo appears, quickly press the F11 button on the keyboard. Then you will enter Boot Menu. It allows you to select the boot device. Security Menu Install or clear Supervisor’s and user’s password settings. Note • Available options on the menu screen may vary depending on the type of passwords set.
Supervisor Password The Supervisor can access and change setup utilities. He/she can also define the limitation of user access. To set or change the supervisor password: 1. Select Change Supervisor Password. 2. Type the password, then press [Enter]. A password can have up to six alphanumeric characters and/or numbers. 3. Re-type the password to confirm, then press [Enter]. Once the Supervisor password is set, you can change the User Access Level.
Clear the Password To delete the Supervisor Password: 1. Select Change Supervisor Password. 2. When prompted to enter the new password, just press [Enter]. 3. A message will appear to confirm password is uninstalled. Press [Enter]. To delete the User Password: 1. Select Clear User Password. 2. A message will appear to confirm clearing of password, select Ok then press [Enter]. Note • Once you have set the Supervisor Password, you cannot start your All-in- One PC without entering the password.
• Discard Changes and Exit Select this option to exit BIOS without saving the modified settings. • Discard Changes Select this option to discard any changes. • Load Optimal Defaults Select this option to load optimal default values. • Load Failsafe Defaults Select this option to load failsafe default values. To perform an option, do the following: 1. Select an item. 2. Press [Enter]. A confirmation message appears. 3. Select Ok to proceed or Cancel to cancel the operation.
System Recovery This chapter provides you with the basic information on the system recovery that enables users to restore the system to its default settings. This function is useful in the event of a system failure or when you forget the system passwords. When to Use System Recovery You need to run system recovery: • In the event of a system or hardware failure. • You need to restore the system back to its default settings. • You forgot the system password.
Note • If Windows operating system starts up before you press F3 and you still wish to run System Recovery, restart the All-in-One PC then follow the same above procedures. The “ViewSonic Recovery System” window appears. 3. Click Recover to Factory Default. 4. Click Yes. Another confirmation message appears on the screen. 5. Click Yes. A message appears on the screen. 6. Click OK. System recovery is initiated.
7. After the system has been restored, the following window appears. 8. Click OK to restart your All-in-One PC. 9. After restarting, the Windows Setup Wizard appears to help you configure basic settings. 10. Follow the on-screen instructions to complete setup and start using your All-inOne PC.
Specifications Feature Specifications ® • Intel Pentium Series Processor • Processors power level up to 65Watts TDP supported Main Chipset • Intel® G41 Express Chipset, consisting of: Intel® 82G41 Graphics and Memory Controller Hub (GMCH) Intel® 82801GB I/O Controller Hub (ICH7) • Intel Socket LGA 775 • Support for Windows 7 DirectX computer • 3D Technology • DirectX 10.1 and Shadier Model 4.0 • OGL 3.
Feature Webcam Specifications • Web camera 1.3M (through USB ports module) • Hard Disk: 9 cm/ 3.5”, SATA-II Storage • Card Reader: 4-in-1 (SD, MMC, xD and MS) • Optical Disk Drive: Slimtype Super AllWrite Drive Built-in Card • TV-Tuner card (Mini PCI-E, Select Mode) • WLAN module card (Mini PCI-E) • One DC jack on the rear • Four USB 2.
Troubleshooting This chapter contains a list of common problems that you might experience when using your computer, and techniques to try and overcome the problem. If you need additional help, contact Customer Support. My All-in-One PC does not start. ●● Check that the All-in-One PC is connected to an electrical outlet and it is turned on. ●● Check that the power cord and all cables are connected firmly.
I cannot play a DVD-ROM ●● If a region code warning appears when you are using the DVD player, it could be that the DVD-ROM you are trying to play is incompatible with the DVD-ROM drive in your All-in-One PC. The region code is listed on the disc’s packaging. ●● If you hear audio but cannot see video, your computer’s video resolution may be set too high. For best results, change the display settings, click Start >Control Panel > Settings.
Customer Support For technical support or product service, see the table below or contact your reseller. NOTE: You will need the product serial number. T = Telephone F = FAX Email Australia/New Zealand www.viewsonic.com.au AUS= 1800 880 818 NZ= 0800 008 822 service@au.viewsonic. com Canada www.viewsonic.com T (Toll-Free)= 1-866-463-4775 service.ca@viewsonic. T (Toll)= 1-424-233-2533 com F= 1-909-468-3757 Europe www.viewsoniceurope. www.viewsoniceurope.com/uk/Support/Calldesk.
Limited Warranty VIEWSONIC® ALL-IN-ONE PC What the warranty covers: ViewSonic warrants its products to be free from defects in material and workmanship during the warranty period. If a product proves to be defective in material or workmanship during the warranty period, ViewSonic will, at its sole option, repair or replace the product with a similar product. Replacement Product or parts may include remanufactured or refurbished parts or components.
How to get service: 1. For information about receiving service under warranty, contact ViewSonic Customer Support (Please refer to Customer Support page). You will need to provide your product’s serial number. 2. To obtain warranty service, you will be required to provide (a) the original dated sales slip, (b) your name, (c) your address, (d) a description of the problem, and (e) the serial number of the product. 3.