繁 體 中 文 ® ViewSonic ViewSonic 32/37/42 吋 Full-HD 液晶顯示器 Digital Photo Frame 32/37/42-Inch Full-HD LCD Display DPX702 - Quick Start Guide - 使用手冊 - User Guide ENGLISH ® Model No. : VT3245-NT / VT3745-NT / VT4245-NT Model No.
Contents Important Safety Instructions...........................................................................................................................................................................1 Declaration of RoHS Compliance.....................................................................................................................................................................2 Copyright Information...................................................................................
1. Read these instructions. 2. Keep these instructions. 3. Heed all warnings. 4. Follow all instructions. 5. Do not use this unit near water. 6. Clean with a soft, dry cloth. If still not clean, see “Cleaning the Display” in this guide for further instructions. 7. Do not block any ventilation openings. Install the unit in accordance with the manufacturer’s instructions. 8.
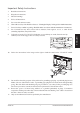
14. Use only with the cart, stand, tripod, bracket, or table specified by the manufacturer, or sold with the unit. When a cart is used, use caution when moving the cart/unit combination to avoid injury from tipping over. 15. Unplug this unit when unused for long periods of time. 16. Refer all servicing to qualified service personnel.
Copyright Information Copyright © ViewSonic® Corporation, 2010. All rights reserved. ViewSonic, the three birds logo, OnView, ViewMatch, and ViewMeter are registered trademarks of ViewSonic Corporation. Disclaimer: ViewSonic Corporation shall not be liable for technical or editorial errors or omissions contained herein; nor for incidental or consequential damages resulting from furnishing this material, or the performance or use of this product.
Antenna Installation Instructions ENGLISH 1.
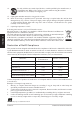
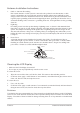
Congratulation in purchasing the LCD Color Display. This product has been designed to provide you with a rich audio and video experience. This monitor enables you to watch broadcast or cable television ,channels, connect VCR, VCD or DVD player to watch your favorites movies, or connect a computer to use the display as a monitor.
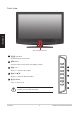
Front view ENGLISH Power Indicator LED 1 訊號源 SOURCE Switch among the input source. 2 選單 MENU Press the button to enter On Screen Display (OSD). 㿞㰳⑤ 3 音量 VOL +/- 䙌ஂ Increase or decrease the volume. ䷇䞣 4 選擇 CH p/q ䷇䞣 Increase or decrease channel number. 5 電源 POWER 1 2 3 䙌 crease or decrease ch 䙌 4 䳏⑤ Power indicator LED indicates if the LCD power is turned on (blue) or in stand-by state (red).
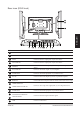
Rear view (32/42-inch) 13 14 ENGLISH 15 1 NO 2 3 4 5 6 7 8 9 10 ITEM 11 12 FUNCTION 1 AC-IN Connect to the AC outlet. 2 S-VIDEO IN Connect to the S-Video output jack of your video/audio device. 3 AV IN Connect to the A/V output jack of your A/V device. 4 AV AUDIO IN Connect to the A/V output jack of your A/V device. 5 HDMI IN Connect to the HDMI output of your PC or portable computer or A/V device. 6 PC AUDIO IN Connect to the audio output of your computer.
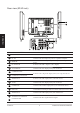
Rear view (32/42-inch) 13 14 ENGLISH 9 10 11 12 1 NO 2 3 4 5 6 7 ITEM 8 FUNCTION 1 USB Connect a USB source. 2 PC -IN Connect to the VGA output of your PC or portable computer. 3 HDMI IN Connect to the HDMI output of your PC or portable computer or A/V device. 4 PC AUDIO IN Connect to the audio output of your computer. 5 AV AUDIO IN Connect to the A/V output jack of your A/V device.
Remote Control 1 電源 POWER Turn power ON or OFF. 電源 1 電視 色差 電腦 音樂 數位相框 2 2 SOURCE HOTKEYS Press the hotkeys to select the input source. 3 頻道往返 RETURN Switch to the previous viewed channel. 4 音量 +/- VOL+/Increase + or decreases - the volume. Disable the audio output. 頻道往返 3 6 離開 EXIT Exit OSD menus. 音量 頻道 顯示 靜音 訊號源 離開 4 7 OSD MENU UP/FAST FORWARD Move up in OSD menus/fast forward media. 8 OSD MENU RIGHT/SKIP FORWARD 5 6 Move right in OSD menus/skip to next media.
Remote Control 13 凍結 FREEZE Freeze the present image on the screen. To continue, press the button again. 電源 電視 色差 電腦 音樂 數位相框 14 雙語 MTS Switch between monaural, stereo, and audio modes. This function enable you to receive a second language or unrelated audio. 15 GUIDE (ONLY IN DTV OSD MENU) Enter the program guide of DTV OSD. 21 16 睡眠 SLEEP TIMER ENGLISH 頻道往返 Press repeatedly to set the sleep timer from 15 to 60 minutes.
Getting started Please refer to the following sections for detailed instructions about connecting the audio/ video (AV) device of your LCD Display and view your favorite programmes or movies .These sections describe the basic procedures required to set up your Display for easy and convenient viewing.
Cable Connections PC Connector HDMI VGA ENGLISH DVI Supported Resolutions Compatibility table of PC Mode Standard Resolution Inputs Composite SVHS YPbPr RGB HDMI DOS 720x400(70Hz) No No No Yes Yes VESA 640x480(60Hz) No No No Yes Yes VESA 800x600(60Hz) No No No Yes Yes VESA 1024x768(60Hz) No No No Yes Yes VESA 1360x768(60Hz) No No No Yes Yes VESA 1280x720(60Hz) No No No No Yes VESA 1280x1024(60Hz) No No No Yes Yes VESA 1920x1080(60Hz) No No No
Other Connections (37-inch) 1 2 3 4 5 3 2 1 S-video cable Connect to devices with S-video output such as DVD players, Digital cameras, and satellite receivers. 2 A/V connector Connect to devices with A/V output such as VCRs, VCD players, and DVD players. 3 HDMI Connect to devices with HDMI output such as Blu-ray players, DVD players, Cable boxes, VCR / VCD players, PCs, and portable PCs.
Compatibility table of Video Mode Inputs ENGLISH Standard Resolution Composite SVHS YPbPr RGB HDMI NTSC 480i(60Hz) Yes Yes Yes No Yes EDTV 480p(60Hz) No No Yes No Yes SDTV 576i(60Hz) No No Yes No Yes SDTV 576p(60Hz) No No Yes No Yes HDTV 720p(50Hz) No No Yes No Yes HDTV 720p(60Hz) No No Yes No Yes HDTV 1080i(50Hz) No No Yes No Yes HDTV 1080i(60Hz) No No Yes No Yes HDTV 1080p(50Hz) No No Yes No Yes HDTV 1080p(24Hz) No No No No Yes
Basic Operation 1 5 Press the POWER key to turn on or off the power of the LCD Display. The indicate light is blue as power ON and orange as power OFF. 4 䙌ஂ 3 ䷇䞣 2 ䷇䞣 3 䙌 1 䳏⑤ Select Channel Press 選擇 ▲▼ or 頻道+/- key to increase or decrease the channel number. 2 䙌 Turn the LCD Display ON Adjust Volume Press 音量+/- key to increase (+) or decrease (-) the volume. 電源 1 電視 色差 電腦 音樂 數位相框 4 Menu Press 選單 key to enter current source OSD Menu.
Basic Operation 6 電源 電視 色差 電腦 音樂 數位相框 Display Press 顯示 key to display channel number (in TV mode) and information of ouput signal. 7 MTS Press 雙語 key to switch monaural and stereo modes. This function enable you to receive a second language or unrelated audio. 8 PICTURE MODE Press 影像 key to change the picture quality : USER, STANDARD, VIVID, SOFT. ENGLISH 9 頻道往返 Sound Mode Press 音效 key repeatedly to select sound mode.
Using the OSD Menu The On-Screen Display (OSD) menu system provides a quick and simple method to adjust LCD Display base setting. OSD menu can be viewed using both the remote control and the control buttons on the control panel. HDMI-1 PICTURE STANDARD NOISE REDUCTION WEAK COLOR TEMP STANDARD AUTO Gamma ON DCR OFF ENGLISH PICTURE MODE : Move ᒔᎁ : Select ᙇ : Return ᠦၲ: Exit 1 Press 選單 key on the control panel or the remote control to view OSD menu. 2 Press pq key to select the function.
Picture Adjustment The Picture adjustment enables you to adjust Brightness, Contrast, Sharpness, Color, Hue, Color Temp, and Dynamic Contrast. 1 Press 選單 key on the control panel or the remote control to view OSD menu. HDMI-1 ᐙቝ ᐙቝᑓڤ : ฝ೯ 2 ۞ྥ ᠧಛࠫލ இ ۥᄵ ۞ྥ ೯ኪGamma ၲ ೯ኪኙֺ ᣂ ᒔᎁ :ᙇᖗ ᙇ :ڃՂԫ ENGLISH PICTURE HDMI-1 PICTURE MODE : Move 3 ᠦၲ:ಯנ Press pq key to select [PICUTURE] mode. Press tu or +/- key to select (PICTURE MODE) item.
4 Press 選單 key on the control panel or 離 開 key on the remote control to exit OSD menu. (Brightness) Adjust the levels of light on your screen. It should be used in conjunction with the contrast option. (Contrast) Adjust the difference between the dark and light level on your screen. (Color) Change the dominant color intensity on your screen. Adjust this setting until the colors on the screen look natural. (Hue) Change the color balance.
Sound Adjustment The Sound adjustment enables you to adjust volume, treble, bass, balance, speaker output and surround setting. 1 Press 選單 key on the control panel or the remote control to view OSD menu. HDMI-1 PICTURE PICTURE MODE : Move 2 STANDARD NOISE REDUCTION WEAK COLOR TEMP STANDARD AUTO Gamma ON DCR OFF ᒔᎁ : Select ᙇ : Return ᠦၲ: Exit Press pq key to select [Sound] mode. Press tu or +/- key to enter sub-menu.
4 Press tu or +/- key to select Standard, Music, Movie, Speech, User. 5 Press 選單 key on the control panel or 離 開 key on the remote control to exit OSD menu. (Treble/Base) Adjust the high frequency content in audio output. (AUTO VOLUME) Turn Auto Volume Control on or off. (SPEAKER) Turn auto speaker adjustment on or off. (HDMI AUDIO INPUT) Select the audio input source: HDMI, VGA ViewSonic 21 VT3245-NT/VT3745-NT/VT4245-NT ENGLISH (Balance) Balance the volume of right and left speakers.
TV Tuner Adjustment • The Tuner Adjustment enables user to adjust the settings of tuner function. • Tuner Adjustment can only be operated in TV mode. 1 Press 選單 key on the control panel or the remote control to view OSD menu. HDMI-1 PICTURE PICTURE MODE : Move 2 STANDARD NOISE REDUCTION WEAK COLOR TEMP STANDARD AUTO Gamma ON DCR OFF ᒔᎁ : Select ᙇ : Return ᠦၲ: Exit Press pq key to select [Channel] mode. Press tu or +/- key to enter sub-menu.
DTV OSD Functions The DTV OSD (On-Screen Display ) menu present user a consistent look and feel throughout. User can adjust the DTV channel system setting in this menu. First time enter DTV OSD, the DTV channel system will be automatically search all channels. Press 選單 key on the control panel or the remote control to view OSD menu. Press pq key to select [DTV] mode then press tu or +/- key to enter sub-menu (make sure the input source is in DTV mode).
DTV Channel Management 1 Press pq key to select (Channel edit). Press u key to enter the Channel edit submenu. DTV CHANNEL 103 104 105 106 107 108 109 110 111 112 : Move ENGLISH DTV Functions ADD ADD ADD ADD ADD DELETE DELETE DELETE DELETE DELETE ATV ATV ATV ATV ATV ATV ATV ATV ATV ATV ˍʳAdd/Delete ᒔᎁ : Select ˍʳ�Favorite 2 Press 選單 key on the control panel or 離開 key on the remote control to exit OSD menu. 1 Press pq key to select (Auto Search) item and press u to start scanning channels.
The PC Setup adjustment enable you to adjust PC mode settings: Auto Adjust, H Position, V Position, Phase, and Clock (make sure the input source is in PC mode). 1 Press 選單 key on the control panel or the remote control to view OSD menu. VGA PC SETUP AUTO ADJUST : Move 2 0 V POSITION 0 PHASE 0 CLOCK 0 ᒔᎁ : Select ᙇ : Return PC SETUP AUTO ADJUST : Move OFF H POSITION 0 V POSITION 0 PHASE 0 CLOCK 0 ᒔᎁ : Select ᙇ : Return ᠦၲ: Exit Press pq key to select (Auto Adjust).
Setup Adjustment • The Setup adjustment enables you to adjust Language, OSD Time, Sleepp Timer, Clock mode, clock set, screen mode, Aspect, blue back, and Backlight. • You can reset all the OSD settings in this option. 1 Press 選單 key on the control panel or the remote control to view OSD menu. SETUP HDMI-1 LANGUAGE : Move 2 ENGLISH OSD TIME 15 SEC SLEEP TIMER OFF ASPECT FULL BLUE BACK RESET OFF ˑˑ VERSION VS32_V0.
Using a USB Source Insert a USB key containing valid file formats into the slot on the display and press 訊號源 key on the control panel or 音樂 key on the remote control to select (USB) source. Music SELECT ALL ˃˃ˍ˃˃ˍ˃˃Γ˃˃ˍ˃˃ˍ˃˃ ARTIST NAME ALBUM PLAY STOP NEXT USB device is not connected RETURN ENGLISH SETUP Supported File Formats PHOTO AUDIO Device File System JPEG File types: *.
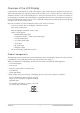
Program Guide ENGLISH Press 節目指南 key on the remote control and wait for few seconds, the LCD Display will show the program guide subpage. There are six parts in the Program Guide: 1. Date and time: Shows the current date and time by day/month/year (DD/MM/YYYY). 2. Time range: EPG shows the program list within a 2-hour range. Current program will be shown in the first block. 3. Channel menu: Shows all channel names. 4.
Other Information Troubleshooting No power • Make sure the Display and the power cord are connected correctly. • Check if you pressed POWER on the remote control unit. If the indicator in the front panel is red, press POWER in the remote control or the front control panel. No picture • Connect to local CATV system equipment, and make sure the signal is unlocked. • Make sure the Display and the Audio/Video signal input devices are connected correctly.
Customer Support For technical support or product service, see the table below or contact your reseller. You will need the product serial number. Country/ Region Website Taiwan www.viewsonic.com.tw T=Telephone E-mail F= Fax T=886 2 2246 3456 F=886 2 2249 1751 service@tw.viewsonic.com Toll Free=0800 061 198 Hong Kong www.hk.viewsonic.com/support/ T= 852 3102 2900 service@hk.viewsonic.
Limited Warranty What the warranty covers: ViewSonic warrants its products to be free from defects in material and workmanship, under normal use, during the warranty period. If a product proves to be defective in material or workmanship during the warranty period, ViewSonic will, at its sole option, repair or replace the product with a like product. Replacement product or parts may include remanufactured or refurbished parts or components.