WMG80 / WMG120 Wireless Media Gateway User Guide
Copyright © 2005 ViewSonic Corporation. All rights are reserved. ViewSonic and the three birds logo are registered trademarks of ViewSonic Corporation. UPnP™ is a trademark of UPnP™ Implementers Corporation (UIC). Microsoft, Windows, the Microsoft Internet Explorer logo graphic, and the Windows logo are either registered trademarks or trademarks of Microsoft Corporation in the United States and/or other countries. Corporate names and trademarks are the property of their respective companies.
Table of Contents Product Registration..................................................................................................... For Your Records......................................................................................................... i i Chapter 1: Overview Typical Setup ................................................................................................................... Product Features .............................................................................
Table of Contents, continued Step 4: Set up your network ........................................................................................ The WAN tab............................................................................................................ Internet Settings ................................................................................................ VPN Connection ................................................................................................ IPSec Policies ...
Table of Contents, continued The WLAN tab.......................................................................................................... Wireless LAN Basic Settings ............................................................................. 54 54 Chapter 3: File Management Transfer content to your Gateway hard drive ................................................................ Method 1: Networking Companion CD....................................................................
Table of Contents, continued Appendix Specifications................................................................................................................. Limited Warranty............................................................................................................ Glossary.........................................................................................................................
Chapter 1: Overview Congratulations on purchasing the ViewSonic WMG80 / WMG120 Wireless Media Gateway print server and hard drive! The ViewSonic WMG80 / WMG120 Gateway gives you the freedom to enjoy all your digital media entertainment - TV, movies, music, gaming, Internet access, digital pictures, and more - from any location in your home. The Gateway easily connects to your networked media adapters and then functions as your in-home networked media storage device.
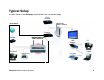
Typical Setup A typical setup for the Gateway shown below starts on the next page.
Product Features Access photos, video, music and more on demand Store the family’s media content on the Gateway for the whole family to access. When the Gateway is combined with a ViewSonic Wireless Media Adapter, you can extend your digital entertainment to any TV or stereo in your home with friends and family in your living room, bedroom, office or media room. Robust security keeps your data secure NAT and SPI firewall ensure your networked data is safe from Internet intruders.
General Requirements • Personal Computer or notebook. • Broadband modem (DSL, cable), or ISP 5.0 or newer. • Microsoft Internet Explorer or Netscape navigator to view and use the Gateway web-based configuration screens. • Available AC power outlet.
Package Contents Check to make sure all of the items shown below are included in the package. WMG80 / WMG120 Gateway Quick Start Guide Networking Companion CD Power Cord and Adapter Ethernet LAN Cable (6 feet) For information on optional accessories and products, go to www.viewsonic.com.
Safety Notice To ensure safe operation, following these simply rules: • Place device in a safe, secure location. • Read the user guide thoroughly before installing the device. • The device should only be repaired by authorized and qualified personnel. Do not try to open or repair the device yourself as this voids the warranty. • Do not place the device in a damp, wet, or humid location like a bathroom. • Do not expose the device to direct sunlight or other heat sources.
Front Panel — LEDs STATUS Solid Green: unit is ready. Blinking Green: HDD is in Standby mode but the Gateway is still operating fully. Link/Act LEDs POWER ON: Solid Blue indicates the hard drive is running. WAN Cable or DSL modem Solid Green: there is a connection. Blinking Green: data is transferring. WLAN Solid Green: Wireless LAN is working.
Back Panel — Ports Antennas USB ports (2) POWER-IN jack to AC power wall outlet or power strip with surge protection WAN port to cable or DSL modem LAN (Ethernet) ports 1, 2, 3, 4. 10/100 Mbps. Connect up to four PCs. LEDs on the front of the Gateway indicate which LAN port(s) are active.
Chapter 2: Set up the Gateway This chapter shows how to set up the ViewSonic® Gateway. For the most Basic Setup, see the Wireless Media Quick Start Guide. For more detailed information, see this user guide. This chapter has the following steps: LAN port LAN port WLAN port Step 1: Connect the Gateway. Details start on the next page. Step 2: Setup your PC to the DHCP setting. Step 3: Configure the Gateway. Step 4: Set up your network.
Step 1: Connect the Gateway (1) Before connecting the Gateway, make sure you have all the setup information that your Internet Service Provider (ISP) requires. (2) Make sure that all network hardware is turned off, including the Gateway, computer(s), and cable or DSL modem. (3) Connect the Ethernet cable from one of the LAN ports on the Gateway to the Ethernet port on your computer. Optional: connect another Ethernet cable from another LAN port on the Gateway to an additional computer or network device.
(4) Connect the AC Power Adapter to the Power Jack on the back of the Gateway. Attach the AC Power Adapter to the Power Cord. Connect the Power Cord to an AC Wall Outlet or a power strip with surge protection. Back of Gateway AC Wall Outlet Power Jack AC Power Adapter to Power Cord POWER ON = Blue LED Other LEDs are green The blue POWER light on the front turns on. The Gateway is ready to configure when the green STATUS light turns on.
Step 2: Set your PC to DHCP Verify that your computer is set to DHCP (Dynamic Host Configuration Protocol) to obtain an IP address automatically as follows: (may be already set to DHCP by default.) For Windows 2000 or XP (1) Click the Windows® Start button > Control Panel > Network and Internet Connections > Local Area Connection. The Local Area Connection Status screen appears as shown on the right. (2) From the General tab (usually appears selected by default), click Properties.
(3) Check the box next to Internet Protocol (TCP/IP) if it isn’t already checked by default. Highlight Internet Protocol (TCP/ IP) if it isn’t already highlighted automatically. Click Properties. The Internet Protocol (TCP/IP) Properties screen appears as shown in the next step.
(4) Select Obtain an IP address automatically. Click OK > OK > Close to complete the PC configuration. (5) Restart your PC if prompted.
Step 3: Configure the Gateway You only need to configure the Gateway once on any computer that is already set up using the Web-based utility screens shown on the next few pages. Default settings in the table on the right may be helpful during the configuration process. Open your web browser. In the Address field, enter http://192.168.1.1 and press Enter. A login window appears like the one shown on the right.
The Primary Setup tab Enter the fields in the Primary Setup screen that are required by your ISP. Time Zone (Primary Setup) Select the time zone you are in and check Enable Daylight Saving Time if this applies. Internet (Primary Setup) Host Name: change if required by your ISP. Otherwise, leave this field as is. Connection Type: if required by your ISP. Otherwise, leave this field as is. Click the down arrow for a dropdown menu with several Connection Types.
LAN (Primary Setup) IP Address: The default is Gateway IP Setting. No change is necessary. Subnet Mask: The default is Gateway IP Setting. No change is necessary. Wireless (Primary Setup) Mode: click the down arrow field for the drop-down menu with a list of wireless networking modes. Select one of the following modes based on your environment setting: • 11b+g: If you have 802.11b and 802.11g devices in your network, then keep the default setting, 11b+g. • 11g Only: Default for optimal performance.
Security Mode: WEP Wired Equivalent Protection. Security Mode: select WEP Encryption WEP Encryption: click the down arrow for more options: select 64bits/10 hex digits or 128 bits/26 hex digits. Default Transmit Key: Select Key 1 from the pull down menu. If you selected the 64bit option, enter 10 hex in Key 1 field. IMPORTANT! For 64bits, enter 10 hex . . . can be 0123456789abcdef in Key 1, 2, 3, or 4 fields. Be sure to write down that key for later configuration on the client side.
Step 4: Set up your network To initialize the WMG, search for Wireless Router with default SSID “xxxx”. Set your laptop or PC to obtain an IP address automatically. The default setting IP for WLAN router is 192.168.5.1. Launch your browser to connect to the WLAN router. The “Home” page appears showing your Wireless Cable/DSL router information and current status. The WAN tab To configure your network, from the Advanced Setup tab > select the WAN tab shown on the right.
Internet Settings Setup Wizard From the Setup Wizard shown on the right > select Internet Settings (recommended) for PPPoE or Ethernet > click Next. The Internet Connection screen appears shown below. Select the type of WAN connection you have: • WAN Ethernet for cable modem. The WAN Ethernet Configuration screen appears as shown on the next page. • WAN PPPoE for DSL. Click Next.
DHCP (Dynamic Host Configuration Protocol). If you want other users in this network to recognize this device, on the screen shown on the right, enter the DHCP Client Host Name > click DHCP Client Information. The DHCP Client Dynamic Interface screen appears as shown below with information only. Or, If you are using Static IP to connect to the WAN, in the RIP Configuration section > select Disable > Submit. The WAN Ethernet Information screen appears as shown on the next page.
Click Return. To use PPPoE as your WAN connection From the Primary Setup tab > Advanced Setup > WAN tab > Setup Wizard > Internet Settings > Next > WAN PPoE > Next > enter the information on the screen shown on the right as required by your ISP to complete the connection. To confirm your PPPoE setting, click Submit, or Clear to reset.
VPN Connection 1 To set up a VPN (Virtual Private Network) connection to your ISP, click the WAN tab > select Setup Wizard > select Creating a VPN Connection. The VPN Connection screen appears. 2 Select the type of of Internet Connection you have: PPTP Client or IPSec > click Next.
1 To complete the VPN connection have all the information that your service provider requires. Click Submit to accept the changes. The VPN POLICIES screen appears.
2 Select one of the two types of VPN POLICIES: IPSec or IKE. IPSec Policies IPSec Policies are a set of crypto map associated with a VPN connection. IPSec can provide data integrity and security. It can be used to protect one or more data flows between a pair of hosts, between a pair of security gateways or between a security gateway and a host. Click Manual tab to set up the IPSec Policies manually. The Manual screen appears as shown on the next page.
IPSec: A framework of open standards that provides data confidentiality, data integrity, and data authentication between peers. IPSec provides these security services at the IP Layer. IPSec uses IKE to handle negotiation of protocols and algorithms based on local policy and to generate the encryption and authentication keys to be used by IPSec. Policy Name: Name the filtering rule whose traffic is protected by IPSec. Status: Select “DISABLE” or “ENABLE.
IKE Policy IKE (Internet Key Exchange) is a key management protocol standard used in conjunction with IPSec and other standards. IKE provides authentication of the IPSec peers, negotiates IPSec keys, and negotiates IPSec security associations. Policy Name Naming the filtering rule whose traffic is protected by IPSec IKE management Source IP address: Specify the source IP address to be filtered. Source Port: Specify the source service port to be filtered.
Manual Connection From the screen shown on the right, click the WAN tab for the pulldown menu > click Setup Wizard (the Setup Wizard screen appears) > select Internet Settings > Next (the Internet Connection screen appears as shown) > select the type of Internet connection that you have > Next.
The LAN tab Select the LAN tab > select LAN Setting. The LAN Ethernet Configuration screen provides the basic setup for the LAN port of the WMG. LAN Ethernet Configuration 1 Enter the IP address and subnet mask for the device. 2 Select Enable DHCP Server for LAN client PCs to obtain IP address automatically. 3 If DHCP Server is enabled, enter the gateway for clients, usually the same for LAN IP Address. 4 Enter the DNS IP address to enable WMG to forward DNS requests from client to WAN.
The Advanced tab To set up the system information and enable the administrator to log the information, monitor the traffic flow and other advanced settings, select the Advanced tab > System Settings. System Settings To change the password for the WMG and to establish the Admin Session Timeout, select the Advanced tab > System Settings. The default session timeout is 30 minutes.
Remote Administration By default, only users on the intra-net can browse the built-in Web pages to perform administration tasks. The Remote Administration feature enables you to perform administrative tasks from a remote host. This section shows how to set up the privilege of remote management through Web. Administrator can allow login and/or ping service through WAN side. You can also manage the device anywhere. Routing In this section, you can view and change the Routing Table of WMG.
Logging Your Administrator can track the information on WMG by recording all the login information. The Administrator can also set the type, time, and level of information that he wants to record and send. The log can be delivered to the administrator by SMTP service by email. General Log Email: all the log information will be recorded and sent within the log time assigned. Alert Log Email: only the alert message will be recorded and sent within the log time assigned.
Two types of logs include the following: Alert Log • Syn Flooding • Ping of Death • IP Spoofing • Unauthorized Login • Win Nuke • IP Option Attacks General Log • System Error Messages • Deny Policies • Allow Policies • Content Filtering • Data Inspection • General Attack • Unavailable Policies • Authorize Login • Configuration Changes • Access Statistics • Allow VPN Messages • Verbose ViewSonic Wireless Media Gateway 33
MAC Clone Clone MAC Address can modify the WAN MAC address to other. It is not recommended that you change the default MAC address unless required by your ISP. DNS Proxy Enter a DNS Server Address if you wish to use the one provided by your ISP. DNS stands for Domain Name System. It translates domain names into IP address.
Dynamic DNS User can enable or disable the automatic update service for DNS. Fill in the required field to use the Dynamic Domain Name Service feature (DDNS). It is a method to keep domain names linked to changing IP address. In this way, changing IP address will not interfere with network connectivity. Service Timeout You can configure WMG to cut the internet connection after it has been inactive for a specified period of time.
IP Reassembly Configuration Fragmentation: breaking a packet into smaller units when transmitting over a network medium that cannot support the original size of the packet. Monitor User can see the log data in this section.
The Security tab This section shows how to secure your Local network as well as the wireless network. Corporate Outbound/Inbound In the Security function setting, you can choose the direction of the traffic flow you want to filter. You can see all the filtering rules in order at this page. You can always move the rule order to higher priority by clicking up and down arrow on the upper right hand side.
After you click Add to insert new security rule, the Internet Access Policy Configuration menu appears. Fill in the necessary information to complete the rule. Source IP: Select Other if to restrict a certain user (IP address) access right. Source Port: The source port here indicates the service port number for the application, such as Telnet, HTTP and so on. Destination IP: Select Other if to restrict the service from a particular remote server.
Self policy You can pick the pre-setting rule to enhance the security policy.
Filtering WMG allows user to setup all sort of combination in Filtering function. This section shows you the details of controlling the network environment. Filters are the mechanism that directs the diverted traffic to the required detection rules. The WMG enables the user to set its preferred filter configurations and thus design a variety of possibilities for customized traffic direction and service detection mechanisms.
User group filtering IP Address filtering IP Address Filtering allows you to select certain IP addresses are able to pass through the WMG or not. In IP Address Screen, you could see the list of all setting you have made. If you wish to add more IP listed, select “Add” to specify more IP.
Service filtering Service Filtering allows you to select what types of packets are able to pass through the WMG. In Service Screen, you could see the list of all pre-set services. If to add more services, select “Add” to specify more services. To define a service, first determine which port number or range of number is used by the application. Common applications are defined by IETF.
Schedule The WMG allows you to specify when to enforce the security rules. The schedule menu is shown below: Click “Add” to create a new schedule. Window Name: Name your scheduling rule. Working Date: Specify the date Working Hours: Specify the active working hours by indicate the open hour and minutes to closed hour and minutes.
MAC address filter In the MAC Address Filter screen, you can insert the MAC address you want to control. WMG allows you to filter 5 MAC addresses. When you finish, remember to mark the Enable Filtering box to enable this function.
Parental Control Parental Control provides more control your network. It provides you with web content filtering options. Once you get into this menu, you can see the lists of Application Name and protecting action. To delete a particular rule, check the box and click “Delete” to erase the rule from the setting. To add a new rule to this control page, click “Add” to get into web control configuration.
NAT (Network Address Translation) NAT is a function allows several networked PCs to share an Internet account using only a single IP address, which may be statically or dynamically assigned by your Service Provider. Click “Add” to add more rule to NAT Configuration. The WMG accomplishes this address sharing by translating the internal LAN IP addresses to public unique address/addresses on the Internet. The internal LAN IP addresses can be either private addresses or registered addresses.
Firewall Attacks Firewall is a security measures that protect the resources of the local network from intruders. First, click either Enable or Disable to activate or deactivate the Firewall Rule. Click SUBMIT to accept the setting.
The Utilities tab This section describes the following Utilities and then gives instructions for downloading content from the Internet to your WMG hard drive: • Save Settings • • • • Factory Default Upload/Backup Configuration Restart Router Firmware Upgrade Save Settings vs Logout To create a saved file of the current configuration settings of the WMG, select the Utilities tab > Save Settings > click “Yes” Logout saves your settings automatically. A screen appears > click Logout.
Factory Default To return the WMG settings back to the factory defaults, select the Utilities tab > Factory Default > click Yes. Upload/backup Configuration You could save the completely-configure setting by clicking “yes”. WMG will save the current configuration to the location you select. If you ever lose your settings or your settings are changed and the WMG stops functioning properly, click “Browse” to locate the saved settings file you created and then click “upload” to restore the saved settings.
Restart Router If the WMG stops responding, highlight the Utilities tab > click Restart router to reboot.
Firmware Upgrade Firmware Upgrade improves the performance of your WMG (Wireless Media Gateway). To download newer software 1 Periodically check the ViewSonic support site www.viewsonic.com/support for updates to software and then download to your local PC hard drive. 2 Login to the WMG web-based utility: http://192.168.1.1 3 Select the Advanced Setup tab. From the Utilities menu shown on the right, click Firmware Upgrade. 4 On the next screen, click Browse.
Upgrade Media Server Application Upgrade Media Server Application for file management and to allow your WMA (Wireless Media Adapter) to see and stream the content from your WMG (Wireless Media Gateway). Check the ViewSonic support site www.viewsonic.com/support periodically for updates to software and then download to your local PC hard drive. To download newer software 1 Login to the WMG web-based utility: http://192.168.1.1 2 Select the Advanced Setup tab.
Update Media Server Host Name To change the name of your WMG (Hostname) 1 From the Utilities menu, click Update Media Server Hostname as shown on the right. 2 In the Hostname field shown on the right, enter a name of your choosing; any name – Vacation, Graduation, Gateway, etc. 3 Click Submit > click Yes to reboot for the new hostname to take effect.
The WLAN tab Wireless LAN Basic Settings This section shows you how to configure the Access Point function of the WMG. Select the WLAN tab. ESSID The Extended Service Set Identification is a thirty-two character (maximum) alphanumeric key identifying the wireless local area network. WEP Wired Equivalent Privacy is a data encryption protocol for 802.11b wireless networks. All wireless nodes and access points on the network are configured with a 64-bit or 128-bit Shared Key for data encryption.
Chapter 3: File Management Transfer content to your Gateway hard drive To download (transfer) files (content) from your PC to the Gateway (WMG) hard drive, do one of the following three methods: (details start at the bottom of this page) • Method 1: The Networking Companion CD that came in the package (recommended), or • Alternate Method 2: Network Share, or • Alternate Method 3: Internet Explorer Browser Method 1: Networking Companion CD 1 Recommended. Make sure your PC is connected to the WMG.
3 Select Setup WMG. Two new shortcuts appear on the desktop that are links to the WMG hard drive; one is a WMG folder for WMG Media and one is for the WMG USB. Click EXIT. Doubleclick WMG Media. An Explore Window appears with three folders for three type of media as shown on the right: music, pictures, videos. If not, then make sure you are connected to the WMG. 4 Drag and drop, or copy and paste, the content from your PC into one of the folders.
Alternate Method 3: Open Internet Browser 1 Use this method if Method 1 and 2 do not work. Open your Internet Explorer Browser. An Internet window appears. 2 In the Address line, type http:\\192.168.1.1 and press Enter. A window like the one shown on the right appears. Double-click Samba ide share. Three media folders appear. ATTENTION! Notice forward slashes (//) are used here! In another place in this guide, you will be asked to use back slashes (\\). 3 Double-click one of the three folders.
Chapter 4: Set Up the Print Server Step 1: Access the Internet Make sure you can access the Internet through the Gateway as shown in the Basic Setup section of this guide. Step 2: Install printer driver USB port IMPORTANT! Install the printer driver for your printer on your computer. See the user guide that came with your printer. Step 3: Connect a USB printer Connect a USB printer to the Gateway USB port and turn the USB printer on.
Step 4: Turn PC on With a PC connected to the Gateway as shown in the Basic Setup section of this guide, turn the PC on. Wait for the USB LED on the front of the Gateway to light up to a steady green as shown on the right. USB LED A steady green USB LED light turns on when an external USB device is connected to either USB port 1 and/or 2.
Step 5: Set up the print server 1 Right-click the Windows Start button > select My Network Places. An Explorer Window appears with an Address line. 2 In the Address line, type “\\192.168.1.1” Press ENTER. Another screen appears with a folder called Printers and Faxes listed beside an icon. \\192.168.1.1 ATTENTION! Notice back slashes (\\) are used here! In another place in this guide, you will be asked to use forward slashes (//). 3 Double-click Printers and Faxes.
4 Click Yes. Another screen appears. 5 Click OK. The Add Printer Wizard screen appears. 6 Select the printer Manufacturer from the list of Manufacturers. The USB print server currently support most HP USB printers and a few other brands such as Epson and Cannon. Check the ViewSonic website for additional printers supported.
7 Select a model from the list of Printers. Click OK.
Step 6: Test printer connection 1 Click the Windows Start button > select and open Printer and Faxes. 2 Right-click on “lp on VIEWSONIC” > select Properties > click Print Test Page. A message appears as shown on the right. 3 Verify that the page printed ok >Click OK. Close Windows.
Chapter 5: Troubleshooting & Maintenance This chapter provides possible solutions to problems you may encounter while operating your Gateway and maintenance instructions. • • • • Getting Help Checklist (shown on the right) Troubleshooting Solutions Customer Support contact information Maintenance instructions - Firmware Updates - Software Updates Getting Help Checklist 1 Read the Troubleshooting section in this chapter.
Troubleshooting Solutions 1 If you are using a cable or DSL modem and are having problems connecting to the Internet, do the following: • Turn off your cable or DSL modem, PC, and the Gateway. • Turn on your modem and wait a few minutes until the modem has established a connection with your ISP. • Turn on the Gateway. • Turn on your PC and attempt to connect to the Internet. For most users, the Gateway’s default values should be satisfactory.
2 My Wireless Media Gateway Access Point Gateway will not turn on. No LED’s light up. • The power is not connected. • Connect the power adapter to your AP and plug it into the power outlet. IMPORTANT! Only use the power adapter that came with your Wireless Media Gateway. Using any other adapter may damage your Wireless Media Gateway. 3 LAN Connection Problems I can’t access my Gateway. • Make sure your Gateway is powered on. • Check network connections.
4 I can’t connect to other computers on my LAN. • The IP Addresses of the computers are not set correctly. Make sure that each computer has a unique IP Address. If using DHCP through the AP Gateway, makes sure that each computer is enable DHCP function and restart the computer. • Network cables are not connected properly. Make sure that the Link LED is on. If it is not, try a different network cable. • Windows network settings are not set correctly. Check each computer for correct network settings.
6 I forgot my password. What do I do? • Press and hold Reset on the back of the Gateway for 6-10 seconds. The Gateway then resets to factory defaults. Reconfigure your Gateway all over again. 7 Why does the Gateway take a long time to boot and get ready to use? • The Wireless Media Gateway supports lots of features and functions that requires it to load file server and drivers to function appropriately. Therefore,it would need approximately one minute to fully load all of these modules and drivers.
Customer Support Before contacting Customer Support, check the Troubleshooting table on the previous page for possible solutions to any setup problems you have. NOTE: For Customer Support or product service you will need to provide the product’s serial number (on the back of the unit). . Country/Region Website (with email address) United States www.viewsonic.com/support T = Telephone F = FAX T: (800) 688-6688 F: (909) 468-1202 Canada www.viewsonic.
Maintenance Instructions Firmware Updates • To ensure optimal Gateway performance, follow the instructions in the Firmware Upgrade section of Chapter 4 on Advanced Web Management Settings. Check the ViewSonic website periodically for the most recent firmware. • Follow the recommended HDD disk cleanup process. Software Updates To ensure optimal Gateway performance, check the ViewSonic website periodically for the most recent software.
Regulatory Information FCC Interference Statement FCC (Federal Communication Commission) Interference Statement Class B Regulations USA This equipment complies with the limits for a class B digital device as specified in Part 15 of FCC Rules which provide reasonable protection against harmful interference in a residential area. This equipment generates and uses radio frequency energy, and if not installed and used in accordance with the instructions, may cause harmful interference to radio communications.
• Relocating the equipment with respect to the receiver. • Consult your dealer or an experienced radio/television technician. • Any changes or modifications to the equipment not expressly approved by the manufacturer could void the user’s authority to operate this equipment. • Use of a shielded interface cable is required to comply with the Class B limits of Part 15 of FCC rules. This device complies with Part 15 of the FCC Rules.
Canada This digital apparatus does not exceed the Class B limits for radio noise emissions from digital apparatus as set out in the interference-causing equipment standard entitled “Digital Apparatus,” ICES-003 of the Department of Communications. Cet appareil numérique respecte les limites de bruits radioélectriques applicables aux appareils numériques de Classe B prescrites dans la norme sur le matériel brouilleur: “Appareils Numériques,” NMB-003 édictée par le ministère des Communications.
Appendix This Appendix has the following information: • Specifications • Limited Warranty • Glossary ViewSonic Wireless Media Gateway 74
Specifications WLAN Standards IEEE 802.11g IEEE 802.11b 54, 48, 36, 24, 18, 12, 9, 6 Mbps 11, 5.5, 2, 1 Mbps Ports WAN LAN USB 1 4 2 Compatibility Operating Systems Min. Sys. Req.
Limited Warranty Wireless Media Gateway Products What the warranty covers: ViewSonic® warrants its Gateway products to be free from defects in material and workmanship during the warranty period. If a ViewSonic Gateway product proves to be defective in material or workmanship during the warranty period, ViewSonic will, at its sole option, repair or replace the product with a like product. Replacement product or parts may include remanufactured or refurbished parts or components.
How to get service: 1. For information about receiving service under warranty, contact ViewSonic Customer Support. You will need to provide your product’s serial number. 2. To obtain service under warranty, you will be required to provide (a) the original dated sales slip, (b) your name, (c) your address, (d) a description of the problem, and (e) the serial number of the product. 3. Take or ship the product freight prepaid in the original container to an authorized ViewSonic service center or ViewSonic. 4.
Glossary 10BaseT. An IEEE standard (802.3) for operating 10 Mbps Ethernet networks (LANs) with twisted pair cabling and a wiring hub. 802.11 standard. 802.11 or IEEE 802.11 is a type of radio technology used for wireless local area networks (WLANs). It is a standard that has been developed by the IEEE (Institute of Electrical and Electronic Engineers), http://standards.ieee.org. The IEEE is an international organization that develops standards for hundreds of electronic and electrical technologies.
802.11a. An IEEE specification for wireless networking that operates in the 5 GHz frequency range (5.725 GHz to 5.850 GHz) with a maximum 54 Mbps data transfer rate. The 5 GHz frequency band is not as crowded as the 2.4 GHz frequency, because the 802.11a specification offers more radio channels than the 802.11b. These additional channels can help avoid radio and microwave interference. 802.11b. International standard for wireless networking that operates in the 2.4 GHz frequency range (2.4 GHz to 2.
also be a switch. But they are all involved in making sure data is transferred from one location to another. A bridge connects devices that all use the same kind of protocol. A Gateway can connect networks that use differing protocols. It also reads the addresses included in the packets and routes them to the appropriate computer station, working with any other Gateway in the network to choose the best path to send the packets on.
Bandwidth. The amount of transmission capacity that is available on a network at any point in time. Available bandwidth depends on several variables such as the rate of data transmission speed between networked devices, network overhead, number of users, and the type of device used to connect PCs to a network. It is similar to a pipeline in that capacity is determined by size: the wider the pipe, the more water can flow through it; the more bandwidth a network provides, the more data can flow through it.
example, wireless, Ethernet or token ring). Wireless bridges are commonly used to link buildings in campuses. Broadband. A comparatively fast Internet connection. Services such as ISDN, cable modem, DSL and satellite are all considered broadband as compared to dial-up Internet access. There is no official speed definition of broadband but services of 100Kbps and above are commonly thought of as broadband. Bus adapter.
Collision avoidance. A network node characteristic for proactively detecting that it can transmit a signal without risking a collision. Crossover cable. A special cable used for networking two computers without the use of a hub. Crossover cables may also be required for connecting a cable or DSL modem to a wireless gateway or access point. Instead of the signals transferring in parallel paths from one set of plugs to another, the signals "crossover.
CSMA/CA (Carrier Sense Multiple Access with Collision Avoidance). The principle medium access method employed by IEEE 802.11 WLANs. It is a "listen before talk": method of minimizing (but not eliminating) collisions caused by simultaneous transmission by multiple radios. IEEE 802.11 states collision avoidance method rather than collision detection must be used, because the standard employs half duplex radios—radios capable of transmission or reception—but not both simultaneously.
from typical "wall wart" transformers that plug into a wall socket and provide DC power via a tiny plug to larger, enterprise-level Power Over Ethernet systems that inject DC power into the Ethernet cables connecting access points. DHCP (Dynamic Host Configuration Protocol). A utility that enables a server to dynamically assign IP addresses from a predefined list and limit their time of use so that they can be reassigned.
DSL (Digital Subscriber Lines). Various technology protocols for high-speed data, voice and video transmission over ordinary twisted-pair copper POTS (Plain Old Telephone Service) telephone wires. Encryption key. An alphanumeric (letters and/or numbers) series that enables data to be encrypted and then decrypted so it can be safely shared among members of a network. WEP uses an encryption key that automatically encrypts outgoing wireless data.
Gateway. In the wireless world, a gateway is an access point with additional software capabilities such as providing NAT and DHCP. Gateways may also provide VPN support, roaming, firewalls, various levels of security, etc. HotSpot. A place where you can access Wi-Fi service. This can be for free or for a fee. HotSpots can be inside a coffeeshop, airport lounge, train station, convention center, hotel or any other public meeting area.
IEEE (Institute of Electrical and Electronics Engineers), New York, www.ieee.org. A membership organization that includes engineers, scientists and students in electronics and allied fields. It has more than 300,000 members and is involved with setting standards for computers and communications. IEEE802.11. A set of specifications for LANs from The Institute of Electrical and Electronics Engineers (IEEE). Most wired networks conform to 802.3, the specification for CSMA/CD based Ethernet networks or 802.
applications. An Internet appliance can be Wi-Fi enabled or it can be connected via a cable to the local network. IP (telephony). Technology that supports voice, data and video transmission via IP-based LANs, WANs, and the Internet. This includes VoIP (Voice over IP). IP address. A 32-bit number that identifies each sender or receiver of information that is sent across the Internet.
modems and network adapters. ISA has been replaced by PCI and is not very common anymore. ISO Network Model (International Standards Organization). A network model developed by the ISO that consists of seven different levels, or layers. By standardizing these layers, and the interfaces in between, different portions of a given protocol can be modified or changed as technologies advance or systems requirements are altered.
such as an Internet connections, printers, files and drives. When Wi-Fi is used to connect the devices, the system is known as a wireless LAN or WLAN. MAC (Medium Access Controller). Every wireless 802.11 device has its own specific MAC address hard-coded into it. This unique identifier can be used to provide security for wireless networks. When a network uses a MAC table, only the 802.11 radios that have had their MAC addresses added to that network’s MAC table will be able to get onto the network.
a type of PC adapter card that either works without wires (Wi-Fi) or attaches to a network cable to provide two-way communication between the computer and network devices such as a hub or switch. Most office wired NICs operate at 10 Mbps (Ethernet), 100 Mbps (Fast Ethernet) or 10/100 Mbps dual speed. High-speed Gigabit and 10 Gigabit NIC cards are also available. See PC Card. PC Card.
Peer-to-peer network. A wireless or wired computer network that has no server or central hub or Gateway. All the networked PCs are equally able to act as a network server or client, and each client computer can talk to all the other wireless computers without having to go through an access point or hub. However, since there is no central base station to monitor traffic or provide Internet access, the various signals can collide with each other, reducing overall performance. PHY (Physical Layer).
Residential gateway. A wireless device that connects multiple PCs, peripherals and the Internet on a home network. Most Wi-Fi residential gateways provide DHCP and NAT as well. RJ-45. Standard connectors used in Ethernet networks. Even though they look very similar to standard RJ-11 telephone connectors, RJ-45 connectors can have up to eight wires, whereas telephone connectors have only four. Roaming. Moving seamlessly from one AP coverage area to another with no loss in connectivity. Router.
WLAN must use the same SSID. A device will not be permitted to join the BSS unless it can provide the unique SSID. Because an SSID can be sniffed in plain text from a packet, it does not supply any security to the network. An SSID is also referred to as a Network Name because essentially it is a name that identifies a wireless network. SSL (Secure Sockets Layer). Commonly used encryption scheme used by many online retail and banking sites to protect the financial integrity of transactions.
takes care of handling the actual delivery of the data, TCP takes care of keeping track of the packets that a message is divided into for efficient routing through the Internet. For example, when a web page is downloaded from a web server, the TCP program layer in that server divides the file into packets, numbers the packets, and then forwards them individually to the IP program layer. Although each packet has the same destination IP address, it may get routed differently through the network.
any operating system. UPnP boasts device-driver independence and zero-configuration networking. USB (Universal Serial Bus). A high-speed bidirectional serial connection between a PC and a peripheral that transmits data at the rate of 12 megabits per second. VoIP (VoiceOver Internet Protocol). Voice transmission using Internet Protocol to create digital packets distributed over the Internet.
WEP (Wired Equivalent Privacy). Basic wireless security provided by Wi-Fi. In some instances, WEP may be all a home or smallbusiness user needs to protect wireless data. WEP is available in 40-bit (also called 64-bit), or in 108-bit (also called 128-bit) encryption modes. As 108-bit encryption provides a longer algorithm that takes longer to decode, it can provide better security than basic 40-bit (64-bit) encryption. WLAN (Wireless Local Area Network). Also referred to as LAN.