
Instruction manual

97
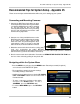
Recommended Tips for System Setup - Appendix #5
Changing the Date and Time
Setting the correct date and time for your system is
important. Once the date and time have been set
correctly, it is highly recommended that you format your
Hard Drive.
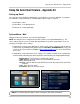
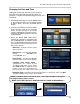
1. Enter MENU mode by pressing the MENU button
on the front panel of the system, Remote Control
or Mouse Menu. Select the SYSTEM SETUP
Option.
2. Select the SYSTEM menu from the MAIN
menu. Navigate using the up and down
arrows on the front panel (or remote
control). Highlight the selection in Green,
and press the ENTER button to enter the
SYSTEM Menu.
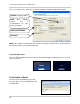
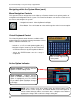
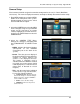
3. Select the DATE AND TIME Menu.
Change the settings by navigating with
the UP/DOWN/LEFT and RIGHT arrow
keys. Set the following based on your local
Time (and Timezone), and set the current
date for the system.
• Date/Time - Sets the current system
Date and Time.*
• Date Format - Sets the Date Display
format (MM-DD-YYYY,
YYYY-MM-DD, etc.).
• Time Format - Sets the Time Display
format to either 12 or 24 hour display.
• Network Time Server Setup -
Synchronizes the system to the
specified remote time server. Select
the SYNC button to connect to the
remote server and synchronize the
time. (may also use a time server of the users choice).
• Timezone Setup - Selections for the local Time Zone (i.e. EST, CST, PST). The DST
(Daylight Savings Time) can be set to ON/OFF.
* NOTE: If the Date/TIme is set into the past, a message will appear warning that
Overlapped date(s) will be erased.
** MAKE SURE THAT THE DATE AND TIME ARE SET PRIOR TO RECORDING! **