
Instruction manual

98
Recommended Tips for System Setup - Appendix #5
Formatting the Hard Drive
Formatting the hard drive after changing the date, and before beginning the recording of YOUR
data is recommended, as the system is set to Automatically start recording when powered on
(continuous recording setting).
NOTE: Formatting the Hard Drive will erase any previously recorded data. This will NOT
affect your system configurations.
1. Enter MENU mode by pressing the MENU button on the front panel of the system, on
the Remote Control or Mouse Menu.
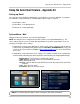
Select the SYSTEM SETUP Option.
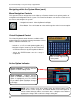
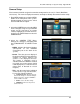
2. Select the DISK MANAGEMENT menu
from the MAIN menu. Navigate using the
up and down arrows on the front panel (or
remote control). Highlight the selection in
Green, and press the ENTER button to
enter the DISK MANAGEMENT Menu.
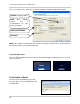
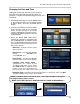
3. Navigate to the Format Option, and select
the Start button.
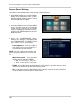
• Once OK is selected, the user will be prompted
to enter the ADMIN PASSWORD. Once the
password is accepted, all Hard Drive data will
be erased.
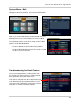
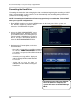
• A warning message will be displayed
with the prompt ‘All Recorded Data will
be erased.’
• Select OK to erase the data, or
CANCEL to return without erasing the
Hard Drive.
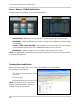
Formatting Status Indicator Window:
Once the format is complete, the
system will return to the Disk Manage
Menu.