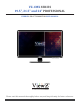
VZ-CMX SERIES 19.5", 21.5" and 24" PROFESSIONAL HYBRID LED CCTV MONITOR USER MANUAL Please read this manual thoroughly before use, and keep it handy for future reference.
CONTENTS Safety Instruction ....................................................................................................................................................................................... 3 1. Mark Indication & Substance ....................................................................................................................................................... 4 2. Warning .................................................................................................
SAFETY INSTRUCTION Important Safety Instruction 1. 2. 3. 4. 5. 6. 7. 8. 9. 10. 11. 12. 13. 14. 15. 16. Read all warnings. Follow all instructions to ensure longevity of monitor. Do not place the monitor near water. Clean only with dry cloth. Do not block any ventilation openings. Install in accordance with the manufacturer’s instructions. Do not install near any heat sources such as radiators, heat registers,stoves, or other heat generating devices.
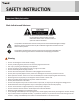
SAFETY INSTRUCTION Important Safety Instruction Mark Indication and Substance CAUTION : TO REDUCE THE RISK OF ELECTRICAL SHOCK, DO NOT REMOVE COVER (OR BACK). NO USER SERVICEABLE PARTS INSIDE. REFER SERVICING TO QUALIFIED SERVICE PERSONNEL This symbol is intended to alert the user to the presence of uninsulated & dangerous voltage within the monitor’s enclosure that may be of sufficient magnitude to constitute a risk of electric shock to persons.
SAFETY INSTRUCTION Important Safety Instruction Caution • • • • • • • • • • • • • If the connector between the plug and the pin is dusty or dirty, clean it properly using a dry cloth. Make sure to unplug the power cord before cleaning the monitor. Make sure to leave a gap between monitor and wall. Do not drop the monitor when moving it. Place your monitor in a location with low humidity and a minimum dust.
FCC RF INTERFERENCE STATEMENT Note This equipment has been tested and found to comply with the limits for a Class A digital device, pursuant to Part 15 of the FCC Rules. These limits are designed to provide reasonable protection against harmful interference in a residential installation. This equipment generates, uses and can radiate radio frequency energy and, if not installed and used in accordance with the instructions, may cause harmful interference to radio communications.
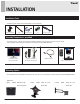
INSTALLATION Installation Tools The following tools may be required depending on your installation. Electronic Stud Finder Pencil Protective Eye-wear Level Phillips Screwdriver Assembly Components - provided Your ViewZ monitor is shipped with all proper installation hardware and components. If there are parts missing and/or damaged, please stop the installation and contact ViewZ USA at (888)-998-4399.
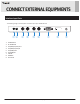
CONNECT EXTERNAL EQUIPMENTS Interface Input Ports The following image is the description of interface input ports of BNC Monitor qw 1. 2. 3. 4. 5. 6. 7. 8. 9. 8 e r t y u i o AV AUDIO IN PC STEREO IN AV (AHD/TVI/CVI) OUT AV (AHD/TVI/CVI) IN AV (CVBS) OUT AV (CVBS) IN VGA IN HDMI IN DC 12V IN Visit the ViewZ USA website at https://www.viewzusa.
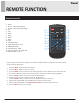
REMOTE FUNCTION Remote Controller 1. 2. 3. 4. 5. 6. 7. 8. 9. 10. 11. 12. 13. 14. 15. 16. Power Picture - Select Picture Mode Freeze - Freeze the Display Image Up Left Menu Right Down Mute Input VGA Input Select YPbPr Input Select - N / A HDMI Input Select AV Input Select - CVBS TVI Input Select - TVI / AHD / CVI DVI Input Select - N / A q w e r t y u i o a s d f g h j Display image, sound and custom settings can be adjusted in OSD (On Screen Display) menu by remote controller.
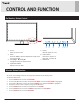
CONTROL AND FUNCTION On Monitor, Button Control q w e r ty u 1. Source 5. Power Select an input source Monitor power on / off 2. Menu 6. LED Indicator Enter the MENU, save the adjustment of sub-menu Blue color: monitor on and exit the OSD Red color : monitor off 3. Left & Right ◄ (VOL) ► 7. IR Receiver Change the value on selected menu 4. Up & Down ▲ ▼ Switch a menu on OSD Monitor Button Function All picture, sound settings and setup can be adjusted in OSD (On Screen Display) menu.
CONTROL AND FUNCTION Select Input Source Input Source PC-RGB HDMI AHD/TVI/CVI CVBS Press 'SOURCE' button on monitor or 'INPUT' button on remote controller Press ▲ / ▼ button to change input source and then press ► button to select input source on monitor Press ▲ / ▼ button to change input source and then press 'INPUT' / ► buttons to select input source on remote controller Volume Press◄ / ► buttons to adjust volume on monitor Press◄ / ► buttons to adjust volume on remote controller Detect Source Signal
CONTROL AND FUNCTION Picture VALUE FUNCTION PICTURE MODE Adjust the image color setting CONTRAST Adjust the contrast 0 ~ 100 BRIGHTNESS Adjust the brightness 0 ~ 100 COLOR Adjust the color saturation 0 ~ 100 Adjust the tint 0 ~ 100 Adjust the sharpness 0 ~ 100 TINT 1) SHARPNESS 2) ASPECT RATIO ▲/▼ MOVE ◄/► SELECT(ADJUST) MENU RETURN See table below See table below Adjust the video format NOISE REDUCTION Adjust the noise reduction value See table below COLOR TEMP See table below Ad
CONTROL AND FUNCTION PC (available on VGA input) ▲/▼ MOVE ◄/► SELECT(ADJUST) MENU RETURN FUNCTION VALUE AUTO ADJUST 1) Fit the image size automatically H-POSITION Adjust the horizontal position of picture 0 ~ 100 V-POSITION 1) Adjust the vertical position of picture 0 ~ 100 CLOCK Adjust the number of horizontal picture elements 0 ~ 100 Adjust the vertical noise of screen image 0 ~ 100 1) PHASE 1) 1) 1) Only available in VGA input User Manual Visit the ViewZ USA website at https://www.
CONTROL AND FUNCTION Sound ▲/▼ MOVE ◄/► SELECT(ADJUST) MENU RETURN FUNCTION 14 VALUE SOUND MODE Select one of the presets STANDARD / MUSIC / MOVIE / SPORTS / USER TREBLE Adjust the treble level 0 ~ 100 BASS Adjust the bass level 0 ~ 100 BALANCE Adjust the balance Visit the ViewZ USA website at https://www.viewzusa.
CONTROL AND FUNCTION OSD ▲/▼ MOVE ◄/► SELECT(ADJUST) MENU RETURN FUNCTION OSD LANGUAGE Set the language of the OSD menu VALUE English, German, French Spanish, Italian, Denmark Poland, Netherland RESTORE USER DEFAULT Reset the monitor settings to the factory default NO SIGNAL SCREEN Set the standby mode screen as blue or black (default) color Blue, Black NO SIGNAL STANDBY Monitor will go into a standby mode when no input source is detected ON / OFF PREVENT BURN-IN ON / OFF User Manual Set period
MOUNTING GUIDE Wall Mounting (Optional) VZ-CMX monitors are suitable for VESA wall mount (not included in the delivery). M4 x L8 screws 1. VZ-19CMX, VZ-22CMX, VZ-24CMX : VESA WALL MOUNT 100mm x 100mm Attention! VZ-CMX : You must use 4 * M4 x L8 screws to assemble this monitor and the wall mount bracket. WARNING ! If user uses screws longer than M4 x L8 mm, it may cause damage to the unit. Please use bolt of correct size and length as instructed.
SPECIFICATION LCD Model No. VZ-19CMX VZ-22CMX VZ-24CMX Size & Type 19.5" 21.5" 24" Panel Type 19.5'' LED Backlit Monitor 21.5'' LED Backlit Monitor 24'' LED Backlit Monitor Pixel Pitch 0.2265 (H) x 0.221(V) mm 0.2482 (H) x 0.2482(V) mm 0.215 (H) x 0.215 (V) mm Brightness 200 cd/m² 200 cd/m² 250 cd/m² Contrast Ratio 3000 : 1(Typ.) 1000 : 1(Typ.) 1000 : 1(Typ.
TROUBLESHOOTING GUIDE - Check the following before calling for service. - If the same problems continue after checking, contact the reseller you purchased the monitor from.
TERMS OF WARRANTY / RMA - The warranty period for this monitor is 3 years. The warranty will be voided for the scenarios listed below. - You can also download the manual and information of VIEWZ web site: VIEWZUSA.
WARRANTY ViewZ USA LIMITED 3 YEAR WARRANTY What and Who is Covered by this Limited Warranty and for How Long ViewZ USA warrants this product to be free from defects in material and workmanship for 3 years to the original owner of this product. The limited warranty is valid only for the original purchaser of the product. What ViewZ USA Will Do At the sole discretion of ViewZ USA, ViewZ USA will repair or replace any product or product part that is defective.