VZ-CM Telescopic Ceiling Mount with length, rotation and tilt adjust VZ-CM series INSTALLATION INSTRUCTIONS VZ-CM06B VZ-CM06W VZ-CM18B VZ-CM18W
CM series Contents Weight Limit ......................................................................................................................................................................................................... Warning Statements ............................................................................................................................................................................................ Ceiling Mount info....................................................
CM series Telescopic Monitor ceiling mount Info This bracket is designed to mount a monitor from the ceiling structure. It can be used with the existing truss structure of the building or in conjunction with a channel strut. There are four lengths of brackets available. • Part # CM06B Length of 3' to 6' • Part # CM06W Length of 3' to 6' • Part # CM18B Length of 6' to 18' • Part # CM18W Length of 6' to 18' Installation Tools The following tools may be required depending on your installation.
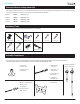
CM series Assembly Components (cont’d) CM06B & CM06W CM18B & CM18W M4 x 0.7 x L10 mm Screw (Qty 1) M6 x 1.0x L12 mm Screw (Qty 1) φ 10 x φ 4.3 x T1 Washers (Qty 2) φ 2.5 x φ 1.5 x L4752 mm U-bolt cable (Qty 1) φ 2.4 x φ 1.6 x L7620 mm U-bolt cable (Qty 1) 1/8" U-bolt cable clamp (Qty 1) M4 x 0.7 x L6 mm Screws (Qty 4) φ 10 x φ 4.3 x T1 Washers (Qty 4) M6 x 1.0 x L12 mm Screws (Qty 4) φ 12 x φ 6.6 x T1 Washers (Qty 4) 4 Visit the ViewZ USA website at http://www.viewzusa.
CM series Features 1/2”-13 Lock Nut Fender Washer Truss or Channel Strut 1/4”-20 x 2” M4 x 45 mm M4 Washer M4 Washer M4 Lock-Nut 1/4” Washer 1/4”-20 Lock Nut 1/4” Lock Washer 1/4” Washer M6 x L12 mm VESA screws ( 4 places ) Installation Instructions Visit the ViewZ USA website at http://www.viewzusa.
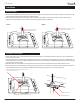
CM series Installation Securing Mount to Building 1/2”-13 Lock Nut Fender Washer Truss or Channel Strut 1) Insert threaded rod between truss gap or into hole in channel strut. 2) Place 1/2” fender washer over the threaded rod and then 1/2” lock nut. 3) Tighten the 1/2”-13 lock nut using a 3/4” wrench. Mounting Monitor to Pole 1) 1. If your monitor is supplied with a VESA plate already mounted on the back, simply ensure the four M4 screws are in place and tightened.
CM series Installation Adjusting Height 1) Hold the lower pole (where it connects to the monitor) while loosening the center collar by turning it counter-clockwise (see illustration on left below). Extend the pole by gently lowering it to the desired length. 2) Once the proper length has been maintained, lock the pole in position by rotating the center collar clockwise. The collar should be hand tightened as snug as possible to prevent the pole from expanding.
CM series Warranty ViewZ USA LIMITED LIFETIME WARRANTY What and Who is Covered by this Limited Warranty and for How Long ViewZ USA warrants this product to be free from defects in material and workmanship for the lifetime of the original owner of this product. The limited warranty is valid only for the original purchaser of the product. What ViewZ USA Will Do At the sole option of ViewZ USA, ViewZ USA will repair or replace any product or product part that is defective.