
Installation Manual


6 Installation InstructionsVisit the ViewZ USA website at http://www.viewzusa.com
7
/
61
1
0
CM series
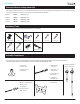
Securing Mount to Building
Mounting Monitor to Pole
Leveling the Pole
Max Load:
16.7 kg / 36.82 lbs
Installation
This stand is intended for use only with the maximum
weights indicated. Use with products heavier than the
maximum weights indicated may result in instability
causing possible injury. This product is intended to mount
to a steel support truss, or channel strut.
1) Insert threaded rod between truss gap or into hole in channel strut.
2) Place 1/2” fender washer over the threaded rod and then 1/2” lock
nut.
3) Tighten the 1/2”-13 lock nut using a 3/4” wrench.
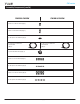
1) You can ensure the pole is plumb by tightening the 1/4”-20 lock nuts
on the top of the pole where it attaches to the structure using a 7/16”
wrench.
2) Place a level on the pole and tighten the nuts that correspond to the
direction that the pole needs to move (see illustration on the right).
3) Check and adjust 2 adjacent sides of the pole until it is plumb in each
direction.
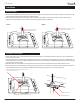
1) 1. If your monitor is supplied with a VESA plate already mounted
on the back, simply ensure the four M4 screws are in place and
tightened. If the mount is not already attached, connect it using the
supplied M4 x 8mm VESA screws (4-places).
*NOTE: Some installations may require running power and video
cables prior to attaching the monitor bracket to the pole. If this is
the case, do so before continuing to step 2.
2) Hold the monitor with attached bracket up to the end of the pole
mount, and line up the wings of the bracket to the holes in the end
of the pole. Insert the 1/4”-20 x 2” bolt, lock washer, washers, and
lock nut in place according to the illustration on the right. You will use
7/16” and 10mm wrenches to fully tighten in step 4.
3) Install the M4 x 45mm screw, washers, and lock nut into the upper
slotted hole according to the illustration on the right. You will use a
#2 Phillips screwdriver and a 7mm wrench to fully tighten in the next
step.
4) Tighten the fasteners to secure the monitor at the desired angle.
*NOTE: Avoid over-tightening which can cause the pole to indent.
1/2”-13 Lock Nut
Fender Washer
Truss or Channel Strut
M4 Washer
Washer Pole will move
in the direcon of the
ghtened bolt
M4 Washer
M4 x 45 mm
1/4”-20 x 2”
1/4” Lock Washer
1/4” Washer
M6 x L12 mm VESA screws ( 4 places )
M4 Lock-Nut
1/4”-20 Lock Nut
1/4” Washer