
Installation Manual


7Installation Instructions Visit the ViewZ USA website at http://www.viewzusa.com
CM series
Adjusting Height
Installing the Safety Cable
Installation
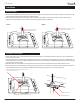
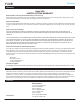
1) Hold the lower pole (where it connects to the monitor) while loosening the center collar by turning it counter-clockwise (see illustration on left
below). Extend the pole by gently lowering it to the desired length.
2) Once the proper length has been maintained, lock the pole in position by rotating the center collar clockwise. The collar should be hand
tightened as snug as possible to prevent the pole from expanding. (see illustration on right below)
1) Run the safety cable into the cable management hole in the top of the pole, and out through the bottom of the pole. The crimped eyelet end
will connect to the monitor.
2) VESA 100 x 100 - Remove one of the M4 x 6mm VESA mount screws from the monitor-bracket assembly, then connect the crimped eyelet end
of the safety cable to the mount using the supplied M4 x 10mm screw. You can discard the unused M4 x 6mm VESA mount screw that has been
removed as it is no longer needed.
3) VESA 200 x 200 - Use one of the M6 x 12 mm VESA mount screw to connect the crimped eyelet end of the safety cable to the mount.
4) Connect the top end of the safety cable by inserting it through a hole in the truss or channel strut, and fasten using the U-Bolt cable clamp. Pull
any remaining slack from the safety cable, and fully tighten the U-Bolt using a 5/16” wrench. Cut or loop any excess cable.
Loosen
Secure assembly by turning collar clockwise:
hand ghten as snug as possible
Hold lower pole secon and turn
counter-clockwise to loosen
VESA 200 x 200 - Use M6 x L12mm VESA screw
VESA 100 x 100 - Remove original M4 x L6mm VESA screw &
replace with M4 x L10mm screw
Cord Management Hole
U-Bolt Cable Clamp
Tighten