
Specifications


Page 14 of 17
Installing & Removing DDR2 SDRAM In-line Memory Modules (DIMMs)
Installing Memory
You can install from 128MB to 4GB of memory in the motherboard DIMM sockets.
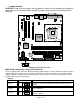
The board has four 240-pin DDR2 SDRAM DIMM sockets.
The motherboard supports the following memory features:
• 240-pin 1.8volt DIMMs with gold-plated contacts.
• Non-ECC (64-bit) or ECC (72-bit) memory.
• 128MB, 256MB, 512MB, 1GB and 2GB (in the future) modules.
When adding memory, follow these guidelines:
• The BIOS detects the size and type of installed memory.
• For ECC operation to become available all installed memory must be ECC and you must
enable the ECC Configuration feature in the BIOS Setup program.
Note:
DDR SDRAM’s must meet the Version 1.0 June 2000 JEDEC Solid State Technology
Association specifications for DDR200/266 SDRAM.
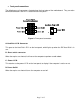
To install DIMMs, follow these steps:
1. Observe the precautions in “Upgrading and ESD precautions”. Turn off the computer and
all peripheral devices.
2. Remove the computer cover and locate the DIMM sockets.
3. Holding the DIMM by the edges, remove it from its antistatic package.
4. Make sure the clips at either end of the socket are pushed away from the socket.
5. Position the DIMM above the socket. Align the two small notches in the bottom edge of
the DIMM with the keys in the socket. Insert the bottom edge of the DIMM into the socket.
6. When the DIMM is seated, push down on the top edge of the DIMM until the retaining clips
at the ends of the socket snap into place. Make sure the clips are firmly in place.
7. Replace the computer cover.
8. If you installed a DIMM with ECC memory, start the computer and use the ECC
Configuration feature in Setup to enable the use of ECC.