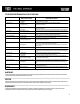
Installation Guide


6

POTENTIAL CAUSE/CAUSE

CORRECTIVE ACTION/MESURE
CORRECTIVE/MEDIDA CORRECTIVA
3 - Leak at connection points
4. - Mounting hardware became loose
5 - Loose handle
5. - Set screw has become loose
4 - Loose faucet body
3.A - Flexible hose leaking at connection point
 


3 - Fuites au niveau des points de raccordement
3.A - Fuite du flexible au niveau du point de raccordement







3.B - Washer defective
2 - Insufficient flow rate
2.A - Dirty aerator
2.B - Clog in supply hose / line
1.B - Cartridge defective
1 - Leaks from handle
1.A - Cartridge unseated
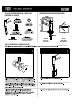
4. - From under the counter, use an adjustable wrench and tighten the mounting hardware. Make sure the faucet is perpendicular
to the counter.
5. - Take off hot/cold cover on handle. This will give you access to the screw that connects the handle to the cartridge. Using either
an allen key or a flat head screw driver, tighten the screw so handle has firm connection to cartridge.
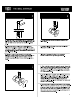
3.A - Tighten hoses. If this does not resolve the issue, remove the flexible hose and rethread, checking to make sure the connection
is secure. Make sure to use pipe tape.

perpendiculaire au comptoir.


cartouche.






1.B - Contactez le service de soutien technique de Vigo pour remplacer la cartouche.

3.B - Remove supply line and check the status of the washer. If torn, washer must be replaced for a secure, non-leaking connection.
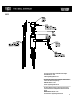
2.A - Remove aerator and soak / clean with a non abrasive agent (i.e. half hot water and half vinegar).
2.B - Remove supply lines and flush lines.
1.B - Contact Vigo Product Support for replacement.
1.A - Remove cartridge from housing, wash thoroughly with hot water and reseat in housing.
4 - Afloje el cuerpo del grifo 4. - Los dispositivos de ensamblaje se aflojaron

5 - Afloje la llave


3.B - Arandela defectuosa

2 - Caudal insuficiente
2.A - Aireadores sucios
1.B - Cartucho defectuoso

1.A - Cartucho no ajustado












MAINTENANCE
Your new faucet is designed for years of trouble-free performance. Keep it looking new by cleaning it periodically with a soft cloth. Avoid abrasive cleaners, steel wool and harsh chemicals as
these will scratch, dull, and/or damage the finish and/or product void your warranty.
ENTRETIEN


MANTENIMIENTO

