
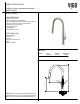
Installation Guide


3
finition et annuler la garantie.
ENTRETIEN
ASSEMBLAGE
OUTILS REQUIS
Mastic de plombier - facultatif
Ruban pour tuyau
Tournevis plats
les conduites d'alimentation d'eau.
POINTS IMPORTANTS
Avant de commencer l'installation, fermez les conduites d'eau froide et chaude
ruban pour tuyau disponible dans votre quincaillerie ou magasin de plomberie
local. Toujours enrober dans le sens des aiguilles d'une montre. Les fournitures
Avant d'installer le robinet veuillez PURGER LES CONDUITES
pourraient endommager le robinet et potentiellement annuler la garantie.
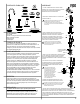
INSTALLATION
3
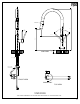
SUPPORT EN
PLASTIQUE
CARTOUCHE)
DEUX TUYAUX
CONTREPOIDS
VAPORISATEUR
ANNEAU EN
CAOUTCHOUC
6
2
1
ENSEMBLE
ROBINET
CONTENU DE L'EMBALLAGE
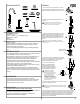
1. COUPEZ L'ALIMENTATION EN EAU. ENLEVEZ L'ANCIEN
ROBINET ET LES TUYAUX FLEXIBLES. NETTOYEZ LA SURFACE
ASSUREZ-VOUS D'UTILISER DU RUBAN POUR TUYAU ET NE
D'ALIMENTATION PUISQUE CELA POURRAIT CAUSER UNE
!
FUITES MINEURES.
6. ATTACHEZ LES CONNEXIONS FEMELLES DES TUYAUX
LA MAIN ET SERREZ POUR BIEN FIXER. ASSUREZ-VOUS
CORRECTEMENT.
!
CONDUITES D'ALIMENTATION.
3. PLACEZ LE ROBINET DANS LE TROU DU DESSUS DE
ASSEMBLEZ LE SUPPORT EN PLASTIQUE, L'ANNEAU EN
(LA PLUS LONGUE PIN). PUSH DANS L'ONGLET ET GLISSER LE
AU TUYAU.
STABILISE LE ROBINET
SOUS LE DESSUS DE
COMPTOIR
!
AJUSTABLE, NE SERREZ PAS TROP PUISQUE CELA POURRAIT
!
CONNEXION POINT ENTRE SPRAYER
4
L'ONGLET