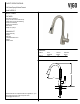
FAUCET SPECIFICATIONS Pull-Down Spray Kitchen Faucet Model VG02013 MODEL VG02013 FEATURES PACKING LIST DIMENSIONS MODEL # VG02013 HOLE DIAMETER 1 3/8" FAUCET HEIGHT 16" SPRAYER REACH 9" 16" 9" 1 3/8" NOTE: All faucets are compliant to CEC 2016 regulations. If you have inquiries about your water flow, please email techmail@vigoindustries.com.
1 1/4" 16" 3 1/8" 9" 7 1/4" 6 3/4" 2 5/8" 2 1/2" 1 3/8" SIDE VIEW SPRAY HOSE SPRAY HOSE FRONT VIEW VG02013 THE MEASUREMENTS IN INCHES ARE ROUNDED TO THE NEAREST 1/8" 2
FLOW RATE REGULATIONS This product meets the CEC requirements. It is up to the discretion of the client to modify the product with the provided restrictor. Doing so will remove the ability for the product to meet certain low flow standards. Please talk to your local or statewide plumbing enforcement agency prior to modifying.
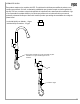
ASSEMBLY PACKAGE CONTENT PLASTIC HOLDER COUNTERWEIGHT 1. SHUT OFF WATER SUPPLY. REMOVE THE OLD FAUCET AND FLEXIBLE HOSES. CLEAN SINK SURFACE WITH A NON ABRASIVE CLEANER IN PREPARATION FOR THE NEW FAUCET. 1 RUBBER RING NUT METAL RING TWO METAL BRAIDED HOSES FAUCET ASSEMBLY 2 2. THREAD FEMALE END OF METAL BRAIDED HOSE TO THE FAUCET (2).
TROUBLESHOOTING PROBLEM POTENTIAL CAUSE 1 - Leaks from handle 2 - Insufficient flow rate 3 - Leak at connection points 4 - Loose faucet body 5 - Sprayer button stops working CORRECTIVE ACTION 1.A - Cartridge unseated 1.B - Cartridge defective 1.A - Remove cartridge from housing, wash thoroughly with hot water and reseat in housing. 2.A - Dirty aerator 2.B - Clog in supply hose / line 1.B - Contact Vigo Technical Support for replacement. 3.A - Sprayer hose not tight 3.
VIGO INDUSTRIES, LLC ("VIGO") FAUCET LIMITED LIFETIME WARRANTY EFFECTIVE APRIL 1, 2013 VIGO offers the following limited warranty on each of its Faucet products (the "Product") and the components thereof. This warranty extends only to the original owner for personal household use. For commercial uses, additional limitations apply.
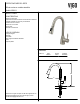
ESPECIFICACIONES DEL GRIFO Grifo de cocina con rociador extensible Modelo VG02013 MODELO VG02013 LISTA DE CONTENIDO DIMENSIONES MODELO # VG02013 ALTURA GRIFO 16" ORIFICIO 1 3/8" ALCANCE ROCIADOR 9" 16" 9" 1 3/8" NOTA: Todos los grifos cumplen con CEC 2016 regulaciones. Si usted tiene preguntas acerca de su flujo de agua, por favor escriba techmail@vigoindustries.com.
1 1/4" 16" 3 1/8" 7 1/4" 6 3/4" 9" 2 5/8" 2 1/2" 1 3/8" VISTA LATERAL MANGUERA DEL ROCIADOR VG02013 2
NORMAS DE CAUDAL La velocidad de flujo con limitador - 1.8 gpm Velocidad de flujo sin restrictor - 2.2 gpm Restrictor el limitador de 1,8 gpm e instalar el grifo como de costumbre. Grifo Limitador 1.
MONTAJE CONTENIDO DE LA CAJA SOPORTE CONTRAPESO 1. CIERRE EL SUMINISTRO DE AGUA. RETIRE EL GRIFO VIEJO Y LAS MANGUERAS FLEXIBLES. LIMPIE LA SUPERFICIE DEL LAVABO CON UN LIMPIADOR NO ABRASIVO PARA COLOCAR EL GRIFO NUEVO. 1 ARO DE GOMA ARO 2 TRENZADA EN EL GRIFO (2). DOS MANGUERAS CONJUNTO DEL GRIFO ! TRENZADAS TUERCA DE SUMINISTRO EN EXCESO, YA QUE LLAVE ALLEN (PARA RETIRAR LA PALANCA Y ACCEDER AL CARTUCHO) POR EL AGUA.
PROBLEMA POSIBLE CAUSA 1 - Fugas en la palanca 1.A 1.B - El cartucho es defectuoso 1.A - Retire el cartucho de la carcasa, lave completamente con agua 2 - Caudal insuficiente 3- 2.A - Suciedad en el aireador 1.B - caliente y vuelva a colocar en la carcasa. Vigo para el reemplazo 4 - Grifo flojo 2.A - Retire y remoje o limpie con un producto no abrasivo (p. ej., vinagre) .2.B 3.A - Retire el rociador y verifique el estado de la arandela negra. ajustar. 5.A - Residuos en el aireador 3.
VIGO INDUSTRIES, LLC ("VIGO") JA PARTIR DEL 1 DE ABRIL DE 2013 de la fecha inicial de compra por parte del propietario, contratista o constructor a VIGO o a un distribuidor autorizado de VIGO, de por vida para el propietario original o usuario final. propietario. Limitaciones causados o derivados de esta, ya sea directa o indirectamente. leyes correspondientes a este tipo de instalaciones.
LISTE D'EMBALLAGE DIMENSIONS VG02013 1 3/8" 16" 9" 16" 9" 1 3/8" de la CEC de 2016.
1 1/4" 16" 3 1/8" 7 1/4" 6 3/4" 9" 2 5/8" 2 1/2" 1 3/8" TUYAU DU VAPORISATEUR VG02013 2
responsable des modifications et de la touche qui peut venir avec la modification du poste de vente de produits et Restricteur Vous trouverez le restricteur de 1,8 gpm ici. Il suffit d'enlever le limiteur de 1,8 gpm et installer le robinet comme d'habitude. Robinet 1.
ASSEMBLAGE CONTENU DE L'EMBALLAGE 1. COUPEZ L'ALIMENTATION EN EAU. ENLEVEZ L'ANCIEN ROBINET ET LES TUYAUX FLEXIBLES. NETTOYEZ LA SURFACE SUPPORT EN PLASTIQUE CONTREPOIDS 1 ANNEAU EN CAOUTCHOUC ANNEAU 2 DEUX TUYAUX EN ! ASSUREZ-VOUS D'UTILISER DU RUBAN POUR TUYAU ET NE SERREZ PAS D'ALIMENTATION PUISQUE CELA ENSEMBLE ROBINET DU PRODUIT CE QUI POURRAIT CARTOUCHE) OUTILS REQUIS 3.
CAUSE POTENTIELLE MESURE CORRECTIVE 1.A - Cartouche non assise avec de l'eau chaude et bien asseoir dans le logement. 2.B - Encrassement dans tuyau/conduite d'alimentation 1.B - Communiquer avec le Soutien technique de Vigo pour un remplacement. 3.B - Fuite du tuyau flexible au niveau du corps ou du point de connexion 2.A - Enlever et faire tremper/nettoyer avec un agent non abrasif (par ex. du vinaigre). 2.
VIGO INDUSTRIES, LLC ("VIGO") EN VIGUEUR LE 1er AVRIL 2013 original pour usage domestique personnel. Des restrictions additionnelles s'appliquent aux utilisations commerciales. de la vente des produits en cause. Restrictions verre qui pourrait causer des blessures corporelles ou la mort.] constructeur.