
Installation Guide


MODEL VG06045
4
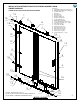
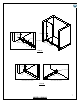
LEFT INSTALLATIONRIGHT INSTALLATION
DOOR
DOOR
DOOR
FIXED PANEL
FIG. 1A (GLASS CONFIGURATION DIAGRAM)
DOORFIXED PANEL
WARNING
WE STRONGLY RECOMMEND THAT A LICENSED PROFESSIONAL INSTALL THIS STANDING SHOWER
CABIN AND INCLUDE THE ASSISTANCE OF A SECOND PERSON TO INSTALL THE DOOR UNIT.
REQUIRED TOOLS:
-Square and/or Phillips #1 and #2 screwdriver
-Flat head screwdriver
-Electric drill; 1/4" drill bit (According to wall)
-Level
-Measuring tape
-Non permanent pencil
-Clear silicone caulking
-Utility knife; Hacksaw
WARNING
- Handle fragile items with care to prevent personal injury or material damage.
- The glass panels are tempered and cannot be cut. Never attempt to do so.
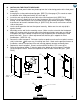
BEFORE INSTALLATION: If needed, remove the plastic layer of the base border. Do not remove the
plastic layer off the plastic platform of the base. Wall and base joints must be siliconed properly. To fit
shower door into your opening cut structural rail on door side only!
INSTALLATION INSTRUCTION
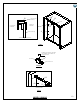
See suggestion of configuration below.
IMPORTANT:
THE CLEAR GLASS MODEL HAS A REVERSIBLE DOOR AND CAN BE INSTALLED TO THE RIGHT OR LEFT
SIDE. (SEE CONFIGURATION DIAGRAM BELOW)
!
INSTALLATION OF THE SHOWER DOORS BY AN INEXPERIENCED PERSON MAY RESULT IN GLASS
BREAKAGE AND CONSEQUENTLY, CAUSE PERSONAL INJURY OR DEATH.
BEFORE STARTING
Compare items on your invoice with what you have received. Carefully review the Packing List on page 2. If
any items are missing, please call Vigo Industries at 1-866-591-7792.
!
IMPORTANT
Fiberglass or acrylic construction might not be sufficiently strong enough to support the shower
door enclosure. You should use the wood framing from behind the face edge of the stall to provide
a secure mounting to the door. Apply a bead of silicone between the walls and base of the stall.
For optimum performance, you should install the shower door perfectly level on a level surface. By
not leveling the unit during construction the unit may leak causing possible water damage.