
Installation Guide


MODEL VG06045
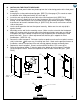
IMPORTANT
INSTALLATION STEPS
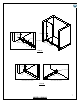
Verify that the overall size of the shower door opening is appropriate for the shower enclosure.
Due to individual site variations, exact guidelines for every situation cannot be supplied. The
recommended framing and dimensional requirements are shown for a typical application and
may vary depending on the site requirements.
To prevent damage to the finish, you should protect the shower cabin bottom with a cardboard
protector before beginning the installation.
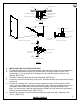
Ensure that there is sufficient structural support behind the
shower wall to hold the weight of the shower door. If there
is insufficient enough support, then reinforce the shower walls
with wooden studs prior to shower door installation.
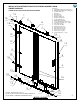
[SEE FIG. 1]
STUDS
FIG.1
5
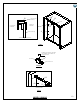
A. INSTALLING THE BOTTOM STRUCTURAL RAIL
Key Note: There is an arrow marker on the bottom structural rail (#9). This is the installation point of
the fixed panel holder (#7). [SEE FIG.2A] See the chart to determine the distance from the center of
hole to the finished wall. [SEE FIG.2] When placed for the dry fit process or installation, this sticker
should be on the inside portion of the shower stall. There is also a marker on the bottom structural
rail (#9) called "Door Side". This indicates the door side location. Note that part #9 is reversible
based off the configuration desired. [SEE FIG. 1A] This is also the only side of the rail that can be
cut. Dry fit all steps prior to installation.
1. Ensure that the bottom wall mount brackets (#1A) are on both ends of the bottom structural rail
(#9). Place the structural rail into the fixed panel holder (#7) opening. If the structural rail is too
long, then cut it with the hacksaw until it fits the opening. [SEE FIG.2C] NOTE: Remove part
#1A prior to cutting and make sure to only cut the door side portion of the structural rail.
2. Position the structural rail correctly using a level. Mark the location of the wall mount brackets
(#1A) on the wall. Make sure that the allen screws are facing towards the inside of the shower
stall. Mark the location of the fixed panel holder (#7) on the floor using the arrow marker on the
structural rail as a guide. [SEE FIG.2C]
3. Remove the structural rail and fixed panel holder. Drill holes into the respective marks and
insert plastic anchors (#16) inside them. Not necessary if installing into studs. Studs are the
preferred means of installation, anchors can pull out of the wall causing property damage and
bodily harm. Note that the housing to part (1A) will need to be unthreaded in order to install the
mounting clips. [SEE FIG. 2B]
4. Prior to installing the bottom structural rail (#9), screw the fixed panel holder (#7) to the floor with
the 3/4" phillips screw (#14). [SEE FIG. 2C] It is highly recommended to dry fit the fixed panel
(#4) at this point. Review the location of the fixed panel holder (#7) and the notch on the bottom
of the fixed panel (#4) to confirm that they are in alignment. Make sure to install the fixed panel
seal strip (#10) on the fixed panel (#4) when checking for accurate dimensions.
5. Install the mounting clips from (#1A) using part (#13) making sure that both sides are level.
Replace the bottom structural rail (#9) with the housings to (#1A) loosely attached and slide
against the wall. Tighten the hex screws. [SEE FIG.2D]
!