
Installation Guide


8
MODEL VG06045
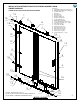
B. INSTALLING THE FRONT FIXED PANEL
FIG.3
THIN
GASKETS
10
16
13
4
WALL
SIDE
4
4
12
1. Remove the fixed panel holder face plate/cap from the inside facing portion of the fixed panel
holder (#7).
2. Arrange glass to the preferred configuration. [SEE FIG.1A on page 4] This needs to match
the location of the fixed panel holder (#7) from step "A".
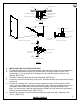
3. Install the seal strip (#10) to the wall side of the front fixed panel (#4). [SEE FIG.3]
4. Screw in the glass support (#12) to the front fixed panel (#4) using the hex key (supplied)
making sure to slide it back as far as possible from the glass before you tighten. The part
that connects to the wall should be facing in. [SEE FIG.4] Be sure to use washers on both
sides of the panel.
5. Use the level to position the front fixed panel correctly. Make sure the seal strip (#10) is
against the wall.
6. Mark holes on the wall for the mounting screws. Make sure the cut out for the fixed panel
holder (#7) matches with the center point of the fixed panel holder and make sure that the
fixed panel (#4) and the bottom structural rail (#9) are parallel prior to attaching the fixed
panel to the wall. There is a 5mm adjustment built into the glass supports for minor
modifications. [SEE FIG. 3A]
7. Remove the front fixed panel. Drill holes into the respective marks and insert plastic anchors
(#16) inside them. Not necessary if installing into studs. Studs are the preferred means of
installation, anchors can pull out of the wall causing property damage and bodily harm.
8. Replace the front fixed panel. Screw it to the wall with the with 1 5/8" screws (#13).
9. Place the fixed panel holder (7) into the notch at the bottom of the fixed panel. Place the
screw through the notch. Screw the cap back on from the other side of the glass. [SEE
FIG.5]
!
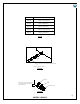
FIG.3A
12
5mm ADJUSTMENT