
Installation Guide


9
MODEL VG06045
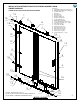
FIG.4
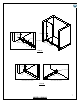
GLASS SUPPORT (12)
GASKET
FIXED PANEL (4)
HEX SCREW
VIEW FROM THE TOP
WALL
HEX SCREW (13)
OUTSIDE OF SHOWER
INSIDE OF SHOWER
VIEW FROM THE SIDE
FIXED PANEL
HOLDER (7)
CAP
FIXED PANEL (4)
GASKET
4
7
7
4
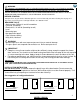
FIG.5
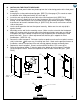
C. INSTALLING THE TOP STRUCTURAL RAIL
1. The top roller guide (#2) is already placed on the top structural rail (#8) for your convenience.
2. Place the top wall mount brackets (#1) on both ends of the top structural rail (#9), if not
already done. If the structural rail is too long, then cut it with the hacksaw until it fits the
opening. [SEE FIG.6]
3. Position the top roller guide (#2) onto the fixed panel. [SEE FIG. 6]
4. Position the structural rail correctly using a level. Mark the location of the wall mount brackets
on the wall.
5. Remove the structural rail. Drill holes into the respective marks and insert plastic anchors
(#16) inside them.
Not necessary if installing into studs. Studs are the preferred means of
installation, anchors can pull out of the wall causing property damage and bodily harm.
Note: The housing to the top wall mount bracket assembly (#1) will need to be unthreaded in
order to install the mounting clips. [SEE FIG.6A]
6. Replace the structural rail and slide mounting brackets against the wall. Tighten the hex
screws. [SEE FIG.7]
!
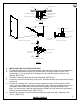
VIEW FROM THE INSIDE
FIXED PANEL
HOLDER (7)
FIXED PANEL (4)
HEX SCREW
VIEW FROM THE OUTSIDE
14
15