VIGO INDUSTRIES INSTALLATION GUIDE FOR SHOWER ENCLOSURE (MODEL VG06062) ! SAFETY PRECAUTIONS This Installation Guide uses the following symbols to indicate important information. Always observe the instructions indicated by these symbols. ! WARNING Instructions that, if ignored, could result in death or serious personal injury caused by incorrect handling or installation of the product. These instructions must be observed for safe installation.
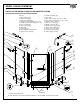
MODEL VG06062 PIEDMONT INSTALLATION INSTRUCTIONS FOR SHOWER ENCLOSURE PLEASE READ INSTRUCTIONS BEFORE PROCEEDING 1 Parts List 1. Wall connector (2pc) 2. Structural arm (2pc) 3. Support assembly (2pc) 4. Side glass panel (with hinge slots, 1pc) 5. Side glass panel (without hinge slots, 1pc) 6. Side seal strip (2pc) 7. Glass support (4pc) 8. Hinge (2pc) 9. Bottom rail (3pc) 10. Door magnetic seal strip (2pc) 11. Bottom corner joint (2pc) 12. Handle assembly (1pc) 13. Door (1pc) 14.
1. WALL CONNECTOR 2. STRUCTURAL ARM 98008-36 98008-38 98008-40 98007 6. SIDE SEAL STRIP 7.GLASS SUPPORT 96001 11. BOTTOM CORNER JOINT 94001 16. PHILLIPS SCREW 1 1/8" 98035 DOOR HANDLE ASSEMBLY 9. BOTTOM RAIL- 3pc. 8. HINGE 98013 13. DOOR 97010-24 98012-18 17. HEX SCREW 1 5/8" 98039 18. PHILLIPS SCREW 3/4" 98033 19. PLASTIC ANCHOR 98037 MODEL VG06062 5. SIDE GLASS PANEL 97009-36 97009-38 97009-40 97008-38 97008-40 98009 98010 12. 4. SIDE GLASS PANEL (with hinge slots) 97008-36 3.
* - WITH HARDWARE AND WITHOUT SHOWER BASE (FULLY INSTALLED) #4- SIDE GLASS PANEL (97008) #5- SIDE GLASS PANEL (97009) #13- DOOR (97010) DOOR OPENING WIDTH MODEL DIM. "A" DIM. "B" DIM. "C" DIM. "D" DIM.
! WARNING WE STRONGLY RECOMMEND THAT A LICENSED PROFESSIONAL INSTALL THIS SHOWER ENCLOSURE AND INCLUDE THE ASSISTANCE OF A SECOND PERSON TO INSTALL THE DOOR UNIT. INSTALLATION OF THE SHOWER DOORS BY AN INEXPERIENCED PERSON MAY RESULT IN GLASS BREAKAGE AND, CONSEQUENTLY, CAUSE PERSONAL INJURY OR DEATH. - Handle fragile items with care to prevent personal injury or material damage. - The glass panels are tempered and cannot be cut. Never attempt to do so.
PREPARATION STEPS TO FOLLOW BEFORE INSTALLATION 1. Remove the plastic layer from the base border (if needed). Do NOT remove the plastic layer off the plastic platform of the base. 2. Properly apply silicone to the wall and base joints. 3. Make sure to read corresponding base instructions carefully prior to install on the Vigo Brand Shower Door System. Failure to do so can cause water leakage and bodily harm.
INSTALLATION STEPS PLEASE NOTE THAT WHEN INSTALLING, THE LARGER OF THE SIDE RAILS IS YOUR HINGE BASE RAIL. THE LARGER OF THE 2 RAILS GOES WITH GLASS PANEL #4. (THE DIFFERENCE IS MINIMAL, PLEASE REVIEW PRIOR TO INSTALL) A C B C A B LEFT SIDE DOOR OPENING A C B A C B RIGHT SIDE DOOR OPENING A. 1. INSTALLING THE BOTTOM RAIL Remove the aluminum cover from the front piece of the bottom rail by sliding it out. A1 ALUMINUM COVER INSIDE OUTSIDE 2. Remove top of the corner joint.
3. 4. Align the bottom rail and corner joint to the desired position on the shower base. Distance A and B should be the same distance from the corner of the wall to the bottom rail (see page 4 for A and B distances). Prior to drilling, dry fit everything making sure that everything is straight, level and plum. Pre-drill for sinkers and tap sinkers. Cut excess sinker off with hacksaw or sharp blade. Dip screws in silicone and screw corner joints and rails down. Silicone tops of screws.
5. Clip the aluminum cover to the front piece of the bottom rail making sure the lower side faces the inside of the shower. Silicone the underneath portion of the corner joint caps and put them on the corner joints.
B. 1. INSTALLING THE WATER SEAL STRIP TO HINGE PANEL Clean the side glass panel (#4) edge where the door side seal strip (#14) is to be installed with rubbing alcohol. Verify that the soft flange of the seal strip faces toward the inside of the shower cabin before seal strip installation. Install the seal strip according to the diagram. See Note: A. Leave the extra top of the 4 seal strip that is overlapping the glass and cut at finish of install. NOTES: 1.
C. 1. HINGE INSTALLATION Clean the glass surface on the side glass panel (#4) where the hinges (#8) are to be installed with rubbing alcohol. Place gaskets on each side of the side glass panel (#4). Position hinges on the side glass panel. C1 DOOR SIDE GLASS PANEL (4) HINGE (8) THIN GASKETS SEAL STRIP (14) VIEW FROM INSIDE 2. Place a shim between the glass and the hinge on the bottom. The metal should not rest on the glass.
3. Screw the hinges to the side glass panel with the hex key (supplied).
D. 1. INSTALLING SIDE GLASS PANEL (PART #4) Arrange glass to the preferred configuration. (see diagram on page 5) These instructions are for a right side door opening configuration. Select the door opening location on the shower cabin. Install the side seal strip (#6) to the wall side of the hinged side glass panel (#4). D1 WALL SIDE 14 DOOR SIDE 6 4 MAKE SURE TO LEAVE A GAP OF 3/8" [10MM] FROM THE BOTTOM OF THE GLASS 2.
3. Make sure glass panel is level to the wall. Be sure to install the correct glass with the correct rail. Place the side glass panel into the bottom rail (#9). Use the level to position the side glass panel correctly. Make sure the seal strip is against the wall. Mark holes on the wall for the mounting screws. D3 THIS SIDE MUST BE LEVEL 9 4. Remove the side glass panel. Drill holes into respective marks and insert plastic anchors (#20) inside them. ! Not necessary if installing into studs.
! WARNING DOOR PANEL INSTALLATION REQUIRES TWO OR MORE PEOPLE TO ASSIST E. INSTALLING THE DOOR 1. Place the door on a 5/8" shim (not provided). Install the top hinge first for safety and ease of install. Position the door onto the hinges. Hold securely in place using shims. The seal (#14) may get stuck between the two panels of glass. Pull the seal out of the groove using your fingers and nothing sharp, making sure not to damage the seal. Tighten allen key screws. Install the hinges as illustrated.
3. Make sure the door is level from the end. If the door is not level, adjust the hinge positions until the door is level. This being level is imperative to the installation and will guarantee a tight seal. 13 E3 THIS SIDE MUST BE LEVEL 4. Clean the door (#13) glass surfaces where the hinges (#8) are to be installed with rubbing alcohol. Place magnetic seal strip (#10) to the panel. The magnetic side should be facing the inside and the clear side be facing the outside.
F. INSTALLING SIDE GLASS PANEL (PART #5) 1. Install the side seal strip (#6) to the wall side of the side glass panel (#5). Install the magnetic side seal strip (#10) to the door side. The magnetic side should be facing the inside and the clear side be facing the outside. Be sure to place the seal strip (#6) 10mm from the bottom of the glass. Installing the magnetic seal strip prior to locating the place for the glass support allows for proper seal.
3. Place the side glass panel (#5) into the bottom rail (#9). Connect the side glass panel (#5) to the door (#13) by the magnetic seal strips (#10). 13 F3 10 5 9 4. One person must hold the connection at the magnetic seal strips (#10) in place. The other person, with the glass supports loose on the glass, will slide the supports along the glass to the wall and mark holes on the wall for the mounting screws.
5. Remove the side glass panel. Drill holes into respective marks and insert plastic anchors (#20) inside them. ! Not necessary if installing into studs. Studs are the preferred means of installation, anchors can pull out of the wall causing property damage and bodily harm. 20 F5 9 6. Replace the side glass panel (#5) back into the bottom rail and screw it to the wall with 1 5/8" screws (#17). Tighten the glass supports to the side glass panel.
G. 1. INSTALLING THE SIDE & FRONT PANEL SUPPORT Install the support assembly (#3) onto the side glass panel (#4) approximately two-thirds away from the wall. Be sure to use gaskets on both sides of the panel. Use hex key to tighten to screws. G1 WALL 3 SIDE PANEL OUTSIDE OF THE CABIN WALL SIDE PANEL 2. Install the support assembly to the structural arm (#2) and wall connector (#1). Make sure it's level. Mark the hole on the wall for the mounting screw for the wall connector.
3. Remove the support assembly. Drill a hole into the respective mark and put a plastic anchor (#19) in it. ! Not necessary if installing into studs. WALL 19 G3 3 SIDE PANEL 4. Replace wall connector to proper position. Screw it in to the wall with 1 1/8" screws (#16). G4 WALL 1 LEVEL 16 2 3 SIDE PANEL 5. Slide the structural arm (#2) into the wall connector (#1). Tighten all set screws. Repeat Steps 1 through 5 to install the other support assembly to the other side glass panel.
H. INSTALLING PRE-CUT BOTTOM DOOR SEAL STRIP 1. Clean the door glass panel (#13) edge where the door bottom side seal strip (#15) is to be installed with rubbing alcohol. Verify that the soft flange of the seal strip faces toward the inside of the shower cabin before seal strip installation. Install the seal strip according to the diagram. NOTE: If the 13 H1 seal strip is not flat or twisted, use hot water and a hair dryer to apply minimal heat and press the seal strip back into position.
I. 1. APPLYING THE SILICONE Apply clear silicone caulking to the inside between the wall and side seal strip. Apply clear silicone caulk to the inside between the bottom of side glass panels (#4, #5) and bottom rail. Apply clear silicone caulk around the inside perimeter of the bottom rail. 2. Apply clear silicone caulk to the seal strip connections of the door bottom seal strip and the door magnetic seal strip.
J. 1. HANDLE INSTALLATION Assemble the door handles (#12) to the door (#13). J1 INSIDE HANDLE METAL WASHER DOOR PANEL CLEAR WASHER METAL WASHER SCREW WHITE TUBE OUTSIDE HANDLE CLEAR WASHER THREADED SCREW K. 1. INSTALLING HEX SCREW AND GLASS SUPPORT COVERS Install hex screw covers (#21) to the hex screws that mount the hinges (#8). Slide the glass support covers down onto the glass supports (#7).
! IMPORTANT - WAIT 24 HOURS BEFORE USING SHOWER - DO NOT ALLOW WATER TO DIRECTLY HIT DOOR SEAL STRIPS. CLEANING INSTRUCTIONS FOR THE SHOWER CABIN AND DOOR PANEL 1. Use a mild liquid household cleaner to keep metal surfaces bright and clean. Rinse well and dry with a soft, clean cloth. 2. Remove dust with a soft, damp cloth. 3. Use a standard household window cleaner to clean the glass panels. 4.
SHOWER ENCLOSURE LIMITED LIFETIME WARRANTY EFFECTIVE JANUARY 1, 2010 only to the original owner or end-user for personal household use. For commercial uses, additional limitations apply.