
Instructions / Assembly


4
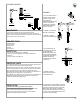
68053
-68052
Handle Set Screw
Handle 68083 W
Handle Cap
64016
CH, BN, ARB
Cartridge
-
PARTS LIST - For any parts needed but not shown, please contact Vigo Technical Support
PART
TOLL FREE: (866) 591 - 7792
E-Mail: techmail@vigoindustries.com
www.vigoindustries.com
PART # FINISH
SUPPLY DATE INDICATOR (INTERNAL USE ONLY)
NSF / ANSI 61
TROUBLESHOOTING
PROBLEM POTENTIAL CAUSE CORRECTIVE ACTION
1 - Leaks from handle
2 - Insufficient flow rate
3 - Leak at connection points
4 - Loose faucet body
1.A - Cartridge unseated
1.B - Cartridge defective
2.A - Dirty aerator
2.B - Clog in supply hose / line
3.A - Flexible hose leaking at connection point
3.B - Washer defective
4. - Mounting hardware became loose
3.A - Tighten hoses. If this does not resolve the issue, remove
the flexible hose and rethread, checking to make sure the
connection is secure. Make sure to use pipe tape.
2.B - Remove supply lines and flush lines.
2.A - Remove aerator and soak / clean with a non abrasive
agent (i.e. half hot water and half vinegar).
1.B - Contact Vigo Technical Support for replacement.
1.A - Remove cartridge from housing, wash thoroughly with hot
water and reseat in housing.
3.B - Remove supply line and check the status of the washer. If
torn, washer must be replaced for a secure, non-leaking
connection.
4. - From under the counter, use an adjustable wrench and
tighten the mounting hardware. Make sure the faucet is
perpendicular to the counter.
5 - Loose handle
5. - Set screw has become loose
5. - Take off hot/cold cover on handle. This will give you access
to the screw that connects the handle to the cartridge. Using
either an allen key or a flat head screw driver, tighten the screw
so handle has firm connection to cartridge.
2.C - Clog in copper supply pins
2.C - Remove copper pins and flush/clean out.
W
W
W
Body Base
Body Base Screw
Flow Restrictor
68050
64022
68081 W
W
W
CH, BN, ARB
-
-
-