
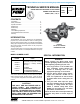
User Manual


SECTION TSM 443 ISSUE C PAGE 6 OF 8
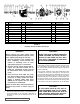
Refill the bracket lubrication chamber with multi-purpose
grease and place the tapered sleeve in the bracket
closure as shown in Figure 10. Flush the sealing faces
of both the rotary member and stationary member with
oil just before installing rotor and shaft.
ASSEMBLY
1. Installing New Seal: The seal is simple to install
and good performance will result if care is taken in its
installation. NOTE: Never touch the sealing faces with
anything except the fingers or a clean cloth. Clean the
rotor hub and bracket seal housing, making sure both
are free from dirt and grit.
Coat the outside diameter of the seal seat and the inside
diameter of the seal housing bore with light oil. With
thumb and forefinger, push the seal seat into place, as
shown in Figures 6 & 7.
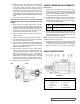
FIGURE 8
SPRING
MECHANICAL SEAL
(ROTARY MEMBER)
COAT WITH LIGHT OIL
BEFORE ASSEMBLY
TAPERED SLEEVE
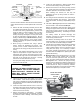
FIGURE 5
CUTAWAY VIEW 260-G SERIES
FIGURE 6
200-G SERIES
FIGURE 9
Place the tapered sleeve (furnished with replacement
seals) on the shaft as in Figure 8. Coat the inside of
the rotary member and the outside of the tapered sleeve
with light oil. Place the spring and rotary member on
the shaft, over the sleeve and against the hub of the
rotor only enough to hold the spring in position. Do not
compress spring at this stage. (See Figure 9). Remove
the tapered sleeve.
FIGURE 10
FIGURE 7
260-G SERIES
BRACKET SEAL HOUSING
SEAL SEAT GASKET
SEAL SEAT
LIPSEAL
FOR SEAL
CHAMBER
SPRING
ROTARY MEMBER
NEEDLE BEARING
COAT WITH LIGHT OIL
BEFORE ASSEMBLY
COAT WITH LIGHT OIL
BEFORE ASSEMBLY
LIPSEAL FOR SEAL CHAMBER
TAPERED SLEEVE