® Viking Range Corporation 111 Front Street Greenwood, Mississippi 38930 USA (662) 455-1200 For product information call 1-888-VIKING1 (845-4641) or visit the Viking Web site at vikingrange.
SERVICE INFORMATION If service is required: 1. Call your dealer or authorized service agency. The name of the authorized service agency can be obtained from the dealer or distributor in your area. 2. Have the following information readily available: a. Model number b. Serial number c. Date purchased d. Name of dealer from whom purchased 3. Clearly describe the problem that you are having.
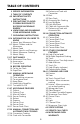
TABLE OF CONTENTS 2 SERVICE INFORMATION 3 TABLE OF CONTENTS 4-5 IMPORTANT SAFETY INSTRUCTIONS 5 PRECAUTIONS TO AVOID POSSIBLE EXPOSURE TO EXCESSIVE MICROWAVE ENERGY 6 UNPACKING AND EXAMINING YOUR MICROWAVE OVEN 7 GROUNDING INSTRUCTIONS 8-14 INFORMATION YOU NEED TO KNOW 8 About Your Microwave Oven 8-9 About Children and the Microwave 9 About Food 10-12 About Utensils and Coverings 13 About Microwave Cooking 14 About Safety 15-17 PART NAMES 15-16 Microwave Oven Parts 16 Accessories 17 Control Panel 18 BEFORE
IMPORTANT SAFETY INSTRUCTIONS When using electrical appliances basic safety precautions should be followed, including the following: WARNING - To reduce the risk of burns, electric shock, fire, injury to persons or exposure to excessive microwave energy: 1. READ ALL INSTRUCTIONS BEFORE USING THE APPLIANCE. 2. Read and follow the specific “PRECAUTIONS TO AVOID POSSIBLE EXPOSURE TO EXCESSIVE MICROWAVE ENERGY” on page 5. 3. This appliance must be grounded. Connect only to properly grounded outlet.
17. Liquids, such as water, coffee or tea are able to be overheated beyond the boiling point without appearing to be boiling. Visible bubbling or boiling when the container is removed from the microwave oven is not always present. THIS COULD RESULT IN VERY HOT LIQUIDS SUDDENLY BOILING OVER WHEN A SPOON OR OTHER UTENSIL IS INSERTED INTO THE LIQUID. To reduce the risk of injury to persons: a. Do not overheat the liquid. b. Stir the liquid both before and halfway through heating it. c.
UNPACKING AND EXAMINING YOUR MICROWAVE OVEN Remove all packing materials from inside the microwave oven cavity; however, DO NOT REMOVE THE WAVEGUIDE COVER, which is located on the top cavity wall. Read enclosures and SAVE the Use and Care Manual. Remove the feature sticker from the outside of the door, if there is one.
GROUNDING INSTRUCTIONS This appliance must be grounded. This microwave oven is equipped with a cord having a grounding wire with a grounding plug. It must be plugged into a wall receptacle that is properly installed and grounded in accordance with the National Electrical Code and local codes and ordinances. In the event of an electrical short circuit, grounding reduces risk of electric shock by providing an escape wire for the electric current.
INFORMATION YOU NEED TO KNOW ABOUT YOUR MICROWAVE OVEN This Use and Care Manual is valuable: read it carefully and always save it for reference. A good microwave cookbook is a valuable asset. Check it for microwave cooking principles, techniques, hints and recipes. NEVER use the microwave oven without the turntable and support nor turn the turntable over so that a large dish could be placed in the microwave oven. The turntable will turn both clockwise and counterclockwise.
Don’t assume that because a child has mastered one cooking skill, he/she can cook everything. Children need to learn that the microwave oven is not a toy. See page 35 for Child Lock feature. ABOUT FOOD FOOD Eggs, sausages, nuts, seeds, fruits & vegetables DO DON'T • Puncture egg yolks before cooking to prevent “explosion”. • Pierce skins of potatoes, apples, squash, hot dogs and sausages so that steam escapes. • Cook eggs in shells. • Reheat whole eggs. • Dry nuts or seeds in shells.
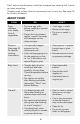
ABOUT UTENSILS AND COVERINGS It is not necessary to buy all new cookware. Many pieces, already in your kitchen, can be used successfully in your new convection microwave oven. The chart below will help you decide what utensils and coverings should be used in each mode. UTENSILS AND COVERINGS MICROWAVE ONLY CONVEC BROIL, SLOW COOK HIGH MIX/ ROAST LOW MIX/BAKE Aluminum foil YES. Small flat pieces YES.
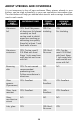
UTENSILS AND COVERINGS MICROWAVE ONLY CONVECTION BROIL, SLOW COOK HIGH MIX/ ROAST LOW MIX/BAKE Lids, metal NO YES. BroilNo cover NO Metal cookware NO YES YES. Do not use metal covering. Metal, misc: dishes with metallic trim, screws, bands, handles. Metal twist ties NO NO NO Oven cooking bags YES. Good for large meats or foods that need tenderizing. DO NOT use metal twist ties. YES. BroilNo cover YES. DO NOT use metal twist ties. Paper plates YES. For reheating.
UTENSILS AND COVERINGS MICROWAVE ONLY CONVECTION BROIL, SLOW COOK HIGH MIX/ ROAST LOW MIX/BAKE Plastic, Thermoset® YES YES. Are heat resistant up to 425°F. Do not use for broiling. YES Plastic wrap YES. Use brands specially marked for microwave use. DO NOT allow plastic wrap to touch food. Vent so steam can escape. NO NO Pottery, porcelain stoneware YES. Check manufacturer's recommendation for being microwave safe. YES YES. Must be microwave safe AND ovenable. Styrofoam YES. For reheating.
ABOUT MICROWAVE COOKING • Arrange food carefully. Place thickest areas towards outside of dish. • Watch cooking time. Cook for the shortest amount of time indicated and add more as needed. Food severely overcooked can smoke or ignite. • Cover foods while cooking. Check recipe or cookbook for suggestions: paper towels, wax paper, microwave plastic wrap or a lid. Covers prevent spattering and help foods to cook evenly.
ABOUT SAFETY • Check foods to see that they are cooked to the United States Department of Agriculture's recommended temperatures. To test for doneness, insert a meat thermometer in a thick or dense area away from fat or bone. NEVER leave the thermometer in the food during cooking, unless it is approved for microwave oven use. TEMP FOOD 160˚F (71˚C) For fresh pork, ground meat, boneless white poultry, fish, seafood, egg dishes and frozen prepared food.
PART NAMES MICROWAVE OVEN PARTS FRONT VIEW 12 11 10 6 1 2 13 4 3 1. Oven door with see-through window. 2. Door hinges. 3. Waveguide cover DO NOT REMOVE. 4. Turntable motor shaft. 5. Oven light. It will light when oven is operating or door is open. 6. Safety door latches. The oven will not operate unless the door is securely closed. 5 6 7 8 9 7. One touch DOOR OPEN button. Push to open door. 8. Fan Hi / Lo button. Push for high/low/off. 9. Light button. Push for on/off. 10.
BOTTOM VIEW 14 (Front of Microwave) 16 17 18 19 15 (Rear of Microwave) 14. Light cover. 15. Grease filters. 16. Removable ceramic turntable. The turntable will rotate clockwise or counterclockwise. Only remove for cleaning. 17. Removable turntable support. Place the turntable support on the floor of the oven cavity and the turntable on the turntable support. 18. Removable low rack for broiling and meat and poultry roasting. 19. Removable high rack for two level baking.
CONTROL PANEL Interactive Display Words will light in the display to indicate features and cooking instructions. 24 37 24 21-22 23-24 27-28 28, 30 30-31 29-30 29 28-29 29 32 33-34 18 35-36 19 36 20 37 20, 40 20, 40 20-21 18 Number next to the control panel illustration indicates pages on which there are feature descriptions and usage information.
BEFORE OPERATING • Before operating your new microwave oven make sure you read and understand this Use and Care Manual completely. • Before the microwave oven can be used, follow these procedures: 1. Plug in the microwave oven. Close the door. The microwave oven display will show WELCOME. 2. Touch the Stop/Clear pad. : will appear. 3. Set clock. TO SET THE CLOCK 1. Touch Clock pad. 2. Enter the correct time of day by touching the numbers in sequence. Touch Clock pad again. This is a 12 hour clock.
MANUAL MICROWAVE OPERATION TIME COOKING MICROWAVE Your microwave oven can be programmed for 99 minutes 99 seconds (99.99). Always enter the seconds after the minutes, even if they are both zeros. • Suppose you want to cook for 5 minutes at 100% 1. Enter cooking time by touching the number pads 500. 2. Touch Start/Touch On pad. TO SET POWER LEVEL There are eleven preset power levels.
KEEP WARM Keep Warm can only be programmed with manual cooking or as a separate program. • Suppose you want to cook a baked potato for 4 minutes at 100% power and you want to keep it warm after cooking for 30 minutes. 1. Touch number pads for the desired cook time for 1 baked potato. Ex: 400�for 4 minutes. 2. Touch Keep Warm pad. 3. Touch Start/Touch On pad. At the end of cook time, Keep Warm is displayed warming food until end of 30 minutes.
THE TURNTABLE SHOULD ALWAYS BE ON WHEN USING THE SPECIAL FEATURES. On/Off function can be used with manual cooking modes and Reheat. Turntable off condition will automatically change to on condition when you select auto cooking except Reheat and Convec Bake. When cooking large quantities of food which cannot be stirred, it is best to use a lower power level such as 40% or 50%.
DEFROST CHART TOUCH DEFROST PAD* FOOD AMOUNT PROCEDURE Once Ground Meat 0.5 - 3.0 lb Remove any thawed pieces after each stage. Let stand, covered, 5–10 minutes. Twice Steaks (Chops, fish) 0.5 - 4.0 lb After each stage of defrost cycle, rearrange and if there are warm or thawed portions, shield with small flat pieces of aluminum foil. Remove any meat or fish that is nearly defrosted. Let stand, covered, 10–20 minutes. 3 times Chicken Pieces 0.5 - 3.
SENSOR COOKING The Sensor is a semi-conductor device that detects the vapor (moisture and humidity) emitted from food as it heats. The sensor adjusts the cooking times and power level for various foods and quantities. It takes the guesswork out of microwave cooking. USING SENSOR SETTINGS: 1. Room temperature should not exceed 95˚F. 2. Be sure the exterior of the cooking container and the interior of the microwave oven are dry. Wipe off any moisture with a dry cloth or paper towel. 3.
3. Paper towel: Use paper towels to absorb excess fat and moisture when cooking bacon and potatoes. Line the turntable when baking potatoes. 4. Wax paper: Cover dish completely; fold excess wrap under dish to secure. If dish is wider than paper, overlap two pieces at least one inch to cover. Be careful when removing any covering to allow steam to escape away from you. REHEAT TURNTABLE ON: You can reheat many foods by touching just one pad. You don’t need to calculate reheating time or power level.
SENSOR CHART FOOD AMOUNT PROCEDURE Leftovers such as rice, potatoes, vegetables, casserole. 4 - 32 oz Place in dish or casserole slightly larger than amount to reheated. Flatten, if possible. Cover with lid, plastic wrap or wax paper. Use covers such as plastic wrap or lids with larger quantities of more dense foods such as stews. Soup 1 - 4 cups After reheating, stir well, if possible. Foods should be very hot. If not, continue to heat with variable power and time.
SENSOR COOK • Suppose you want to cook a baked potato. 1. Touch Sensor Cook pad. 2. Select desired sensor setting. Ex: touch number pad 1 to cook baked potatoes. 3. Touch Start/Touch On pad. When sensor detects the vapor emitted from the food, the remainder of cooking time will appear. Open microwave oven door or touch Stop/Clear pad. The time of day will appear in the display. SENSOR COOK CHART FOOD 1. Baked potatoes AMOUNT PROCEDURE 1 - 6 medium Pierce. Place on paper-towel-lined turntable.
SENSOR COOK CHART (cont.) FOOD AMOUNT PROCEDURE 5. Frozen entrees 6 - 17 oz Use for frozen convenience food. It will give satisfactory results for most brands. You may wish to try several and choose your favorite. Remove package from outer wrapping and follow package directions for covering. After cooking, Iet stand, covered, for 1 to 3 minutes. 6. Hot dogs 1-4 servings Place hot dog in bun and wrap in paper towel or paper napkin. 7.
3. Enter cooking time by touching number pads 2000. 4. Touch Start/Touch On pad. PREHEAT AND COOK WITH CONVECTION Your microwave oven can be programmed to combine preheating and convection cooking operations. You can preheat to the same temperature as the convection temperature or change to a higher or lower temperature. • Suppose you want to preheat to 350˚F, and then cook 25 minutes at 375˚F convection: 1. Touch Preheat pad. 2. Select temperature by touching number pad 6 . 350˚F 3. Touch Convec pad. 4.
Note: 1. Preheating for broil may take from 7 to 10 minutes depending on temperature of room and available power. 2. Although time is usually set for the maximum broiling time, always check food at the minimum time recommended in the chart of cookbook. This will eliminate the need to completely reprogram the microwave oven if additional cooking time is needed. Simply close the microwave oven door and touch Start/Touch On to continue. SLOW COOK Slow Cook is preset at 300˚F for 4 hours.
COOK WITH AUTOMATIC MIX • Suppose you want to bake a cake for 25 minutes on Low Mix/Bake. 1. Touch Low Mix/Bake pad. 2. Enter cooking time by touching number pads 2500. 3. Touch Start/Touch On pad. PREHEAT AND COOK WITH AUTOMATIC MIX Your microwave oven can be programmed to combine preheating and automatic mix cooking operations. You can preheat at the same temperature as the preset combination temperature or change it to a different temperature.
For well done or rare burgers, touch Power Level pad to select More for well done or Less for rare. See More/Less Time Adjustment on page 37. 4. Touch Start/Touch On pad. After broil preheat cycle ends, 4 long tones will sound. PREHEAT OVER PLACE FOOD IN OVEN will be displayed repeatedly. Open the door and place hamburgers into microwave oven. Close the door. 5. Touch Start/Touch On pad. After broil cycle ends, 1 long tone will sound and END will be displayed. Note: 1.
CONVEC ROAST Convec Roast automatically roasts chicken, turkey, turkey breast or pork. • Suppose you want to roast a 2.5 pound chicken. 1. Touch Convec Roast pad. 2. Select desired setting. Ex: for chicken, touch number pad 1. 3. Touch number pad to enter weight. Ex: 25 lb. 4. Touch Start/Touch On pad. After Convec Roast cycle ends, a long tone will sound. Follow the indicated message. Note: 1. Convec Roast can be programmed with More/Less Time Adjustment. See page 37. 2.
CONVEC BAKE Convec Bake automatically bakes cakes, brownies, muffins and French fries. • Suppose you want to bake a 13"x9"x2" cake. 1. Touch Convec Bake pad. 2. Select desired setting. Ex: for cake, touch number pad 1. 3. Touch Start/Touch On pad. After Convec Bake preheat cycle ends, 4 long tones will sound. PREHEAT OVER PLACE FOOD IN OVEN will be displayed repeatedly. Open the door and place pan into microwave oven. Close the door. 4. Touch Start/Touch On pad.
3. Muffins 12 cup muffin pans Ideal for packaged muffin mix or your own recipe for 12 medium size muffins. Prepare according to package or recipe directions and place in one 12-cup muffin pan. After the preheat is over, place pan in microwave oven centered on low rack. 4. French fries 3 - 24 oz Cookie sheet to hold Use frozen prepared French fries. No preheat is required for the French fries baking procedure. Place French fries on cookie sheet on low rack.
OTHER CONVENIENT FEATURES HELP (CONTROL PAD) Help provides 5 features which make using your microwave oven easy because specific instructions are provided in the interactive display. 1. CHILD LOCK The Child Lock prevents unwanted microwave oven operation such as by small children. The microwave oven can be set so that the control panel is deactivated or locked. To set, touch Help, the number 1 and Start/Touch On pads. Should a pad be touched, LOCK will appear in the display.
4. LANGUAGE SELECTION The microwave oven comes set for English. To change, touch Help and the number 4 pads. Continue to touch the number 4 pad until your choice is selected. Then, touch Start/Touch On pad. Touch number 4 once for English. Touch number 4 twice for Spanish. Touch number 4 three times for French. 5. WEIGHT AND TEMPERATURE SELECTIONS The microwave oven comes set for U.S. Customary Unit-pounds. To change, touch Help and the number 5.
MORE OR LESS TIME ADJUSTMENT MORE: Should you discover that you like any of the Sensor, Sensor Cook, Defrost, Convec Broil, Convec Roast or Convec Bake settings slightly more done, touch the Power Level pad once after touching your choice of pads. LESS: Should you discover that you like any of the Sensor, Sensor Cook, Defrost, Convec Broil, Convec Roast or Convec Bake settings slightly less done, touch the Power Level pad twice after touching your choice of pads.
DEMONSTRATION MODE To demonstrate, touch Clock, the number 0 and then touch Start/Touch On pad and hold for 3 seconds. DEMO ON DURING DEMO NO OVEN POWER and DEMO will appear in the display. Cooking operations and specific special features can now be demonstrated with no power in the microwave oven. For example, touch Add-A-Minute pad and the display will show 1.00 and count down quickly to END. To cancel, touch Clock, then the number 0 and Stop/Clear pads.
INTERIOR - AFTER CONVECTION, MIX OR BROIL COOKING Spatters may occur because of moisture and grease. Wash immediately after use with hot, soapy water. Rinse and polish dry. Harder to remove spatters may occur if microwave oven is not thoroughly cleaned or if there is long time/high temperature cooking. If so, you may wish to purchase an oven cleaner pad with liquid cleaner within it—not a soap filled steel pad—for use on stainless or porcelain surfaces.
remove the filter. Repeat for the other filter. 2. Soak the filters in a sink or dish pan filled with hot water and detergent. DO NOT use ammonia or other alkali; they will react with the filter material and darken it. 3. Agitate and scrub with a brush to remove embedded dirt. Filter 4. Rinse thoroughly and shake dry. 5. Replace by fitting the filter back into the opening.
4. Close light cover and secure with screw removed in step 2. Cautions: Light cover may become very hot. Do not touch glass when light is on. Do not use light for long time use such as a night light. CHARCOAL FILTER Charcoal Filter is used for Non-vented, recirculated installation. The filter should be changed every 6 to 12 months depending on use. 1. Disconnect power to the oven at the circuit breaker panel or by unplugging. 2. Remove 2 screws that secure louver. 3.
SPECIFICATIONS AC Line Voltage: UL Rating - Single phase 120V, 60Hz, AC only CSA Rating - Single phase 116V, 60Hz, AC only AC Power Required: UL Rating - Microwave 1.60 kw, 13.2 amps. UL Rating - Convection 1.60 kw, 13.2 amps. CSA Rating - Microwave 1.5 kw, 13.0 amps. CSA Rating - Convection 1.5 kw, 13.0 amps.
SERVICE CALL CHECK Please check the following before calling for service: 1. Place one cup of water in a glass measuring cup in the microwave oven and close the door securely. Operate the microwave oven for one minute at HIGH 100%. A Does the microwave oven light come on? B YES _____ NO _____ Does the cooling fan work? YES _____ NO _____ (Put your hand over the rear ventilating openings.) C Does the turntable rotate? YES _____ NO _____ (It is normal for the turntable to turn in either direction.
MICROWAVE OVEN WARRANTY ONE YEAR FULL WARRANTY Viking Microwave Oven and all of their component parts and accessories, except as detailed below*, are warranted to be free from defective materials or workmanship in normal household use for a period of twelve (12) months from the date of original retail purchase. Viking Range Corporation, warrantor, agrees to repair or replace, at its option, any part which fails or is found to be defective during the warranty period.