User’s Guide KEEPING THE WO RLD S EWIN G ™
This houshold sewing machine is designed to comply with IEC/EN 60335-2-28 and UL1594 IMPORTANT SAFETY INSTRUCTIONS When using an electrical appliance, basic safety precautions should always be followed, including the following: Read all instructions before using this household sewing machine. DANGER - To reduce the risk of electric shock: • • A sewing machine should never be left unattended when plugged in.
CONTENTS 3 1 GET TO KNOW YOUR MACHINE Machine Overview 4 Accessories 5 Presser Feet 5 Stitch Overview 7 2 MACHINE FUNCTIONS Machine Functions Speed Control Slide Foot Control Needle Stop Up/Down Stop Fix Reverse Presser Foot Pressure Dial Stitch Balance 23 23 23 24 24 24 24 25 25 26 26 26 26 26 26 27 27 27 27 27 Connect the Foot Control 13 Function Buttons Direct Stitch Selection buttons Stitch Width Stitch Length Menu Selection Font Menu Selection (only EMERALD™ 203) Mirror Side to Side Sti
BASIC SEWING TECHNIQUES Seam 33 Edge/Quilting Guide 34 Overcast 34 Seam and Overcast 34 Darning and Mending 35 Sewing Hems in Heavy Fabric 35 Blind Hem 36 Sewing Buttonholes Buttonhole Slider Foot C Corded Buttonhole (Stretch fabrics) 37 37 38 Sewing on Buttons 38 Sewing Zippers Center Zipper 39 39 Gathering 40 Dual Feeder (only Emerald™ 203) 40 5 CARE OF YOUR MACHINE Cleaning 41 Changing the Light Bulb 41 Clean the Bobbin Area Cleaning Under the Bobbin Area 42 42 Trouble S
1 GET TO KNOW YOUR MACHINE 1.
1 2 14 26 13 3 4 5 25 2223 24 12 11 15 20 19 17 18 16 21 6 10 9 8 7 MACHINE OVERVIEW 1. 2. 3. 4. 5. 6. 7. 8. 9. 10. 11. 12. 13. 14. 4 Thread tension dial Lid InfoDisplay Handwheel Indicator for active menu Function panel Main power switch, connection to power supply and foot control connection Accessory box Bobbin cover Needle plate Light Thread cutter Presser foot pressure dial Thread take-up lever 15. 16. 17. 18. 19. 20. 21. 22. 23. 24. 25. 26.
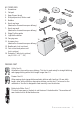
ACCESSORIES 1. 2. 3. 4. 5. 6. 7. 8. 9. 10. 11. 12. 13. 14. Screwdriver 1 Felt pad Seam Ripper/brush Multipurpose tool/Button reed 4 Bobbins Spool cap large (attached on the machine upon delivery). 8 Spool cap small (attached on the machine upon delivery) Edge/Quilting guide Light bulb remover Carrying case 10 Accessory box (attached on the machine upon delivery).
Blind Hem Foot D This foot is used for blind hem stitches. The inner edge of this foot guides the fabric. The right toe of the foot is designed to ride along the hem edge. Zipper Foot E This foot can be snapped on either to the right or to the left of the needle. This makes it easy to sew close to both sides of the zipper teeth. Move needle position to right or left to sew closer to zipper teeth or for covering large cording.
STITCHES Utility Stitches, Menu 1 & 2 Use those stitches for utility sewing, garment sewing and mending. 1:0 – Buttonhole Buttonhole for blouses shirts and linen. C 1:1 – Straight Stitch For all kinds of sewing in woven fabrics. A 1:2 – Stretch Stitch For seams in tricot and stretch fabrics. A 1:3 – Reinforced Straight Stitch For seams which are subject to considerable strain. Use to reinforce and topstitch sportswear and working clothes.
8 2:01 – Double Overlock Seam and overcast in one step along the edge or trim later. For heavy stretch fabrics. B 2:02 – Darning Stitch Darn and mend work clothers, jeans, table cloths and towels. B 2:03 – RicRac Stitch For joining fabric edge to edge, overlapping leather, or decorative stitching. B 2:04 – Elastic Blind Hem Invisible hems in stretch medium and heavy fabrics. D 2:05 – Woven Blind Hem Invisble hems in woven fabrics.
Utility Stitches, Menu 2 only EMERALD™ 203 2:16 – Overlock Stitch Seam and overcast in one step along the edge or trim later. For medium stretch fabrics. B 2:17 - Gathering Stitch For gathering. A 2:18 – Shell Edge Stitch For edgings, sew over the edge on light stretch fabrics, sew woven fabric on bias. A 2:19 – Elastic or Smocking Stitch Sew over two rows of elastic thread for elastic shirring. B 2:20 – Heirloom Buttonhole For hand look on fine and delicate fabrics.
Decorative Stitches Menu 3 only EMERALD™ 203 Menu 4 only EMERALD™ 203 Menu 5 only EMERALD™ 203 Alphabet Menu EMERALD™ 203 Alphabet Position Table 10 EMERALD™ 183
2 SET UP UNPACKING 1. Place the machine on a sturdy, flat surface, remove the packaging and lift off the cover. 2. The machine is delivered with an accessory bag, a main cord and a foot control cord. 3. Wipe the machine, particularly around the needle and needle plate to remove any oil before sewing. PACK AWAY AFTER SEWING 1. Press the power switch to turn off the machine. 2 Unplug the cord from the wall socket and then from the machine.
ACCESSORY BOX In the accessory box there is a special tray for presser feet and bobbins plus a space for other accessories. Store the presser feet and the bobbins in the tray so they are always easily accessible. Remove the Accessory Box / Use the Free arm Keep the accessory box on the machine to provide a larger flat work surface. Slide the accessory box to the left when you wish to remove it and use the free arm. To facilitate sewing trouser legs and sleeve hems use the free arm.
CONNECT THE FOOT CONTROL Among the accessories you will find the foot control cord and the main power cord. Connecting the foot control cord to the foot control is only necessary the very first time you are going to use the machine. 1. Take out the foot control cord. Turn the foot control over. Connect the cord to the socket inside the space of the foot control. 2. Push firmly to make sure it is properly connected. 3. Lay the cord into the slot on the underside of the foot control.
SEWING GUIDE REFERENCE CHART Consult the Sewing Guide Reference Chart for the fast easy way to select the best stitch, stitch length, stitch width, thread tension, presser foot and presser foot pressure for your sewing technique and fabric. Look in the column for your fabric type: WOVEN FABRICS: for stable fabrics that have no stretch. Usually woven. STRETCH FABRICS: for fabrics that have stretch. Usually knit. LEATHER/VINYL: for suede, real leather and for artificial leather and suede.
LOWER THE FEED TEETH To lower the feed teeth you need to remove the accessory box. The feed teeth lever is located on the back of the machine at the base of the free-arm. Slide the lever (A) to the right to lower the feed teeth. The feed teeth are raised when you move the lever (A)to the left. The feed teeth will come up when you begin to sew or turn the handwheel towards you. The feed teeth should be lowered when sewing on buttons. A CHANGING THE PRESSER FOOT Turn off the main switch 1.
NEEDLES The sewing machine needle plays an important role in successful sewing. To ensure you will get a quality needle, we recommend needle system 130/705H. The needle package included with your machine contains needles of the most popular sizes for sewing on woven and stretch fabrics. Universal Needles (A) Universal needles have a slightly rounded point and come in a variety of sizes. For general sewing in a variety of fabric types and weights.
SPOOL PINS Your sewing machine has two spool pins, a main spool pin and an auxiliary spool pin. The main horizontal spool pin (A) is used for sewing with normal threads. The auxiliary vertical spool pin (B) can be used for large spools of thread or specialty threads. Also use the vertical spool pin for bobbin winding. B A Horizontal Position Place a spool cap and the thread spool on the spool pin. Make sure that the thread reels over the top.
C A B E THREADING THE UPPER THREAD E D Make sure the presser foot is raised and the needle is in the up position. Turn off the main switch. 1. Pull the spool pin up. Place a spool cap and then the thread on the spool pin. Place the second spool cap on the spool pin (A). Push the spool pin back in. 2. Bring the thread in the direction of the arrow under the thread guide (B) so that the thread snaps into place. Then bring the thread under the second thread guide (C). 3.
Needle Threader The needle must be in the up position to use the built-in needle threader. We also recommend lowering the presser foot. 1. Use the handle to pull the needle threader down, catching the thread under the guide (A). 2. Push the needle threader all the way down until the metal flanges cover the needle. A small hook will pass through the needle eye (B). 3. Place the thread under the flanges in front of the needle, so the thread catches into the small hook (C). 4.
Threading for Twin Needle Turn off the main switch 1. Insert a twin needle. 2. LEFT NEEDLE: Thread the machine as explained on page 18 and thread the left needle. 3. Pull up the vertical spool pin and place a spool cap on the spool pin. Place a thread spool or wind a bobbin with the thread you are going to use as the second upper thread. 4. RIGHT NEEDLE: Thread the machine as before but this thread should lie outside the upper needle thread guide (A) and behind the lower needle thread guide (B).
A B C WIND THE BOBBIN 1. Pull the vertical spool pin up (A). Place a large spool cap on the spool pin and place the thread on the spool pin. 2. Bring the thread under the thread tension disk (B) and around clockwise. 3. Insert the thread though the hole in the bobbin from the inside to the outside. Place the bobbin on the bobbin winder spindle with the free end of the thread at the top. 4. Push the bobbin to the right. 5. Hold the thread end and press the foot control.
PRESSER FOOT LIFTER The presser foot is lowered or raised with the presser foot lifter. If you are sewing on heavy fabric or several layers of fabric, the presser foot can be raised higher to make it easier to place the fabric underneath the presser foot. THREAD TENSION To understand the correct thread tension, sew a few sample straight stitches at different settings. 1. Begin with a tension that is too loose, i.e. set at the lowest number.
3 MACHINE FUNCTIONS MACHINE FUNCTIONS Speed Control Slide With the speed control slide, you can change the maximum sewing speed to suit your needs. The slide limits how fast you can sew. To increase the sewing speed, slide the bar to the right. To reduce the sewing speed, slide the bar to the left. Foot Control You can control the sewing speed by using the foot control. The harder you press the foot control, the faster the machine sews.
Needle Stop Up/Down (A) Press this button to lower the needle down or raise up. This function can be useful when turning a corner on your garment or project. Stop (B) STOP is used to conclude a stitch or to sew just one unit of the stitch. Your sewing machine ties off the thread and stops automatically when one stitch unit or stitch program has been completed. The stop icon will be lit in the InfoDisplay.
Presser Foot Pressure Dial Turn the presser foot presser dial to adjust the pressure of the presser foot on the fabric when sewing on different thicknesses of fabric. The pressure dial should be set on 4 for regular sewing. Reduce the pressure to 1-2 for applique, cutwork, stretch fabric, chiffon, lace, organdy and other fine fabric sewing. 5 3 Stitch Balance (A) If you are sewing a manual buttonhole or a decorative stitch and the stitch is uneven, you can adjust the stitch with the stitch balance dial.
B C F G D C B F E A G D A J H I J H I Touch Panel – EMERALD™ 203 Touch Panel – EMERALD™ 183 FUNCTION BUTTONS Menu Selection (D) Press the Menu Selection button to select different stitch menus. When turning the machine on, the direct stitch selection mode (menu one) is always selected. Direct Stitch Selection Buttons (A) When menu one is activated you can use the direct stitch selection buttons to choose your stitch.
Mirror Side to Side (F) Press this button to mirror the selected stitch side to side. If this button is pressed when straight stitch with left needle position is selected, the needle position is changed from left to right. A stitch in a combination can also be mirrored. The change will be visible on the InfoDisplay. Clear Button (J) Use this button to erase an incorrect character or stitch in a combination.The machine erases the character you have selected.
DISPLAY ICONS A. B. C. D. E. F. G. H. I. J. K. L. Stitch number Thread tension recommendation Presser foot recommendation Reverse icon Needle up/down icon FIX icon STOP icon Mirror icon Stitch length Needle position Stitch Stitch width A B C D E F G H K I J L Display Icons – Alphabet M. Stitch/Character number N. Thread tension recommendation O. Presser foot recommendation P. Reverse icon Q. Needle up/down icon R. FIX icon S. STOP icon T.
Display Icons – Elongation V. Stitch number W. Stitch elongation X. Thread tension recommendation Y. Reverse icon Z. Needle up/down icon a. FIX icon b. STOP icon c. Presser foot d. Stitch length e. Stitch width Display Icons – Memory f. Memory number g. Number of the current unit h. Total number of units i. Stitch width j. Stitch length k. Needle up/down icon l. Mirror icon m. FIX icon n. STOP icon o. Stitch to edit p. Needle position V W X Y Z a e d c b f g h i j k l o n m p 3.
WARNING MESSAGES The Presser Foot is Not Lowered If you touch the foot control and the presser foot is not lowered, the machine will beep and give you the following message. Main Motor Blocked This message means that the thread is twisted or jammed and the hand wheel motor cannot move. Look at the trouble shooting guide on page 43. The Buttonhole Lever is not Lowered The buttonhole or darning stich was selected and the foot control was pressed while the buttonhole lever was raised.
PROGRAMMING Your sewing machine has a programming function. You can program up to 20 stitches and characters into the same combination. Combine any stitches except the following: 1:09, 1:00, 2:07, 2:08, 2:09, 2:10, 2:11 and 2:12 (and 2:20, 2:21, 2:22 on EMERALD™ 203). Save the combination in one of the memories. Create a Combination 1. Touch the memory button on your machine. A pop up appears on your InfoDisplay allowing you to choose which memory you want to save your stitches in.
Editing Stitches/Letters 1. In the memory mode, use the stitch width or length buttons + and - to place the cursor at the stitch you wish to edit. 2. Touch the “E” button to edit the stitch. The background of the stitch you wish to edit becomes black (B). You can adjust the width, length, mirror the stitch and on some stitches, elongate the stitch. 3. Touch the “E” button again to return to the memory mode. Removing Stitches/Letters 1.
4 BASIC SEWING TECHNIQUES SEAM A seam sews two pieces of fabric together with a seam allowance that usually will be pressed open. In most cases edges of the seam allowance are finished with an overcast stitch before sewing the seam. Seams in stretch fabric must stretch with the fabric. The Stretch Stitch makes a stretchy seam that is suitable for sewing together pieces of light stretch fabric. 1:1 Straight Stitch Fabric: Woven medium, cut in two. Use: Presser Foot A and size 80 needle.
EDGE/QUILTING GUIDE The Edge/Quilting Guide is used for wide seam allowances, topstitching, or channel quilting. Slide the guide into the clip on the ankle. Adjust to the desired position. OVERCAST The three-step zigzag, is up to 1/4’’ (7mm) wide and suitable for all types of fabrics. Use this stitch for overcasting, butting two edges together to join them, mending tears and other special finishing. 1:4 Three-Step Zigzag Fabric: All types of fabric. Use: Presser Foot J.
DARNING AND MENDING Darning a small hole or a tear before it becomes larger can save a garment. Choose a fine thread in a color as close to your garment as possible. 2:07 Darning Stitch Fabric: All types of fabric. Use: Buttonhole Slider Foot C. Sew: • Attach the Buttonhole Slider Foot C and choose stitch 2:07. • Place the fabric in position under the presser foot. • Lower the presser foot and pull the button holder to the rear.
BLIND HEM The blind hem creates an invisible hem on garments. There are two types of blind hem; one is recommended for medium to heavy woven fabric, the other for medium to heavy stretch fabric. Fold the fabric as illustrated. Make sure the folded edge of the fabric follows the inside of the right “toe” of Blind Hem Foot D. Lower the presser foot and step on the foot control. The left swing of the needle should just catch the edge of the folded fabric.
SEWING BUTTONHOLES The buttonholes in your sewing machine are specially adjusted for different kinds of fabric and garment. Look at the stitch table on the last pages in this book to find descriptions of each buttonhole. Fabric should be interfaced and/or stabilized where buttonholes are to be sewn. Buttonhole Slider Foot C 1. Make removable marks on fabric where you want the buttonholes to be placed. 2. Attach the buttonhole slider foot C and pull out the button holder plate. Insert the button.
Corded Buttonhole (StretchFabrics) When sewing buttonholes in stretch fabrics we recommend cording the buttonhole to increase the stability and to keep the buttonhole from stretching out. 1. Loop a piece of heavy thread or perle cotton over the finger at the back of the Buttonhole Slider Foot C. 2. Stitch a buttonhole. Do not hold back the cord. The satin buttonhole columns will stitch over the cord. 3. When the buttonhole is finished, lift the cord off the finger and pull out the slack. 4.
SEWING ZIPPERS The Zipper Foot E can be snapped on either to the right or to the left of the needle, making it easy to sew both sides of the zipper from the same direction. To sew the other side of the zipper, reposition the Zipper Foot. Center Zipper 1. Sew the two fabrics right sides together along the 5/8’’ (15 mm) seam line, stopping at the notch for the zipper placement. 2. Baste the remaining seam where the zipper will be placed. Press the seam open.
GATHERING Turn off the main switch. 1. Snap on the gathering foot. Switch on the sewing machine. 2. If you are only using one piece of fabric, place it under the presser foot and sew a straight stitch. The fabric will gather. 3. If you are using two pieces of fabric place one piece under the presser foot and the other piece of fabric in between the cut in the foot (see picture). 4. Start sewing. The bottom layer of fabric will gather while the top layer stays flat.
5 CARE OF YOUR MACHINE To keep your sewing machine operating well, clean it often. No lubrication (oiling) is needed. Turn off the main switch. CLEANING Wipe the exterior surfaces of your sewing machine with a soft cloth to remove any dust or lint built up. CHANGING THE LIGHT BULB Only use light bulbs of a type as indicated on the front of the machine (12V, 5W). They are available at your authorized HUSQVARNA VIKING® dealer. Turn off the main switch. 1.
CLEAN THE BOBBIN AREA Turn off the main switch 1. Remove the presser foot, the bobbin cover and bobbin. 2. Clean the feed teeth with the brush. Cleaning Under the Bobbin Area Turn off the main switch After sewing several projects or any time you notice an accumulation of lint in the bobbin case area, the area under the bobbin case must be cleaned. 1. Remove the needle, presser foot, bobbin cover and bobbin. 2. Remove stitch plate by removing the two screws in the stitchplate. Lift up the stitchplate. 3.
TROUBLE SHOOTING Have your Sewing Machine Serviced Regularly by an Authorized HUSQVARNA VIKING® Dealer! If you have followed the below trouble shooting information and still are having sewing problems, take the sewing machine to your authorized dealer. If there is a specific problem, it is a great help to test sew with your thread on a scrap of your sewing fabric and bring it to your dealer. A sewing sample will often give much better information than words.
• • • Try different spool pin positions (horizontal or vertical). If stitch plate hole is damaged, replace stitch plate. Is the correct spool cap used in front of the thread? Fabric Does Not Move? • Feed teeth up. • Increase stitch length. Bobbin Thread Breaks? • Wind a new bobbin. • Replace the bobbin in the machine, check correct threading. • If stitch plate hole is damaged - replace stitch plate. • Clean bobbin area. Bobbin Winds Irregularly? • Check threading for bobbin winding.
We reserve the right to change the machine equipment and the assortment of accessories without prior notice, or make modifications to the performance or design. Such modifications, however, will always be to the benefit of the user and the product. INTELLECTUAL PROPERTY VIKING, KEEPING THE WORLD SEWING & Design and EMERALD are trademarks of KSIN Luxembourg II, S.ar.l. HUSQVARNA and the “crowned H-mark” are trademarks of Husqvarna AB. All trademarks are used under license by VSM Group AB.
413 24 06-26H w w w . h u s q v a r n a v i k i n g .com • InHouse • © 2012 KSIN Luxembourg II, S.ar.l.